UEFI, or Unified Extensible Firmware Interface, is a new motherboard firmware standard that allows your PC to boot faster and has more security features. Starting with Surface Pro 4, Microsoft has developed its own UEFI firmware for use with its future devices. This new Surface UEFI is currently used on newer devices, including Surface Go, Surface Pro, Surface Laptop, Surface Book, Surface Laptop Studio, and Surface Studio.
This article will teach you how to enter the Surface Pro UEFI settings. You will also learn how to configure the UEFI settings to improve the device security, check your device information, and more.
This tutorial applied to the Surface Pro (5th Gen), Surface Pro 6, Surface Pro 7, Surface Pro 8, and Surface Pro 9.
Table of Contents
1. Boot into UEFI Mode
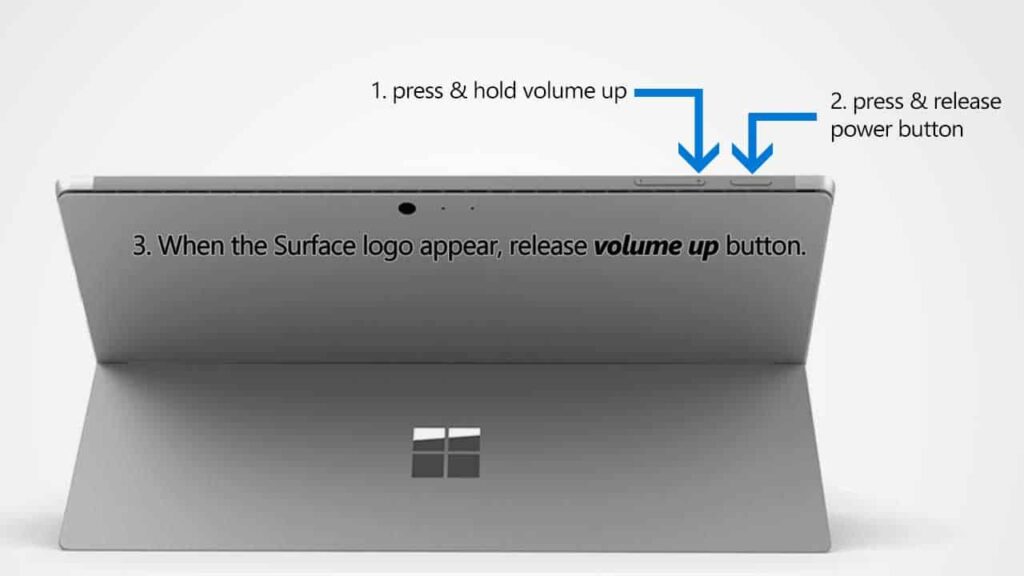
You can only enter the Surface Pro UEFI setup screen while your device starts. Here is how you do that:
- Shut down your Surface.
- Press and hold the Volume Up button on your Surface, then press and release the Power button.
- When you see the Surface logo screen appear, release the Volume Up button. The Surface UEFI screen will appear in a few seconds.
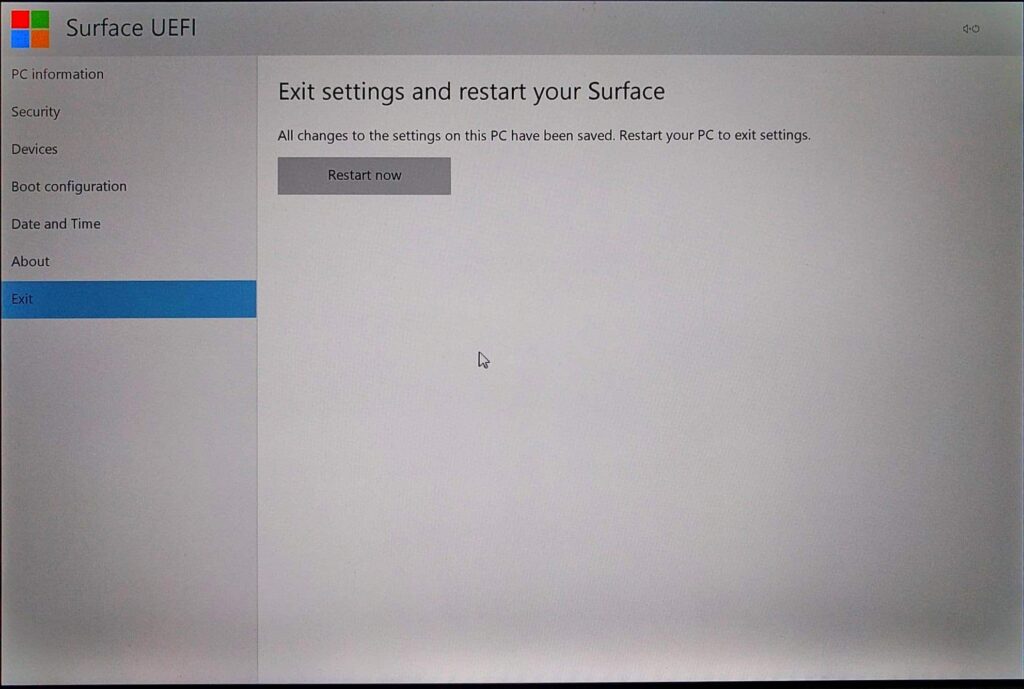
Exit UEFI Settings
After you have made any changes to the UEFI settings, you can exit the UEFI setup screen by restarting your Surface.
In the Surface UEFI menu, choose Exit and click on Restart Now.
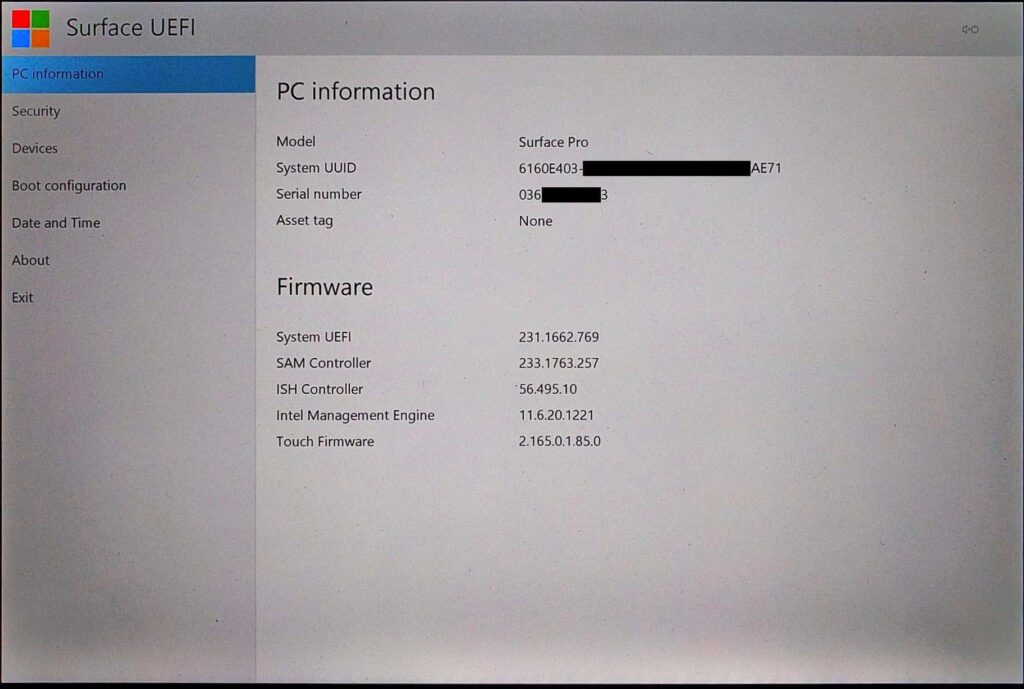
2. Check Surface Pro Information
The PC Information page is the first displayed when you enter UEFI settings. You can find more information about your device identities on the page, such as Model, System UUID (Universally Unique Identifier), Serial Number, and Asset Tag. Moreover, it also displays all critical system component versions you might need for troubleshooting.
See also: How to manage asset tag on Surface Pro.
3. Configure Boot Order
To change the alternate system boot order on your Surface Pro:
- Enter Surface UEFI settings as per the instructions above.
- In the Surface UEFI menu, go to the Boot Configuration page as below:

On the “Configure boot device order” page, you can:
- Rearrange the boot order by dragging and dropping any available boot option.
- Turn any boot option on or off by using the checkbox
- Remove the available boot option permanently by using the trash button.
Note If you accidentally delete Windows Boot Manager from your Master Boot Record, restart your Surface, and Windows Boot Manager will reinstall automatically.
4. Manage Devices
Surface Pro allows you to deactivate some of your surface device components and features to meet your security requirements. You can turn those components on or off by:
- Access Surface UEFI settings as per the instructions above.
- In the Surface UEFI menu, go to Devices, and you will see the following options:
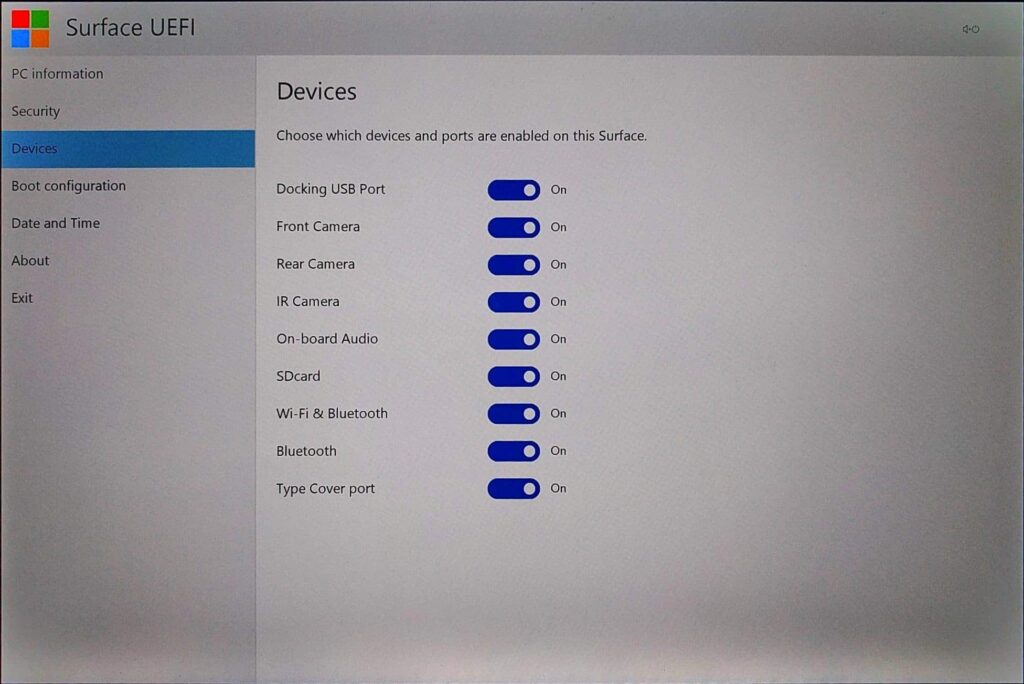
In my Surface Pro with System UEFI version 231.1662.769, you can choose to turn on or off the following device’s components or ports:
- Docking USB Port
- Front Camera
- Rear Camera
- IR Camera
- Onboard Audio
- SDcard
- Wi-Fi & Bluetooth
- Bluetooth
- Type Cover port
5. Change Date and Time
The new Surface UEFI now allows you to set your Surface Pro’s date and time on the UEFI settings page. To check or set a date and time for your Surface Pro:
- Enter Surface UEFI settings as per the instructions above.
- In the Surface UEFI menu, go to the Date and Time page as below:
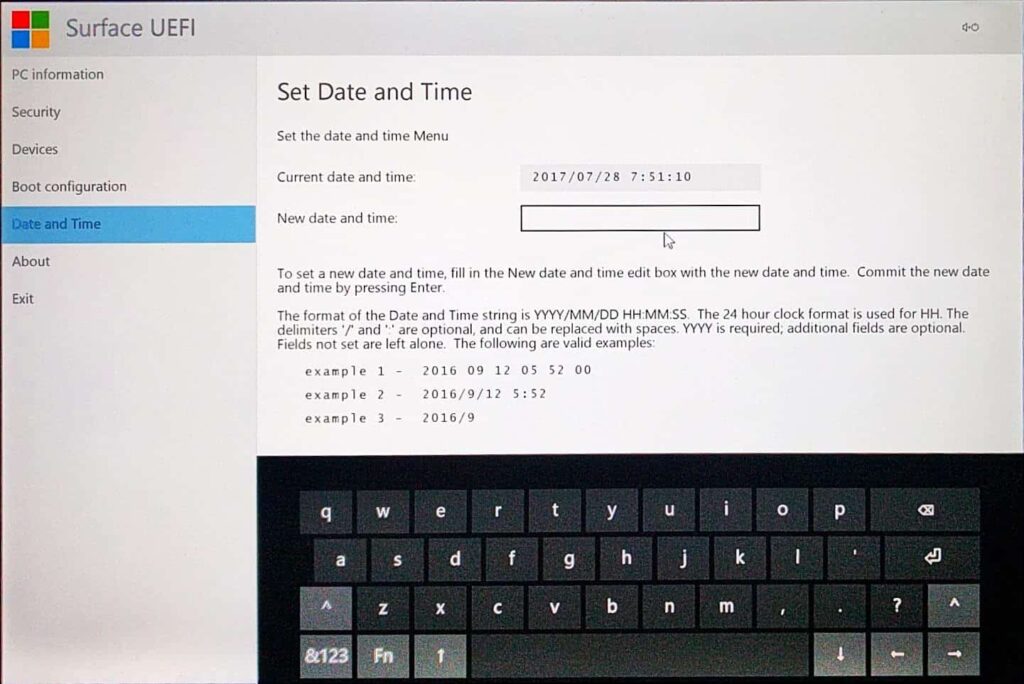
- To set a new date and time, select the edit box and type your new date and time.
- Press Enter to apply changes.
6. Security
Set UEFI Password
You can prevent others from changing your UEFI settings by setting an Administrator Password in UEFI settings. To do that:
- Enter Surface UEFI settings as per the instructions above.
- Go to the Security section below:
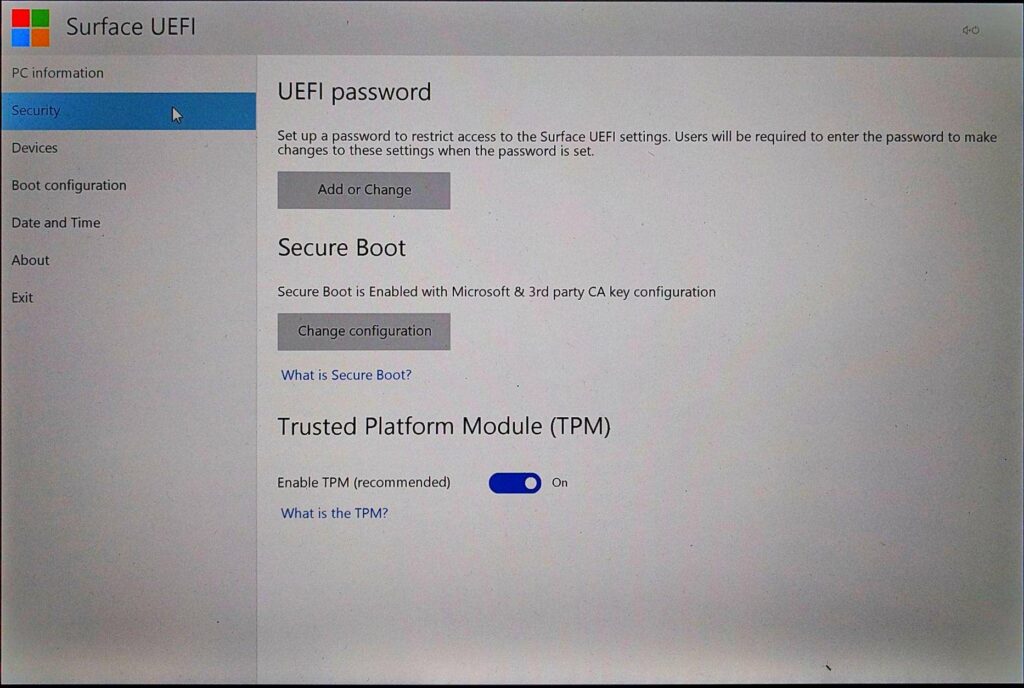
- To set a UEFI password, click on the Add or Change button, and you will see the following requirements:
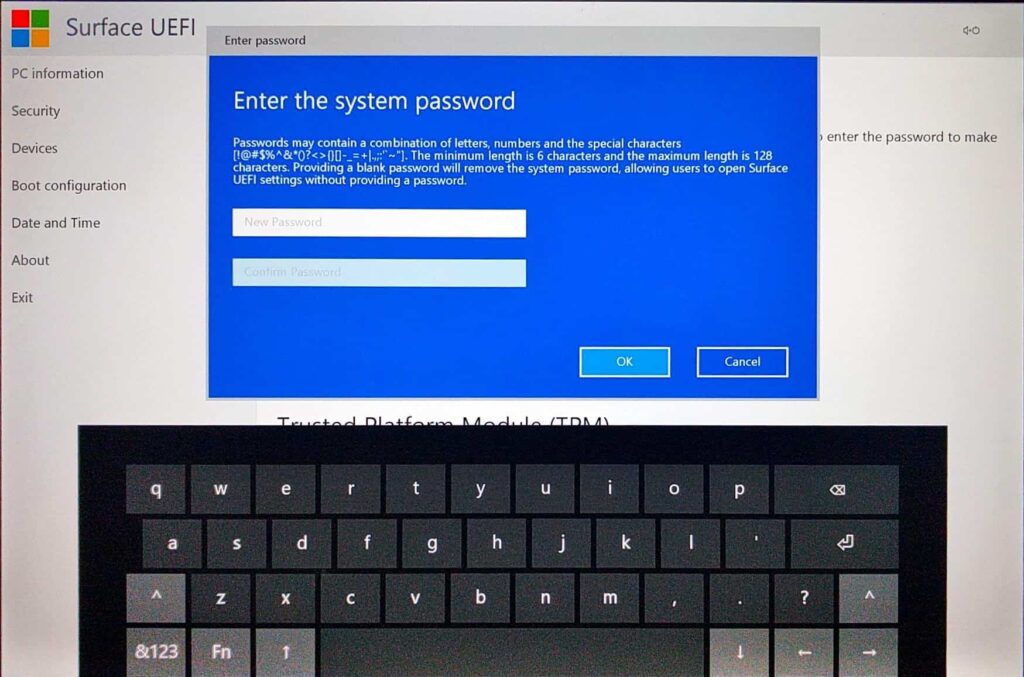
- You will need to enter a password in the box with your keyboard or the on-screen keyboard with the following criteria:
- Minimum Length: 6 characters
- Maximum Length: 128 characters
- It may contain a combination of letters, numbers, and special characters.
- If you have set the password before and want to remove it, leave the password box blank.
Note If you enter the administrator password incorrectly three times, you’ll be locked out of the UEFI. Restart your Surface to enter the password again.
What is Secure Boot?
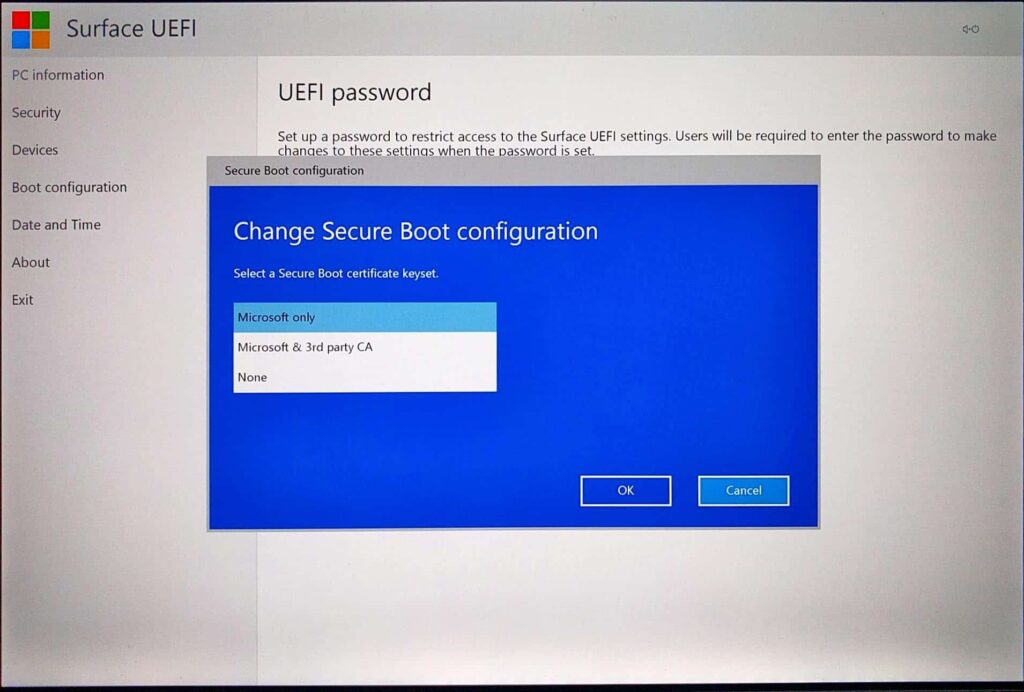
The Secure Boot is a technology that blocks the loading of uncertified bootloaders and drives. It helps to prevent your Surface from being loaded with unauthorized operating systems and malicious software applications.
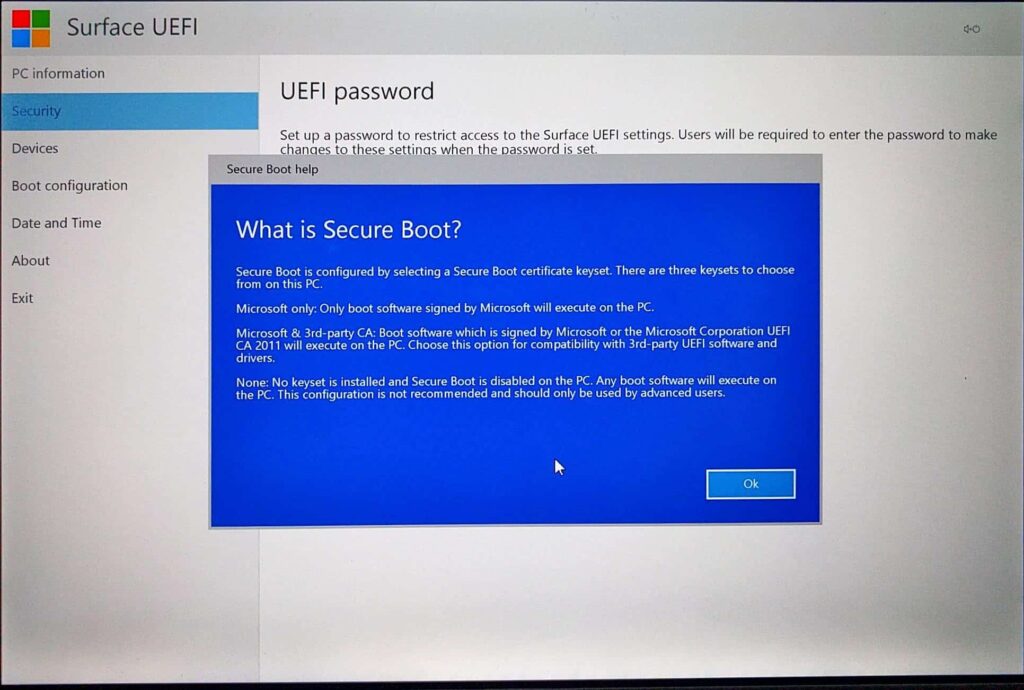
If you desire to install other operating systems like Ubuntu or other Linux distributions, you may need to turn off this feature in the UEFI settings above.
What is the Trusted Platform Module (TPM)?
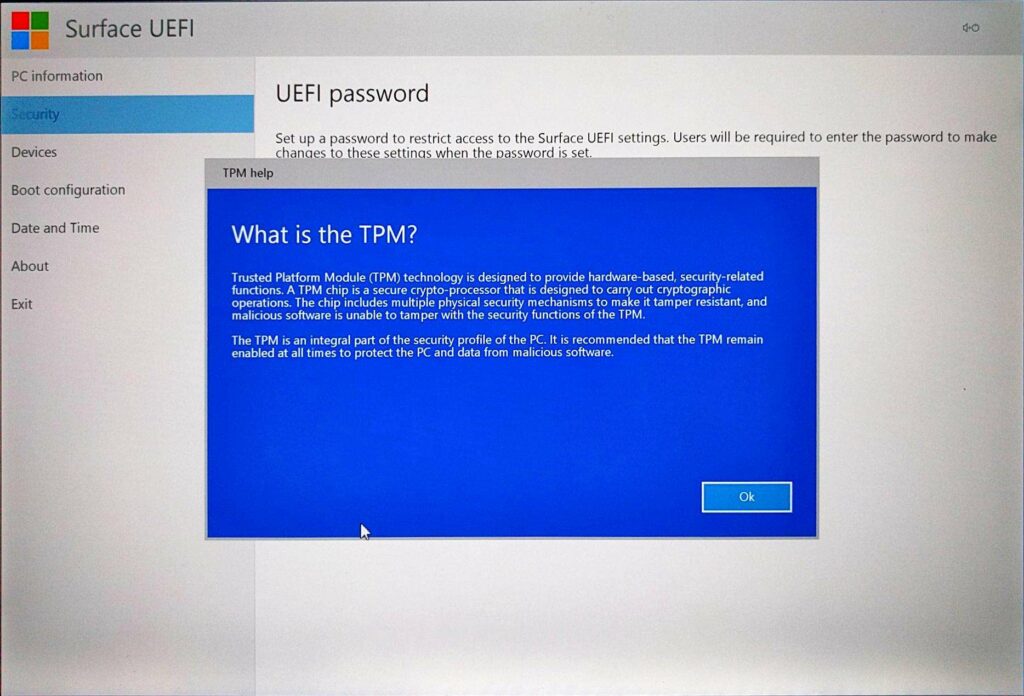
The Trusted Platform Module (TPM) technology significantly advances BIOS in hardware-based security features. It is a specialized chip that stores RSA encryption keys specific to each Surface device for hardware authentication.
TPM technology is a requirement of BitLocker disk encryption. The TPM helps you encrypt/decrypt the entire disk without requiring complex long passphrases. It means the encryption and decryption keys are stored within the TPM chip. So, your encrypted disks can’t be accessed on other devices.
Other Surface UEFI Settings
We have covered this topic for other Surface PCs as well. For more information on UEFI settings for other Surface models, visit the link below:


COMMENTS
Let us know what you think!
We appreciate hearing your thoughts, questions, and ideas about “How to Configure Surface Pro UEFI/BIOS Settings”.
How do you set an asset number so that it shows up on the surface UEFI screen?
I have both Surface books models 1 & 2’s.
The articles I have found online only have it for surface book 3’s.
Hi Jose,
Please check out the guide https://surfacetip.com/manage-asset-tag-microsoft-surface/, which works on any supported Surface device.
Thank you , best guide EVER!!!!
Guten Tag, wenn Sie es einschalten, erscheint ein roter Streifen und eine Fehlermeldung. Ich kann nichts tun.
Windous failed to start. А recent hardware or software change might Ье the
cause. То fix the problem:
1. Insert your Windous installation disc and restart your computer
2. Choose your language settings, and then click “Next
3. Click “Repair your computer
If you do not have this disc, contact your systen administrator or computer
manufacturer for assistance
File: \EFI\Microsoft \Boot\BCD
Status: Oxc000000f
Info: The Boot Configuration Data for your РС is missing or contains
errors,