In September 2018, Microsoft started rolling out a new “feature called “Battery Limit” “Battery Limit” feature to all Surface devices, beginning from Surface Pro 3 forward. This feature can prolong your Surface’s battery lifespan by limiting the total charge to 50%.
Enabling the setting preserves the battery’s ability to take and hold a charge while it’s connected to external power for an extended period of time and is recommended for Surface devices integrated into solutions like kiosks, consoles, and other scenarios where they are constantly connected to an external power supply.
Microsoft Support
The feature is being rolled out to Surface devices via the Firmware update. This article will walk you through enabling this feature on your supported Surface devices.
Table of Contents
Battery Limit Supported Surface Devices
Here is the complete list of Surface devices that support the “Battery Limit” feature with the associated firmware updates.
| Surface Model | Required Firmware | UEFI version | EC* version | SA* version |
|---|---|---|---|---|
| Surface 3 | Dec 6, 2018 update | 1.51116.218.0 | ||
| Surface Go | Nov 9, 2018 update | 1.0.10.0 | ||
| Surface Go LTE | Jul 23, 2019 update | 1.1.12.0 | ||
| Surface Pro 3 | Sep 10, 2018 update | 3.11.2550.0 | 38.14.80.0 | |
| Surface Pro 4 | Sep 10, 2018 update | 108.2318.769.0 | 103.2241.256.0 | |
| Surface Pro 5 | Aug 1, 2019 update | 239.2660.257.0 | ||
| Surface Pro 6 | Aug 1, 2019 update | 182.1004.139.0 | ||
| Surface Laptop | Jan 24, 2019 update | 137.2439.769 | ||
| Surface Laptop 2 | Jan 24, 2019 update | 137.2439.769 | ||
| Surface Book | Oct 10, 2018 update | 90.2226.256.0 | ||
| Surface Book 2 | Oct 10, 2019 update | 182.1004.139.0 |
*EC = Surface Embedded Controller Firmware
*SA = Surface System Aggregator Firmware
Make sure to check the Microsoft support page for the latest updates.
Boot Into Surface UEFI
You can boot your Surface into the UEFI menu by using the following methods:
- Method 1: Hardware Buttons or Keyboard
- Method 2: Windows Recovery Settings
Let’s get into the details of each method.
Method 1: Boot to Surface UEFI via Hardware Buttons or Keyboard
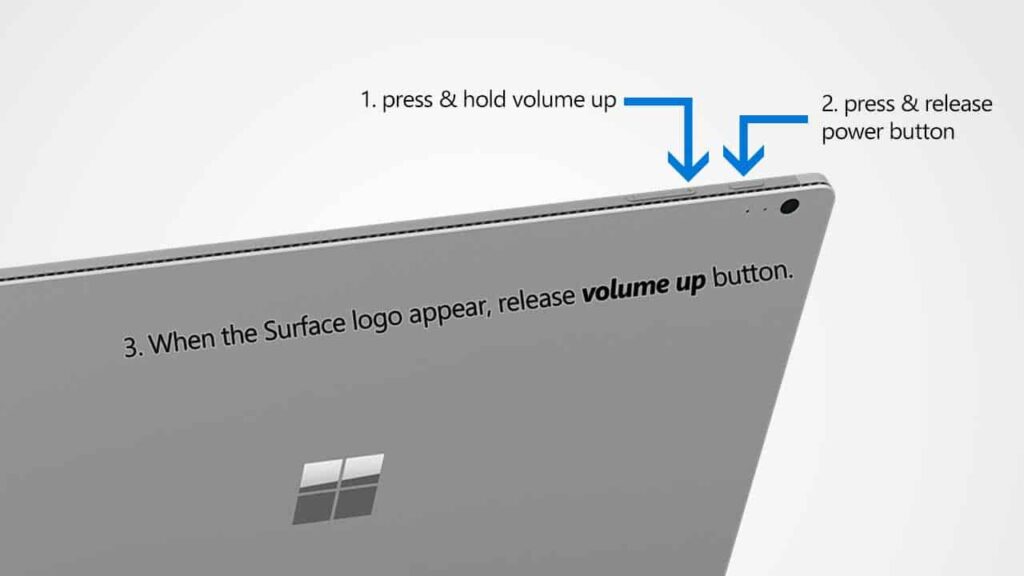
To boot into the Surface UEFI menu on Surface Pro 3, Surface Pro 4, Surface Pro 5, Surface Pro 6, Surface Pro 7, Surface Pro 8, Surface Pro 9, or Surface Pro X, do the following:
- Shut down your Surface Pro.
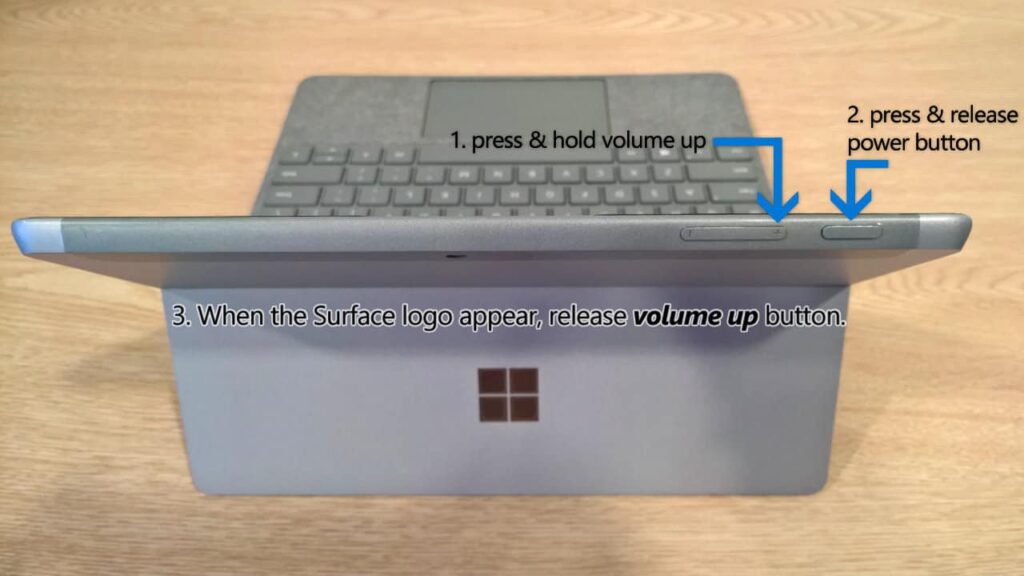
- Press and hold the Volume Up button on your Surface, then press and release the Power button.
- When you see the Surface logo screen appear, release the Volume Up button. The Surface UEFI screen will appear in a few seconds.
To boot into the Surface UEFI menu on Surface Laptop (1st Gen), Surface Laptop 2, Surface Laptop 3, Surface Laptop 4, Surface Laptop 5, Surface Laptop Go (1st Gen), Surface Laptop Go 2, Surface Laptop SE, or Surface Laptop Studio, do the following:
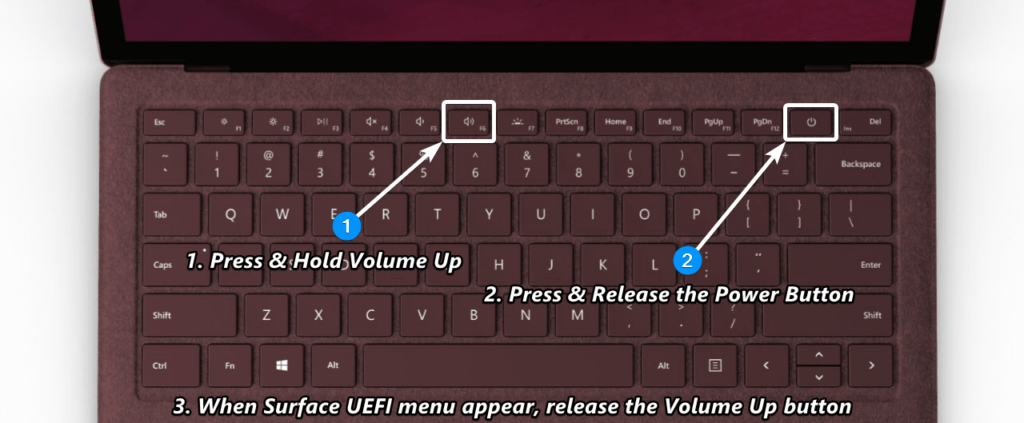
- Shut down your Surface Laptop.
- Press and hold the Volume Up (F6) key on your Surface, then press and release the Power Key next to the Del key.
- When you see the Surface logo appear, release the Volume Up button. The Surface UEFI screen will appear in a few seconds.
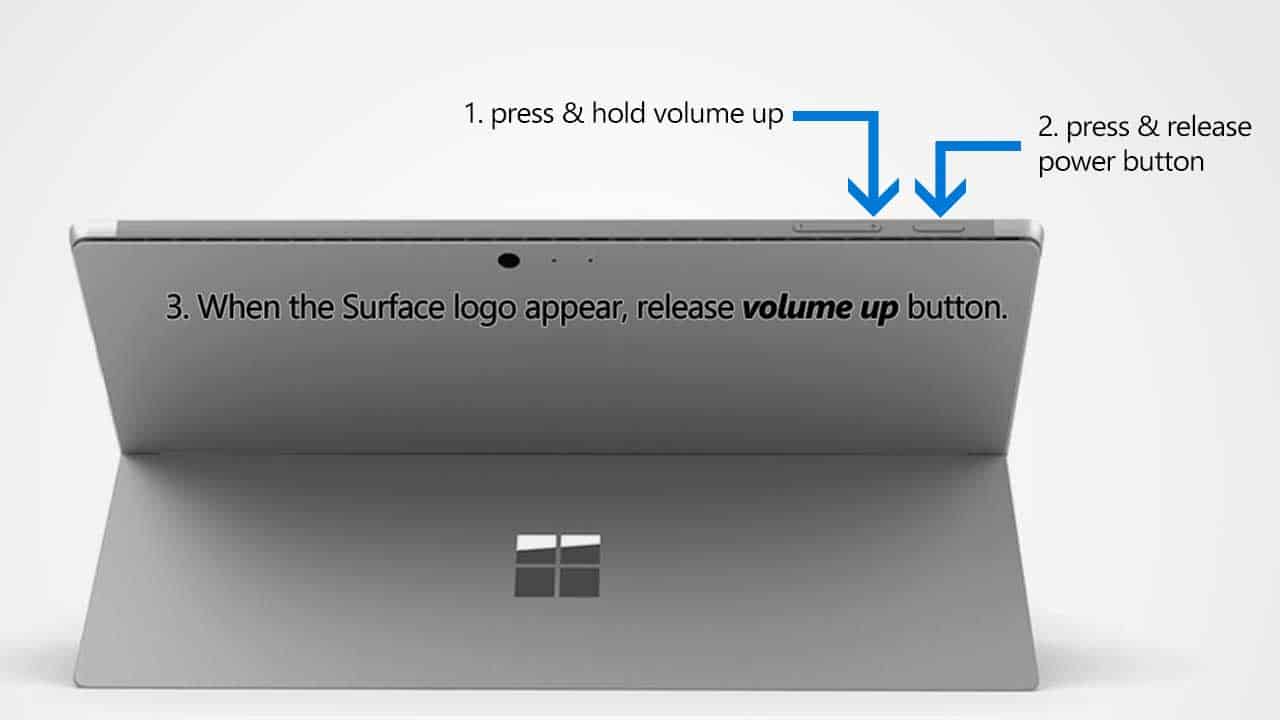
To boot into the Surface UEFI menu on Surface Book (1st Gen), Surface Book 2, or Surface Book 3, do the following:
- Shut down your Surface Book.
- Press and hold the Volume Up button on your Surface, then press and release the Power button.
- When you see the Surface logo screen appear, release the Volume Up button. The Surface UEFI screen will appear in a few seconds.
To boot into the Surface UEFI menu on Surface Go (1st Gen), Surface Go 2, or Surface Go 3, do the following:
- Shut down your Surface Go.
- Press and hold the Volume Up button on your Surface, then press and release the Power button.
- When you see the Surface logo screen appear, release the Volume Up button. The Surface UEFI screen will appear in a few seconds.
Method 2: Boot to Surface UEFI via Windows Recovery Settings
- Open Windows Settings
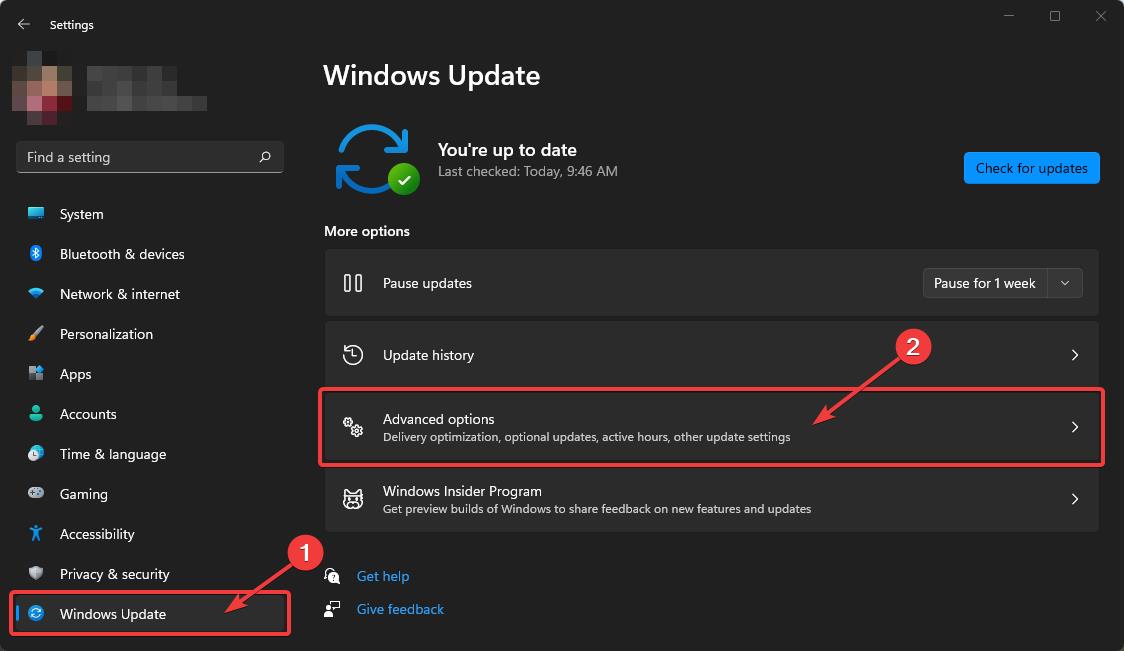
First, you need to access Windows Settings by going to Start and opening the Settings app with the gear icon (or by using Win + I shortcut key). - Go to Windows Updates > Advanced options
On the left pane of the settings, select "Windows Updates". Then select "Advanced options" from the more options section.

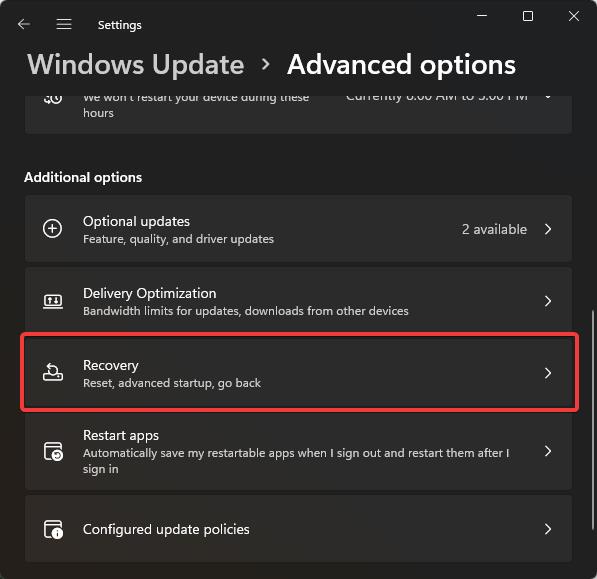
- Select the "Recovery" option
Under the "Additional options", select "Recovery".

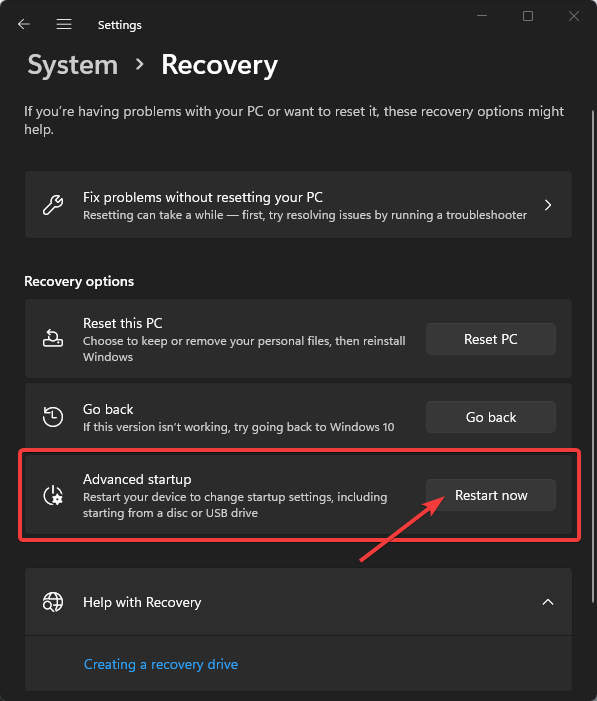
- Restart your Surface Laptop in "Advanced Startup" mode.
Under recovery options, click the "Restart now" button to restart your Surface Laptop in advanced startup mode which will allow you to change startup settings.

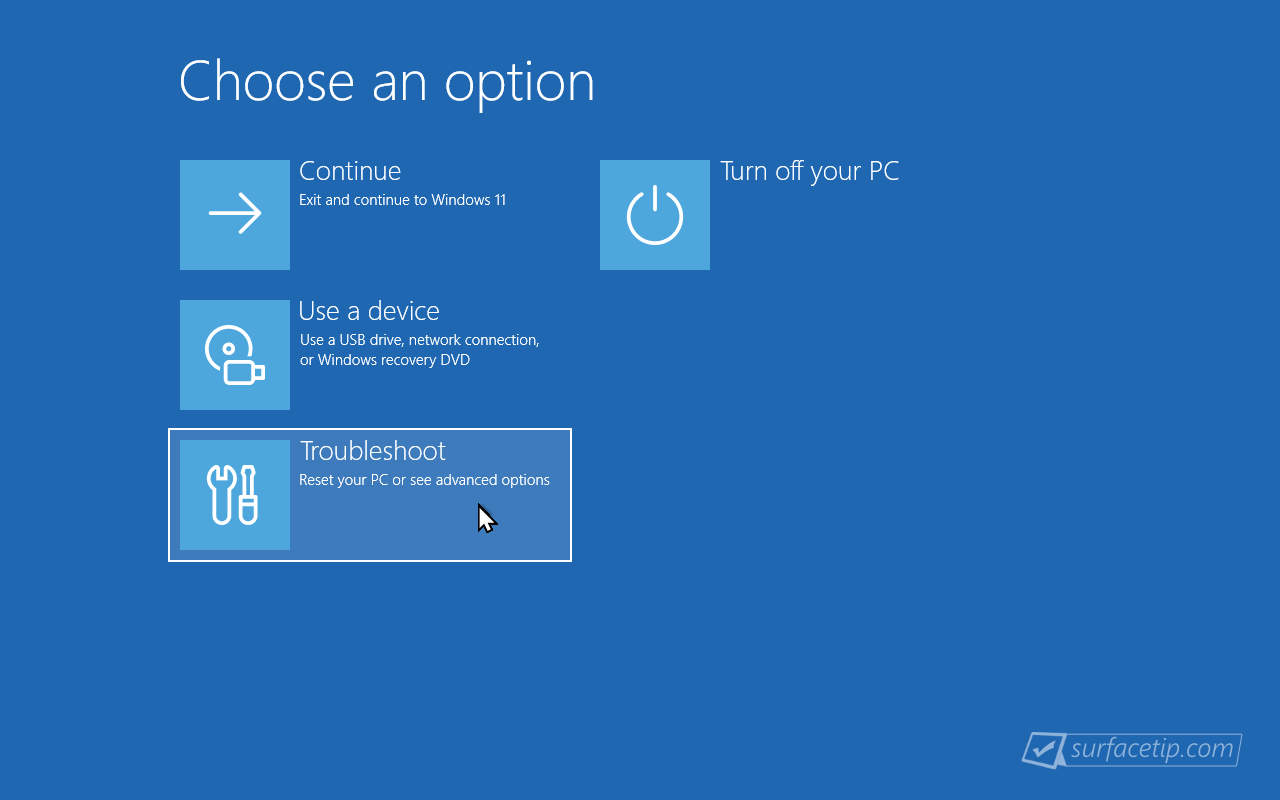
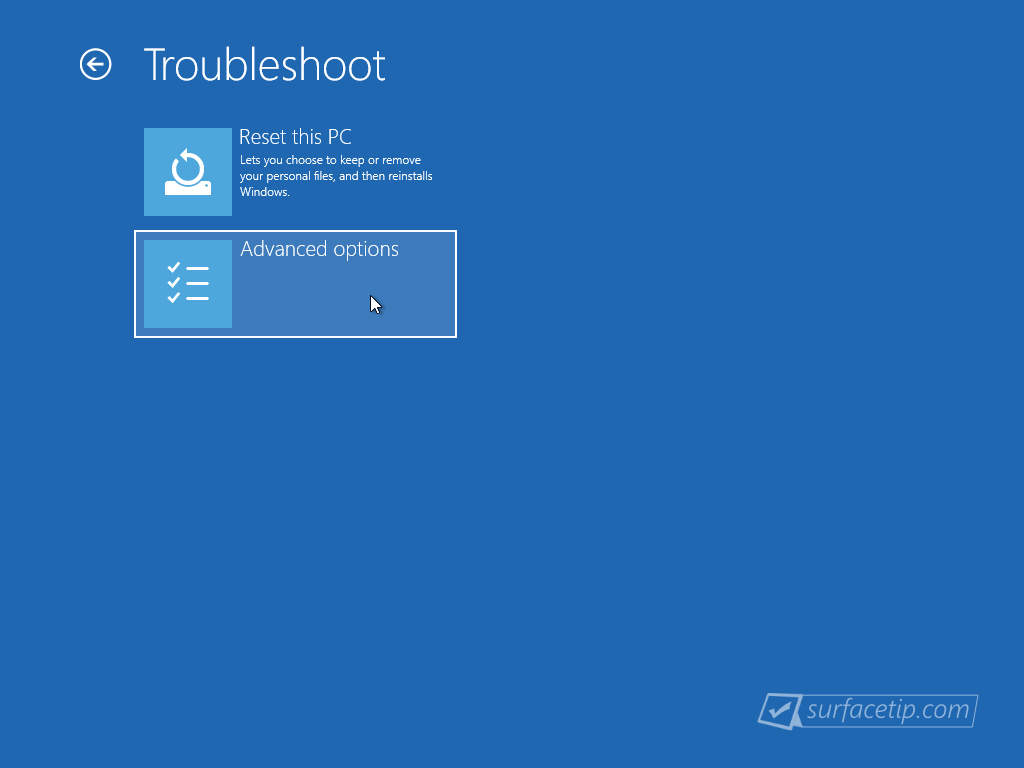
- Select "Troubleshoot"
After your Surface is restarted, you will see a blue screen with the following options. Select "Troubleshoot".

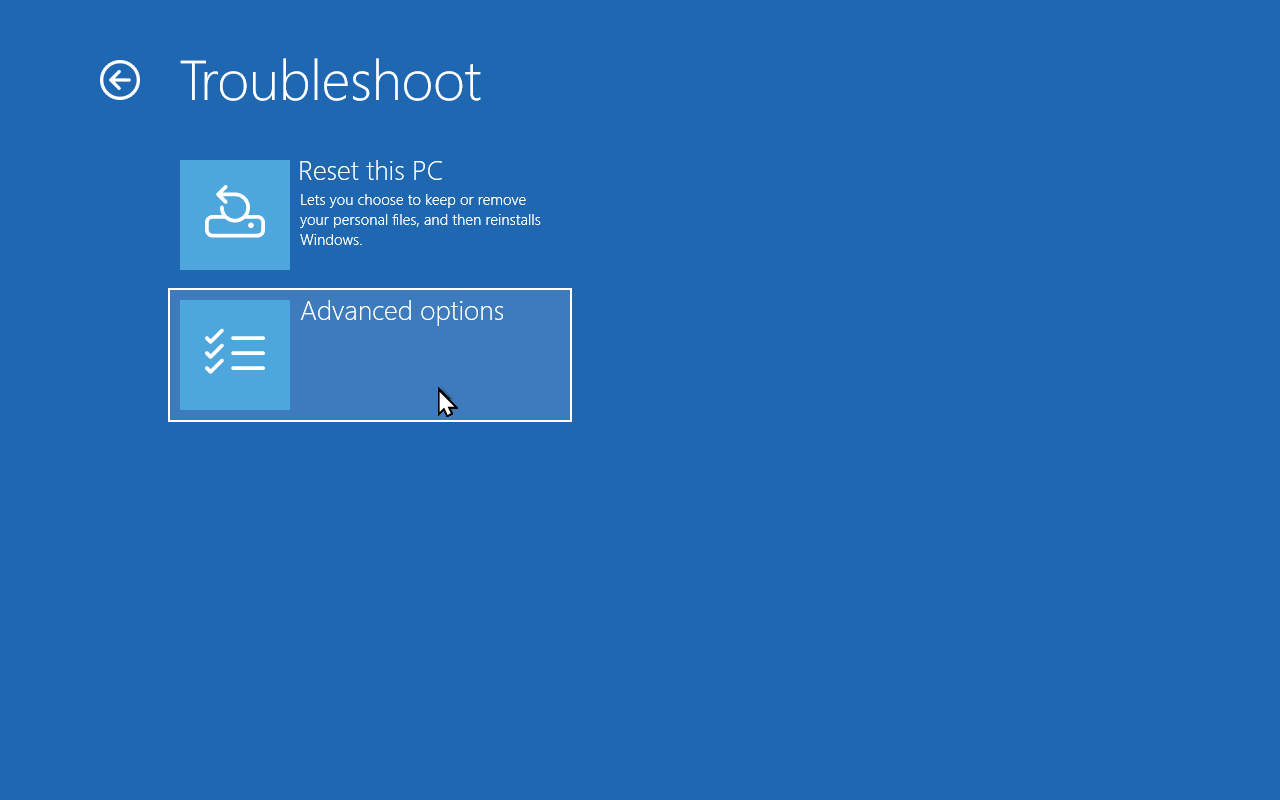
- Select "Advanced options".
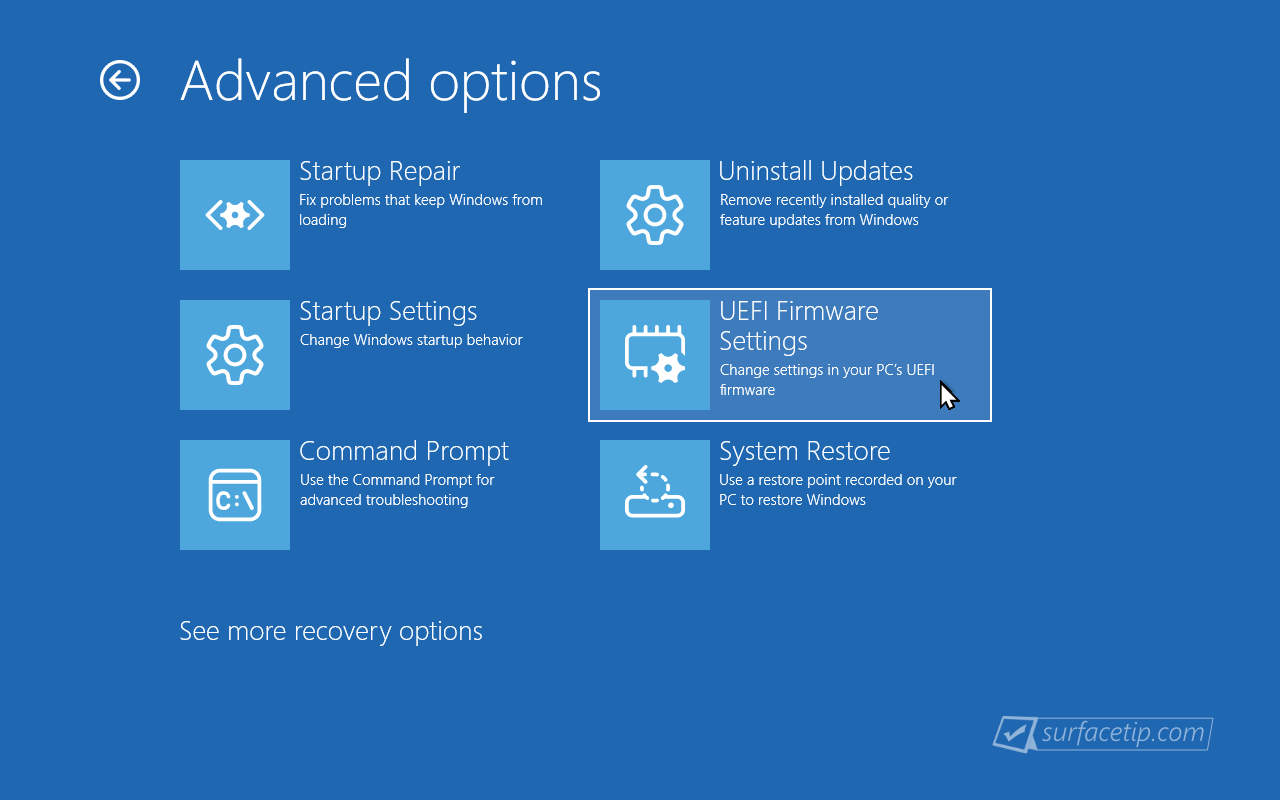
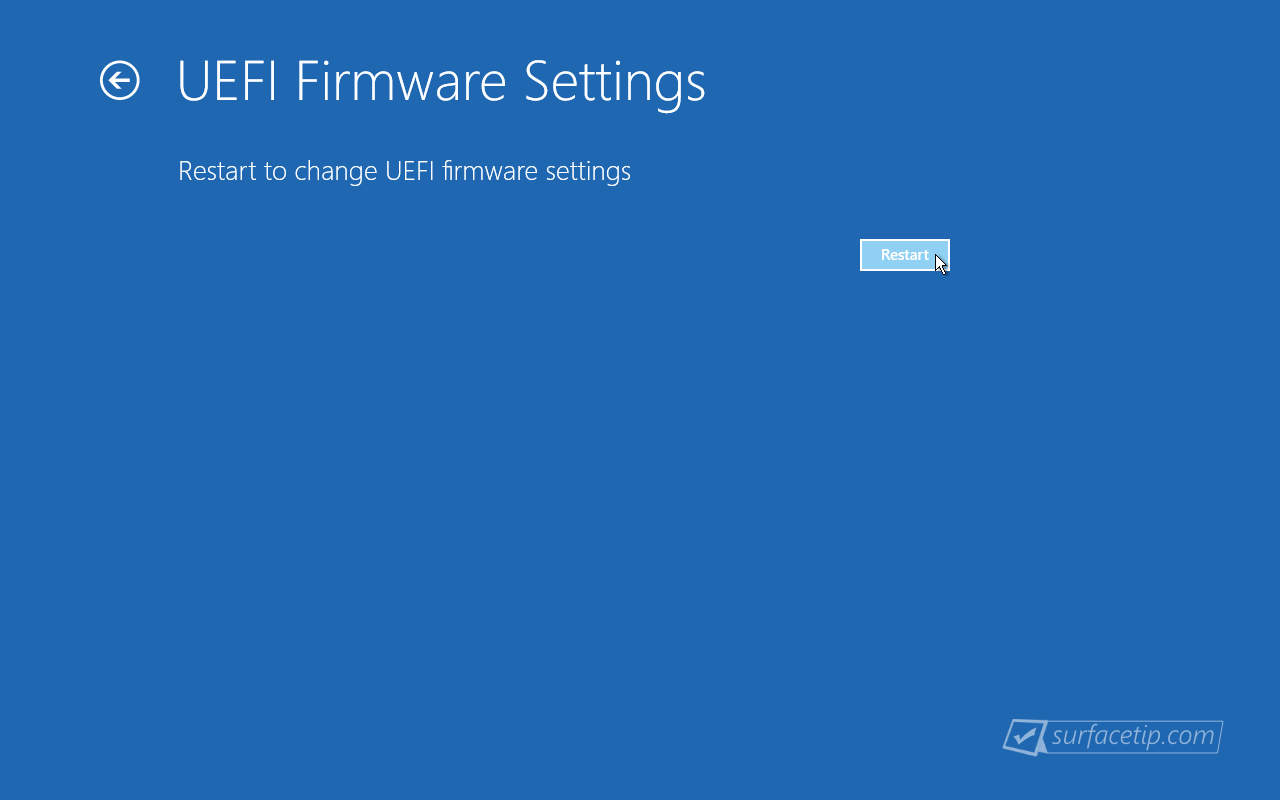
- Select "UEFI Firmware Settings".
- Select "Restart" to restart your Surface directly into the UEFI Firmware Settings.

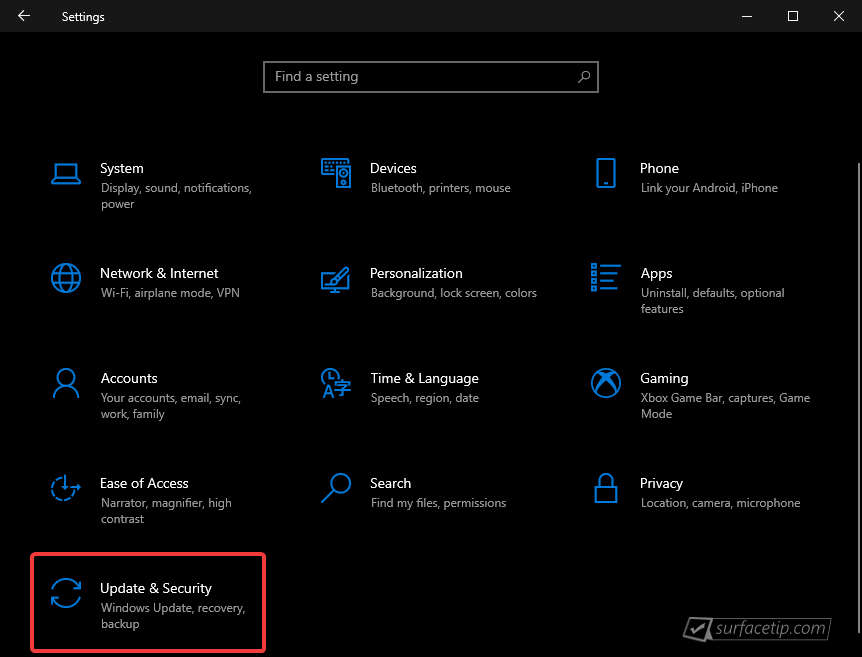
- Open Windows Settings
First, you need to access Windows Settings by going to Start and clicking the Gear icon (or by using Win + I shortcut key). - Go to Update & Security
In Windows Settings, select "Update & Security".

- Go to Recovery
On the left side of the settings, select Recovery.
- Restart your Surface in Advanced Startup
Under the "Advanced startup" section, click Restart now to restart your Surface in an advanced startup mode.
- Select "Troubleshoot"
After your Surface is restarted, you will see a blue screen with the following options. Select "Troubleshooting".
- Select "Advanced options".

- Select "UEFI Firmware Settings".
- Select "Restart" to restart your Surface directly into the UEFI Firmware Settings.


Enable the Battery Limit Mode in Surface UEFI
When you’ve successfully accessed the Surface UEFI menu, do the following:
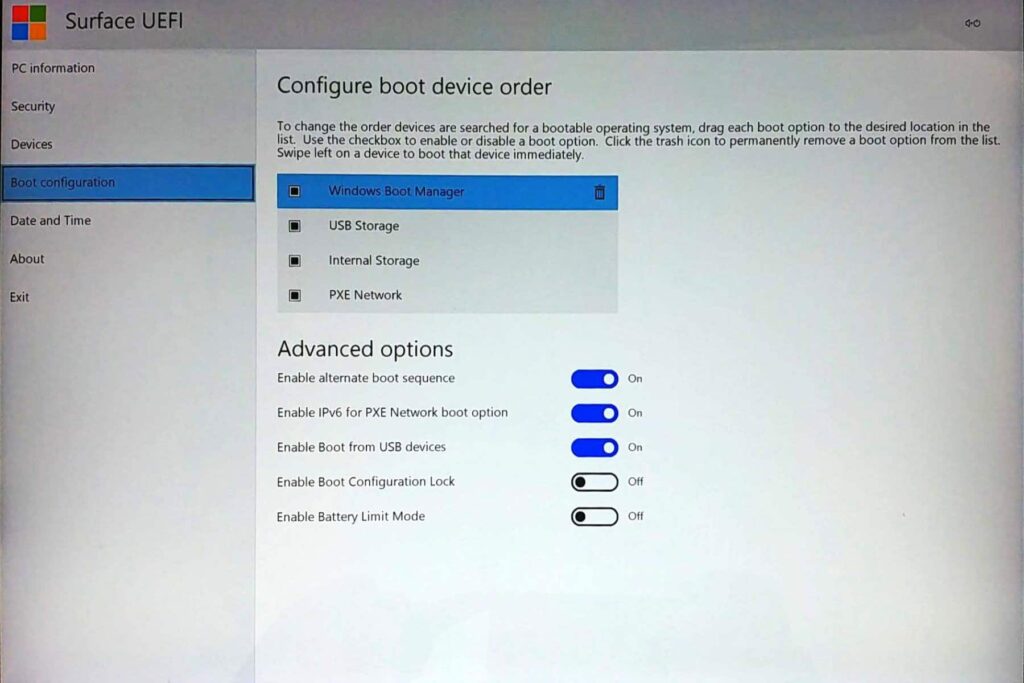
- In the Surface UEFI menu, choose the Boot Configuration page as below:

- Under Advanced Options, toggle the Enable Battery Limit Mode to On.
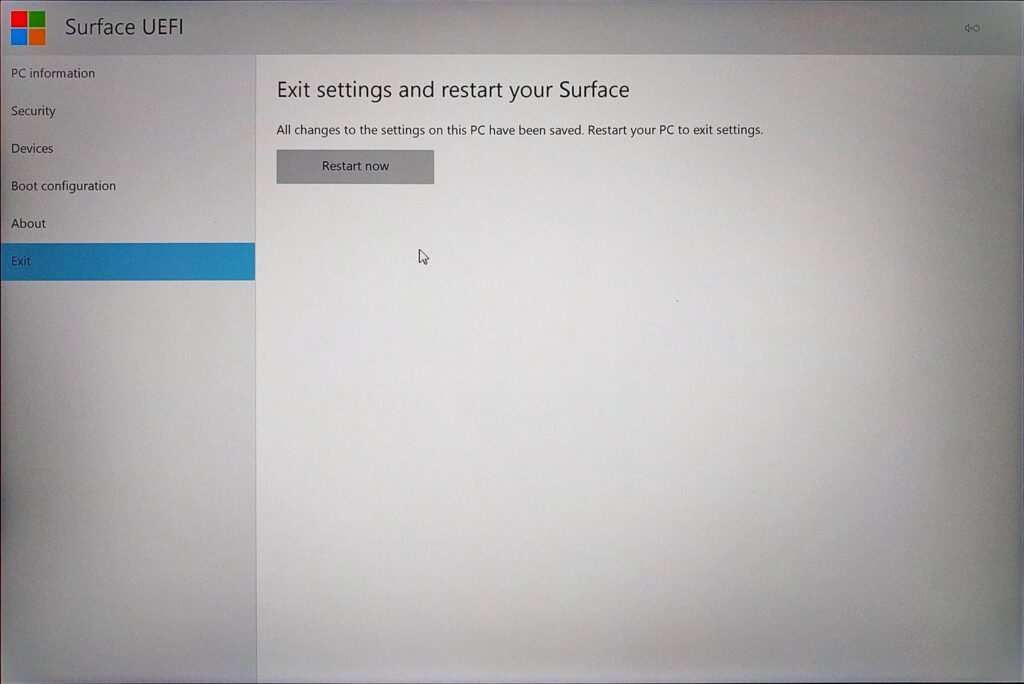
- After you have made changes, you can restart your Surface by choosing the Exit menu and clicking Restart Now.


Verify the Battery Limit Mode
You can verify the Battery Limit feature by doing the following:
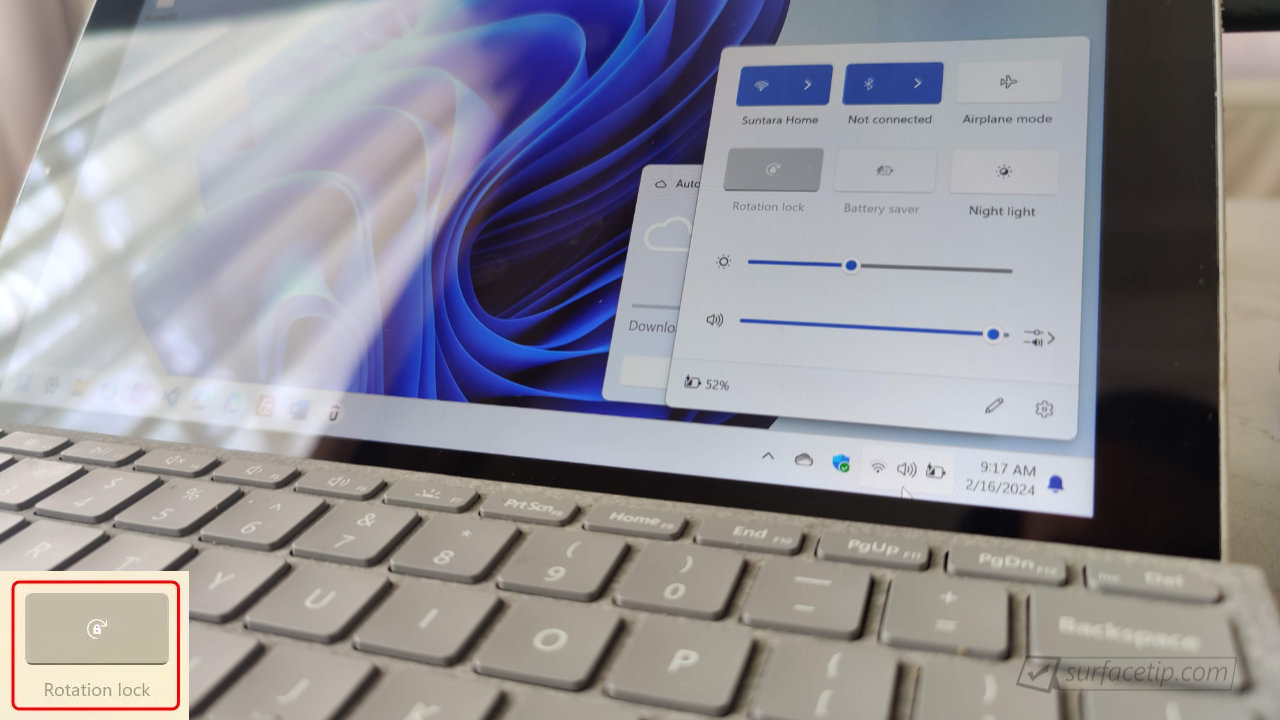
- On the Windows taskbar, click on the battery icon; it will pop up the battery status windows with the following information.

- You will notice that after charging for a while, the battery will cap at 50%.
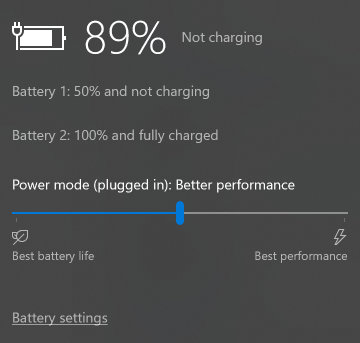
Note On Surface Book, the base section will remain fully charged (Battery 2) at 100%, while the tablet section (Battery 1) is capped at 50%.


COMMENTS
Let us know what you think!
We appreciate hearing your thoughts, questions, and ideas about “How to Protect Your Surface Battery with Battery Limit Mode”.
So it’s NOT available for the Surface Pro 6 then….?♀️
Battery one will be capped with 50% on SB2 but battery 2 will continue to be charged to 100%.
Does this not entirely counteract the whole purpose of Battery Charge Capping? With this configuration, you will save the lifespan on the base section and end up with a dead battery on the tablet.
But the tablet section will not be replaced or repaired, all you can hope for is a lousy refurb.
Microsoft, Microsoft – can’t you get anything right? And to think it took a whole bl**dy year to serve us this crap.
Hi Patrick, I’m really sorry and thanks for pointing that out. This is my mistake, I’ve double-checked on my Surface Book, and it appears that the Battery 1 is for tablet’s section and Battery 2 is for the keyboard base. I’ve updated the article with the right info. Thanks!
If you discharge the keyboard below 50%, then it also has a limitation, as well as on the main screen part. For some reason, they write everywhere that it does not have such a function, although it does exist)))
Hi Evan, do you know how to change the battery limit to above 50%?
The 50% limit is too low for me.
I have double-checked the Microsoft support documents site, Currently, there is no way to set a custom battery limit on Surface devices yet.
Why is this feature absent in Surface 8 Pro?
Works on Surface 8 Pro.
However, it would be perfect if you could set it at 75% or so. Would preserve battery life without negatively impacting it’s use as a mobile device – 50% is a bit low. Of course, you can always shut it off when you’re travelling and expect you’ll be working away from a charger.
Thanks Evan , to prolong the battery lifespan whe to recharge the battery until flat at 0? Or top up when it below 20%?
Thanks
Sunny