The battery icon on the Taskbar is a crucial feature of Windows that indicates the status of your laptop or tablet’s battery. It allows you to check your battery life quickly and decide to charge your device. However, there may be times when the battery icon is not visible in the Taskbar, which can be annoying if you need to keep track of your battery life.
There are several reasons why the battery icon may not be displayed, such as a disabled battery icon setting, outdated or corrupted battery drivers, Windows update issues, or power settings issues. This guide will explore these issues in more detail and provide step-by-step instructions on fixing the battery icon that is not showing in the Taskbar.
Table of Contents
1. Turn on the battery icon.
Unlike Windows 11, you can show or hide the battery icon on the Taskbar by modifying the system icon settings on Windows 10.
To turn on the battery icon:
- Right-click on the Taskbar
- Select “Taskbar settings”
- Then click the “Turn system icons on or off” link under the “Notification area” section.
- Look for the “Power” option and turn it on.
With this method, the Taskbar should immediately show the battery icon if your computer’s battery is fine and can hold charge.
2. Restart your device.

One simple trick to fix most problems is to restart your system correctly. Some software or updates can mess up the battery configuration and Windows Explorer process, which can also cause the battery icon to disappear.
Follow the following steps to restart your computer:
- Go to the Start menu and click on the Power icon.
- Choose “Restart” from the power menu.
You can also shut down and then turn on your PC again using these steps:

- Go to the Start menu and click on the Power icon.
- Select “Shut down” from the power menu.
- Wait for a few seconds until your PC turns off completely.
- Press the Power button to turn on your PC.
Check if the battery icon appears in the Taskbar when logging into your PC.
3. Force your device to shut down and restart.
Another approach to fix the issue is to force shut down your laptop or tablet and restart using the power button.
Save all your work, close all the applications, and follow the steps below to force shut down and restart your device.
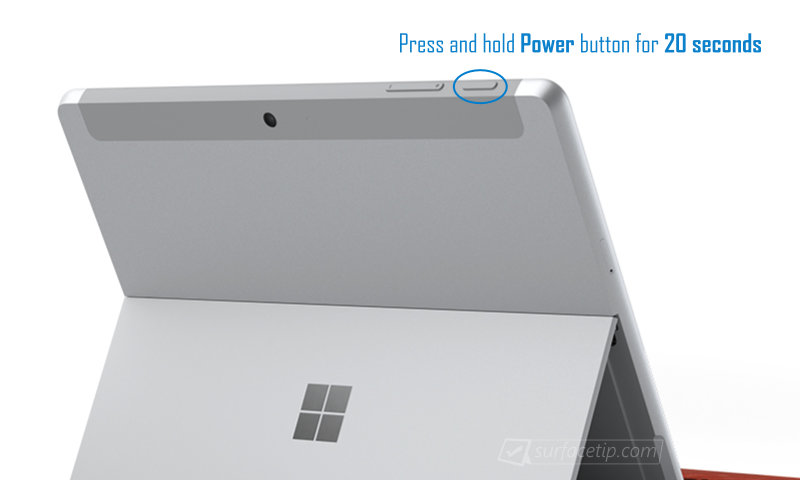
- Press and hold the power button for about 20 seconds until your laptop or tablet shuts down and restarts.
- When the Windows logo appears on the screen, release the power button.
4. Run Surface Diagnostic Toolkit

Running the Surface Diagnostic Toolkit is another solution that may help fix battery-related problems. The SDT is a tool developed by Microsoft that can diagnose and fix various issues with your Surface devices. To run the diagnostic, follow the steps below:
- Download the Surface Diagnostic Toolkit from Microsoft Store using the following URL:
https://www.microsoft.com/store/productId/9NF1MR6C60ZF - Install and open the tool.
- Click on the “Continue” button to start the diagnostic process.
- Follow the on-screen instructions to complete the diagnostic process.
Throughout the process, if the diagnostic tool detects any issues, it will suggest a solution and allow you to fix them immediately.

In this case, there was a problem with the Windows Update on my Surface Laptop. All I have to do is click the “Fix” button to let the tool resolve the issues.
Surface Diagnostic Toolkit may detect and fix battery-related issues like device drivers or system settings. After running the tool, restart your computer and check if the battery icon appears.
5. Run the Power troubleshooter.

The Power troubleshooter is a built-in feature in Windows 10 that checks for and fixes your device’s power settings and battery usage issues. The feature was later built into “Power & battery” settings on Windows 11 as an Energy recommendation.
The tool will scan your system for common problems and offer solutions to help you optimize your power settings and improve the battery life on your device. Some of the issues that the Power troubleshooter can fix include power management problems, battery drain issues, and problems with sleep mode and hibernation.
Use the following steps to run Power Troubleshooter on Windows 10.
Go to Start > Settings > Update & Security > Troubleshoot and click on the Additional troubleshooters link button.

Locate and click on the Power option, then click on Run the troubleshooter.


When completed, it will generate a report to let you know all the issues it found and which problems can and can’t be fixed.
6. Reinstall the battery control module.
Windows uses a “Microsoft ACPI-Compliant Control Method Battery” device module to communicate with the battery. If there’s an issue or conflict with its driver, it can disrupt the communication between Windows and the battery.
To resolve this issue, you need to uninstall the device module and restart your computer to let your system reinstall the module. To reinstall the battery control module:
Right-click the Start menu and select Device Manager.

Expand the Batteries section and double-click on the “Microsoft ACPI-Compliant Control Method Battery.”

Select the Driver tab, and select Uninstall Device.

Click the Uninstall button again to confirm the uninstallation.

Go to Start menu > Power button > Restart to restart your system.
Conclusion
In short, this guide provided several solutions to fix the battery icon not showing in the Windows Taskbar, such as turning on the battery icon, restarting your device, running diagnostic tools, and troubleshooting power settings. Following these steps, you can quickly restore the battery icon and monitor your device’s battery life. If you have any questions or know any other ways to fix the issues, please share them in the comments section below.


COMMENTS
Let us know what you think!
We appreciate hearing your thoughts, questions, and ideas about “How to Fix Battery Icon Not Showing in the Taskbar”.