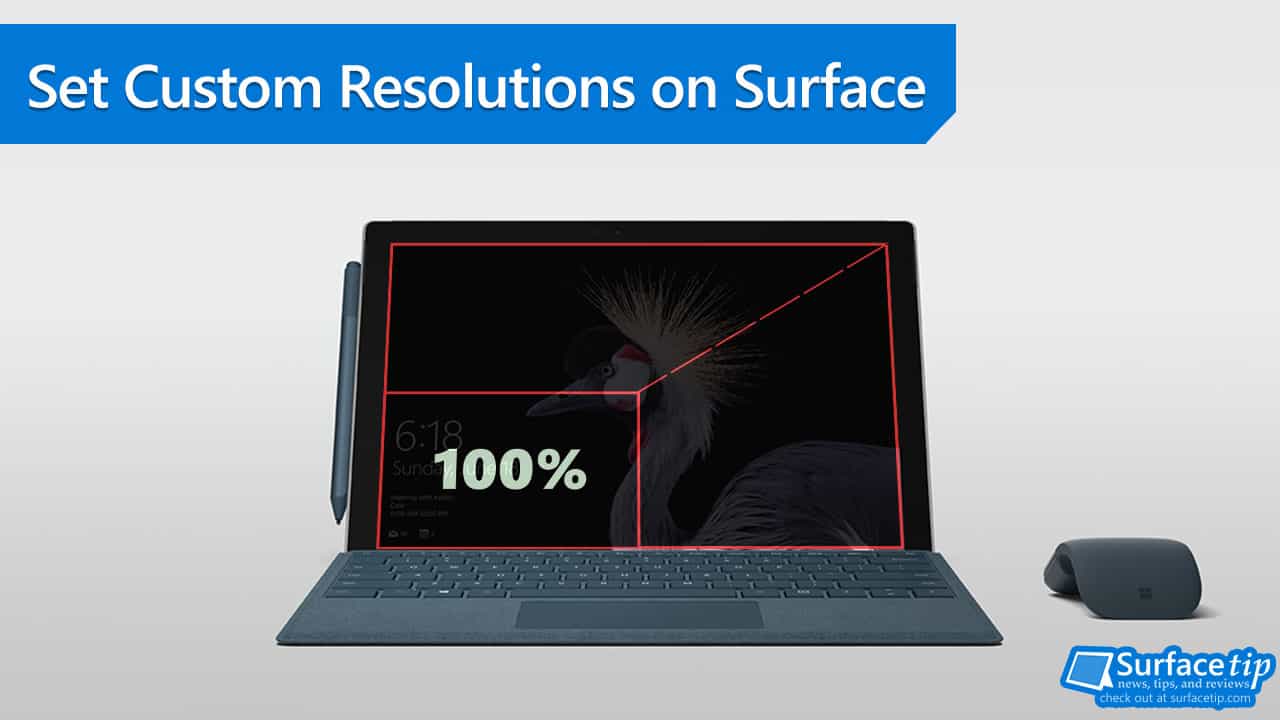
Microsoft Surface comes with a high-resolution display packing millions of pixels for delivering as straightforward as possible to the human eye. However, it also causes issues when using software or old applications that are unaware of display scaling.
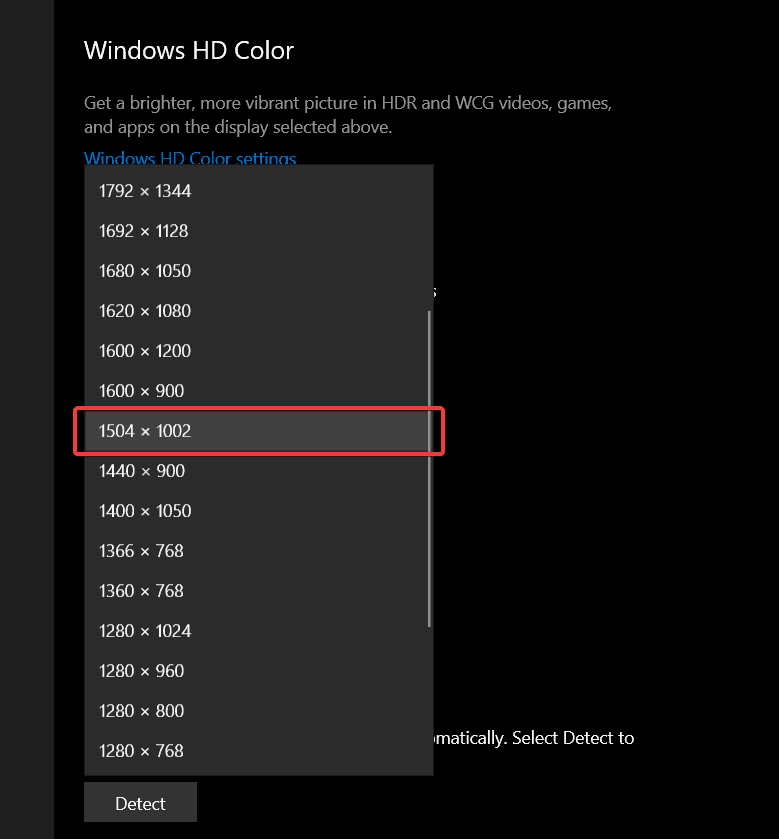
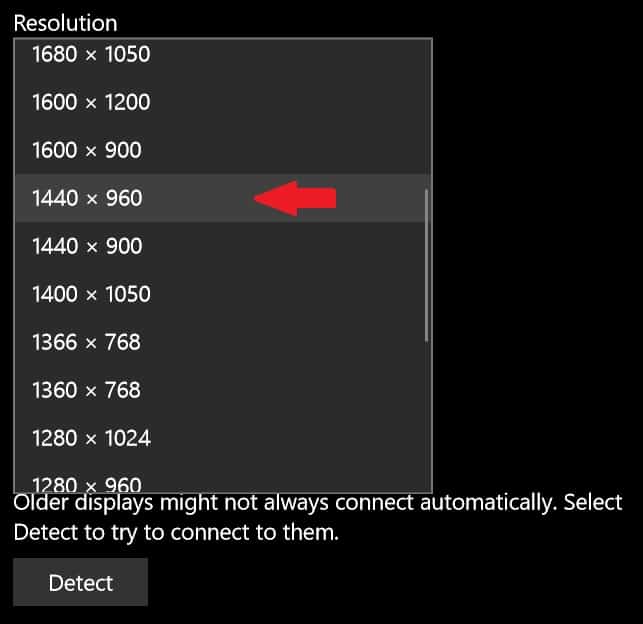
To fix the display scaling problem, software developers must rebuild their software to be compatible with high DPI displays. You can also fix this problem by adjusting your Surface’s display resolution and scaling to a viewable 100% display scaling. However, Windows 10 doesn’t include any 3:2 resolution options besides the default maximum resolution on your Surface (see image below).
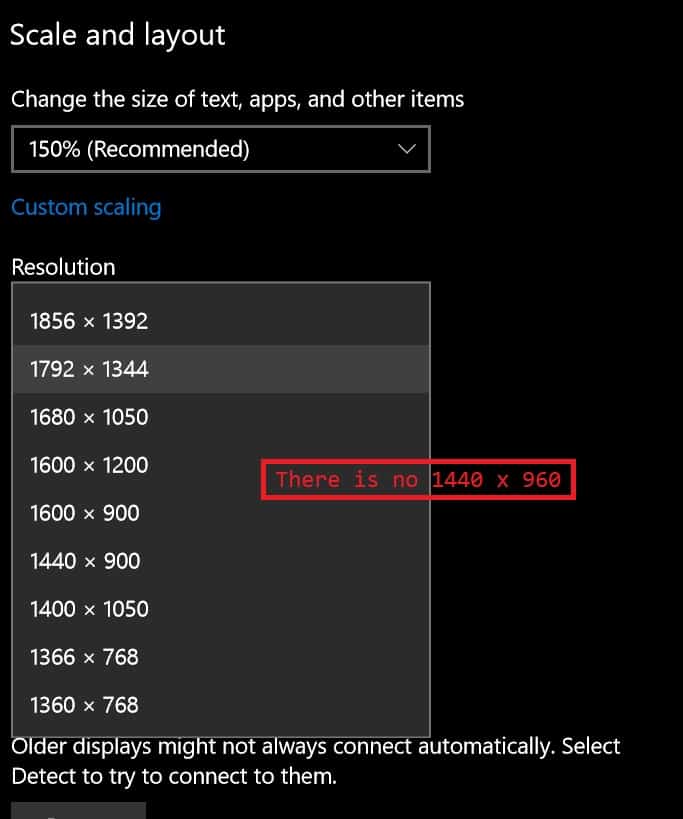
No 1440 x 960 (3:2 aspect) is in the resolution list by default on Surface Pro 3.
Table of contents
Why do you need custom resolutions on Microsoft Surface?
There are situations in which you might need a custom resolution. Here are a few of those:
- When you are working with applications that do not support high DPI.
- When you want to fix problems while working on multiple displays with different scaling.
- When optimizing gaming performance with a lower resolution and the proper 3:2 aspect ratio.
Microsoft Surface Screen Resolution
Here is some information about native resolution and resolution at 100% scaling you might need when adding a custom resolution on your Surface.
| Device Name | Native Resolution & Scaling | Resolution at 100% Scaling |
|---|---|---|
| Surface Go | 1800 x 1200 (150%) | 1200 x 800 (100%) |
| Surface Pro 3 | 2160 x 1440 (150%) | 1440 x 960 (100%) |
| Surface Pro 4-7 | 2736 x 1824 (200%) | 1368 x 912 (100%) |
| Surface Laptop 1-3 | 2256 x 1504 (150%) | 1504 x 1002 (100%) |
| Surface Book / Book 2 13" | 3000 x 2000 (200%) | 1500 x 1000 (100%) |
| Surface Book 2 15" | 3240 x 2160 (200%) | 1620 x 1080 (100%) |
| Surface Studio 1-2 | 4500 x 3000 (200%) | 2250 x 1500 (100%) |
You can also use the calculator below to help you find more 3:2 resolutions for your Surface devices. First, choose 3:2 from the preset and enter your desired resolution width or height to find its corresponding value.
Add custom resolutions via Intel Graphics Command Center
Recently, Intel has introduced a new tool called Intel Graphics Command Center that is available for free download via Microsoft Store. This tool has many features and functions that allow you to customize your device’s graphics settings without messing with current installed graphics drivers. On top of that, it also offers an easy way to add custom resolutions for your device.
The Intel Graphics Command Center currently supports only 6th Gen Intel Core processors or newer and Windows 10 version 1709 later. Here is the list of devices that support this tool:
- Surface Pro 4/Pro 5/Pro 6/Pro 7
- Surface Laptop/ Laptop 2/ Laptop 3 (Intel)
- Surface Book/Book 2
- Surface Studio/Studio 2
To add a custom resolution via Intel Graphics Command Center:
- Install the Intel Graphics Command Center from the Microsoft Store.

- Open Intel Graphics Command Center.
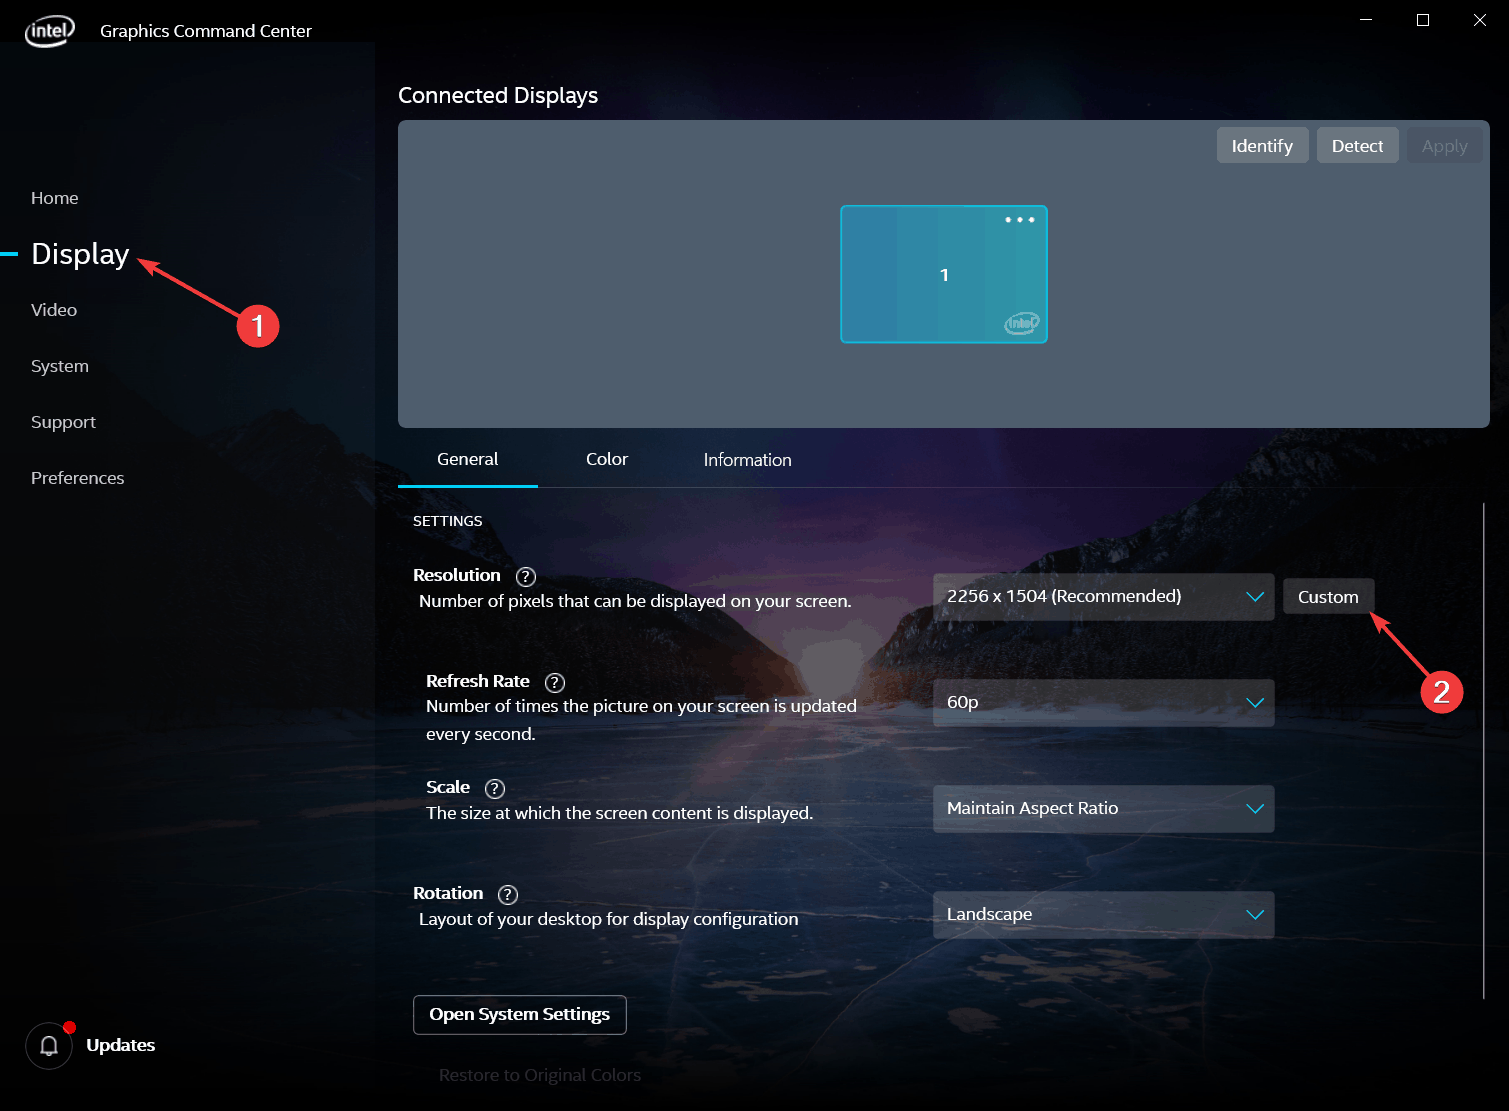
- Go to the Display section and click the Custom button.

- Enter your preferred width and height and click OK. In this case, I entered 1504 for width and 1002 for height on my Surface Laptop 3.

- Click Yes to confirm adding the custom resolution.

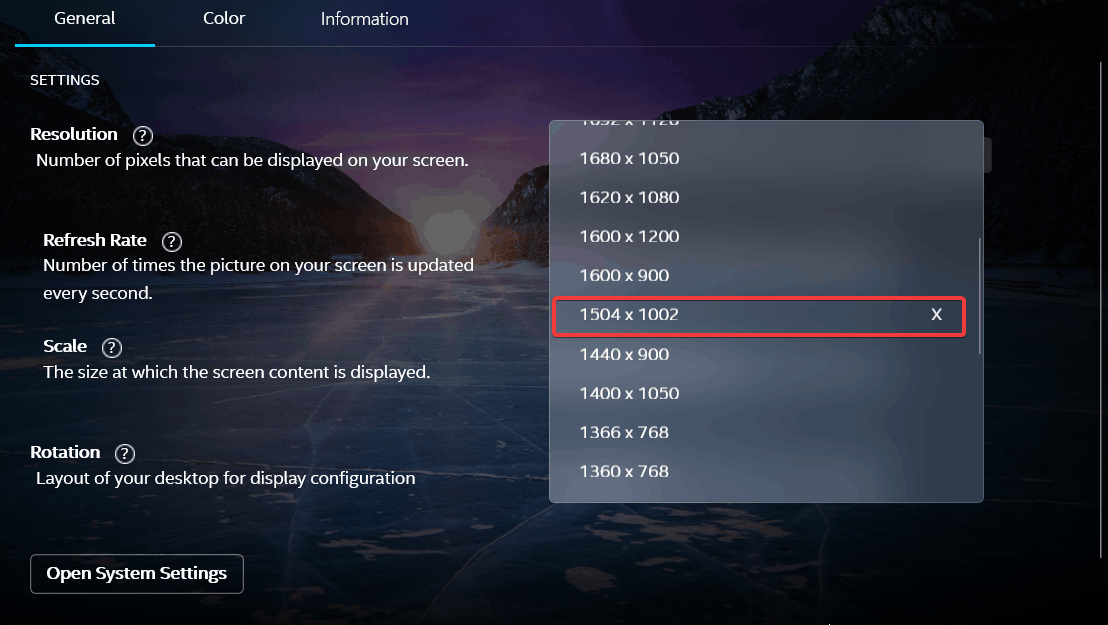
- Now, it will be available in the resolution list. You can identify custom resolutions with an “X” next to them.

- It will also be available in the system resolution list as well.

Add custom resolutions via CRU
Today, I want to introduce a tool called CRU to manage custom resolution.
- Download the CRU (Custom Resolution Utility).
- Extract the downloaded file.

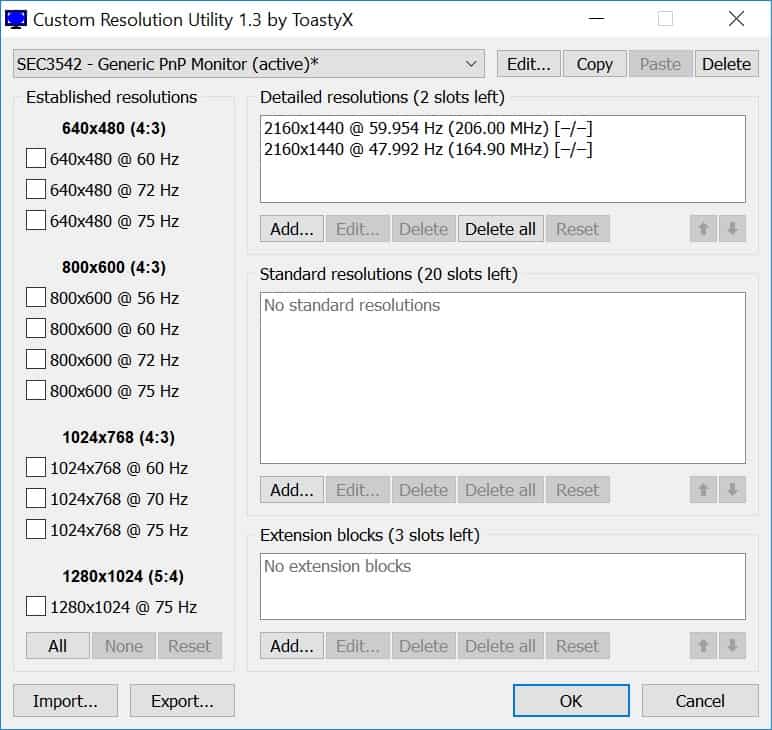
- Open the CRU tool.

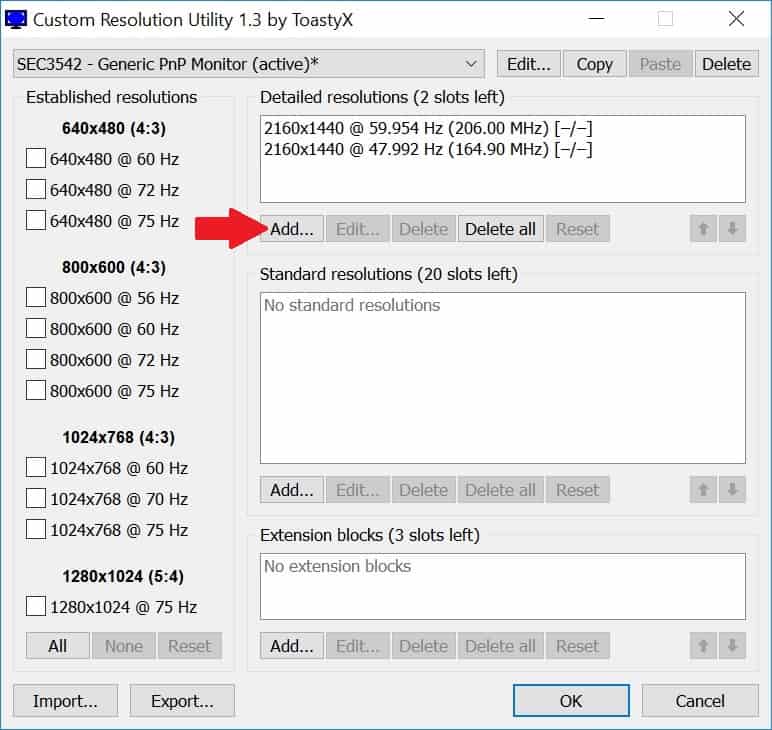
- To add a custom resolution, click the Add button under Detailed Resolutions.

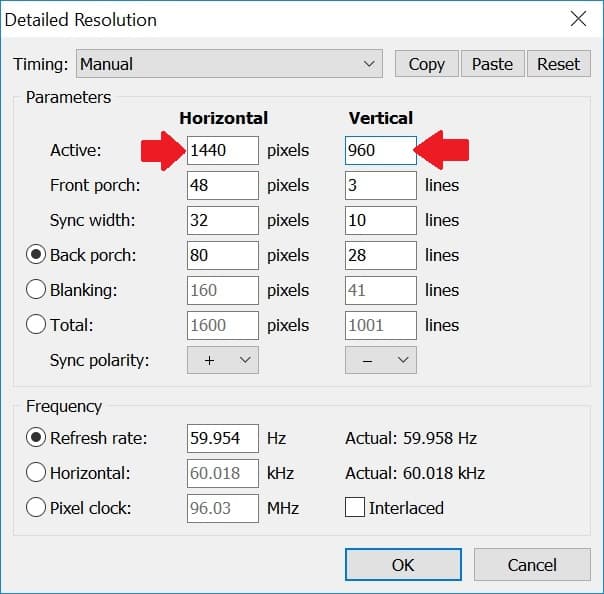
- Set values of your preferred horizontal and vertical resolution. In this case, on my Surface Pro 3, I set 1440 for horizontal and 960 for vertical.

- Click OK to close the Detailed Resolution dialog.
- Click OK again to save changes.
- Restart your computer to apply changes.
Applying your new custom resolution
After you restart, you can now set your added custom resolution.
- Go to Settings > System > Display.
- Under the resolution, choose your new custom resolution (1440 x 960).

- Click Keep Changes to accept your new resolution.
Alternative Methods
Besides using the CRU tool, you can use a predefined screen resolution list explicitly made for the 3:2 aspect for Surface Pro 3, Surface Pro 4, and Surface Book with a reg key. For more information, check out:





COMMENTS
Let us know what you think!
We appreciate hearing your thoughts, questions, and ideas about “How to set custom screen resolutions on Microsoft Surface”.
Warning from a Surface Pro 2017 owner (i7 model): I used of the CRU tool (following the above instructions) and it caused as side-effect the “black screen” issue on my pc (Surface did not “awake” after suspension / ibernation mode any more and a forced restart – keeping the on-off buttop pressed for 10 seconds – was needed). To fix the issue I had to restore the default screen resolution modes by deleting the two customer resolutions I created by CRU. I spent a lot of time to discover that the root cause of the problem was CRU…. The issue completely disappeared as soon as I removed the cru new resolutions.
Thanks for sharing
Also own Pro 2017. This problem doesn’t occur though. Set to resolution 1800×1200. Has no issues. And used for just under a year. Figured it’s the perfect resolution.
I also can’t get this to work on one of two surface books I just purchased for work (not the new surfacebook coming out in a few days).
I didn’t get a black screen, but CRU seems to have no effect (on either machine). I downloaded the .reg file listed in other methods and it seemed to work on one machine, but not the other. I’m not entirely sure why at this point; they are both running the same version of windows and are identical machines.
I started downloading intel video drivers per a recommendation from another site, but the user had to take back the surfacebook so I can’t test this method for a few days. I’ll report back if I have any success.
Same on my Book Pro, no effect after creating1500x1000 resolution…
Same on my Surface Book, I’m looking into this problem. I will update when I found solution.
Hi Evan, any news on this. Just tried it on my Surface Book (gen 1) and the above issue still exists. Thanks for your help and work in doing all of this.
I can’t make it works with CRU tool yet. Currently I’m using the latest Intel HD Graphics 520 from Intel website to create custom resolutions (1504×1000). So far so good, there is no problem for me.
Great, thanks for the reply, I’ll try it out.
Worked perfect for me. I used it for my Surface Laptop.
You can add another resolution to your grid
Surface laptop 2256 x 1504 175% scaling, 1692×1128 100% scaling
Thanks for a good post.
what is the optimal resolution for surface laptops?
I like this post so much I disabled my ad-blocker and reloaded the page. Thanks for the very helpful guide!
Thank for supporting!
Can confirm this works 100% on Surface Pro 2017. And I made use of this for over 9 months. Whether it works on not, ENTIRELY depends on if you set resolution that’s supported or not. Supported resolutions are: 1600×1066, 1728x 1152, 1800×1200 (best option I found as has no blurry fonts). All resolutions are at 100% scaling.
If doesn’t work, then launch CRU by right-clicking: Run as Administrator (else it won’t save the changes).
Or just install the Intel driver from their website and use the built in software.
Note, do not update to the latest DCH drivers from Intel if you’re using CRU resolutions, only the legacy drivers (25.20.100.6373 and below) will work with them.
Thank for your sharing!
Did it, and set my pro 5 and 6 to a resolution like pro 3 2160×1440, and then texts, bitmaps are fuzzy.Why this? I have a pro 3 that is ok, but pro 5 and 6 with that resolution all is tiny.
And would like to imitate pro 3 on the others.
Don’t forget to set the screen at 60Hz , 59Hz was more blurry for me
Thank you so much for this article and the little CRU tool! I have changed resolution on my Surface Pro4 to conserve battery usage.
Tried the Intel utility on my Surface Go 2, it works but there no “Custom” button next to the resolution settings.
CRU tool doesn’t work – boots to a backscreen. Power button restart is needed
Just got black screen and audio when testing a game on Surface Pro 4 using custom 1440 x 960 resolution. Any help?
This software can no longer be used to set a custom resolution.
In ‘Settings’, there are now something called ‘Screen settings’, which has the description ‘Configure screen settings such as resolution, refresh rate and rotation’ which LINKS TO THE NORMAL WINDOWS SETTINGS.
So this tool from Intel is utterly useless. What a crying shame.