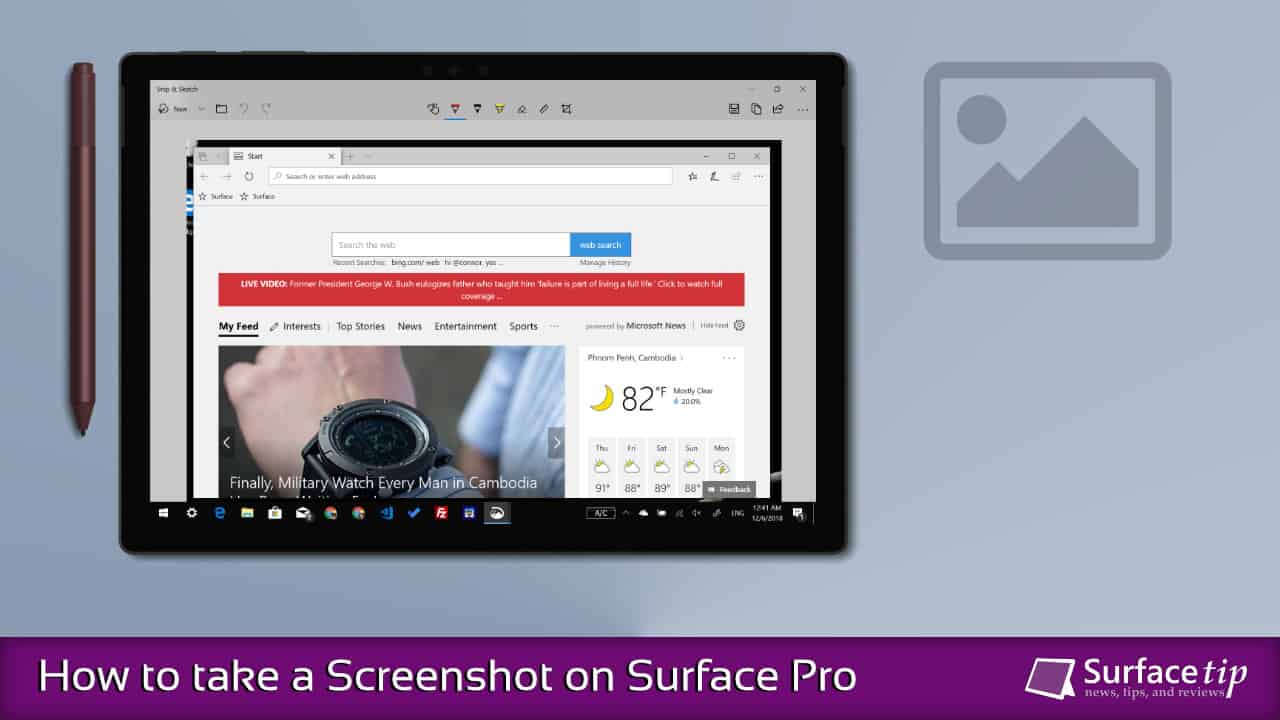
Microsoft Surface Pro lineup is the most popular 2-in-1 tablet or laptop that does great in both worlds with an incredible performance, detachable keyboard, adjustable kickstand, best-in-class digital pen, and more. The tablet is perfect for digital artists, students, and professional users looking for a capable machine with a portable form factor.
If you recently switched from other laptops, you might experience some difficulties taking screenshots on Surface Pro, especially in tablet mode. Microsoft Surface, operated by Windows 11/10, offers a variety of methods and tools to take and edit a screenshot. You can just read on to find out the best way for you.
Table of Contents
1. Using tablet buttons
This method is tricky and unique to each type of Surface Pro device you have. Here, we have instructions and illustrations for all types of Surface Pro to help you understand the steps to take a screenshot.
You can capture a screenshot on the tablet using the physical buttons without help from a type cover or keyboard. To take a screenshot on the tablet using hardware buttons, do the following steps:
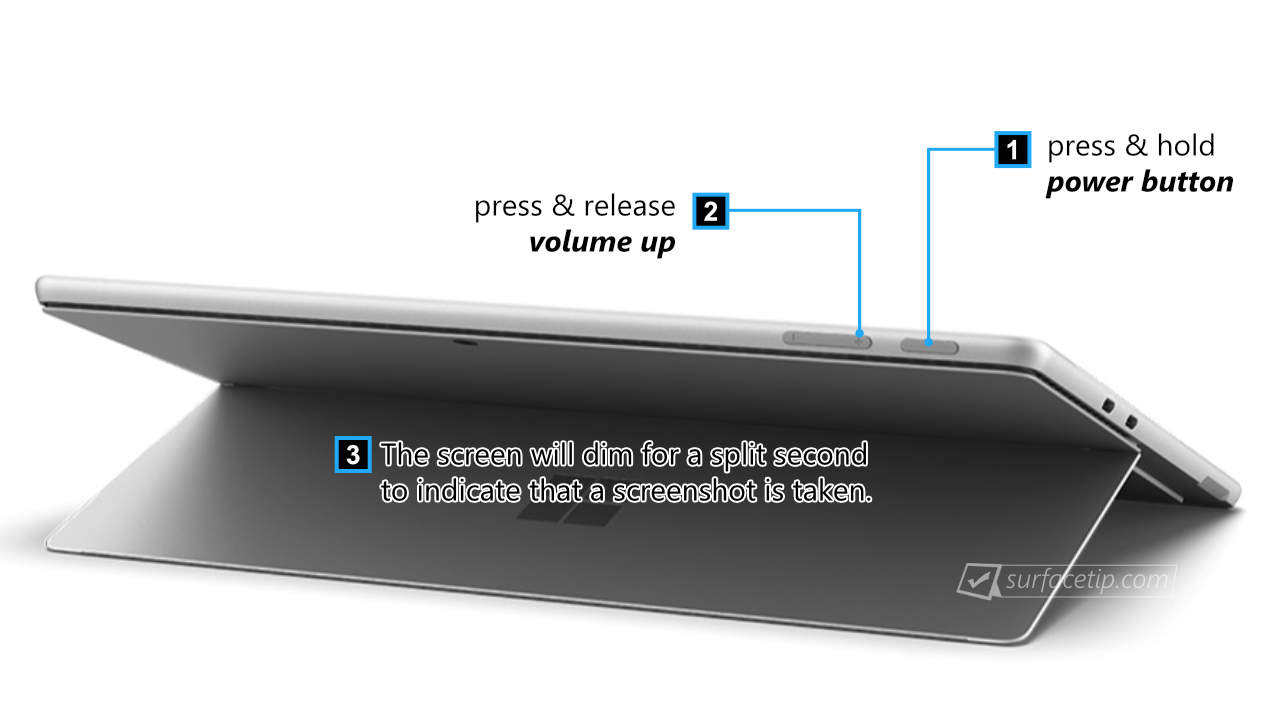
To take an entire screen capture on a Surface Pro 9 tablet without a keyboard attached:
- Press and hold the Power button.
- While holding the Power button, press and release the Volume Up button on the side of the device.
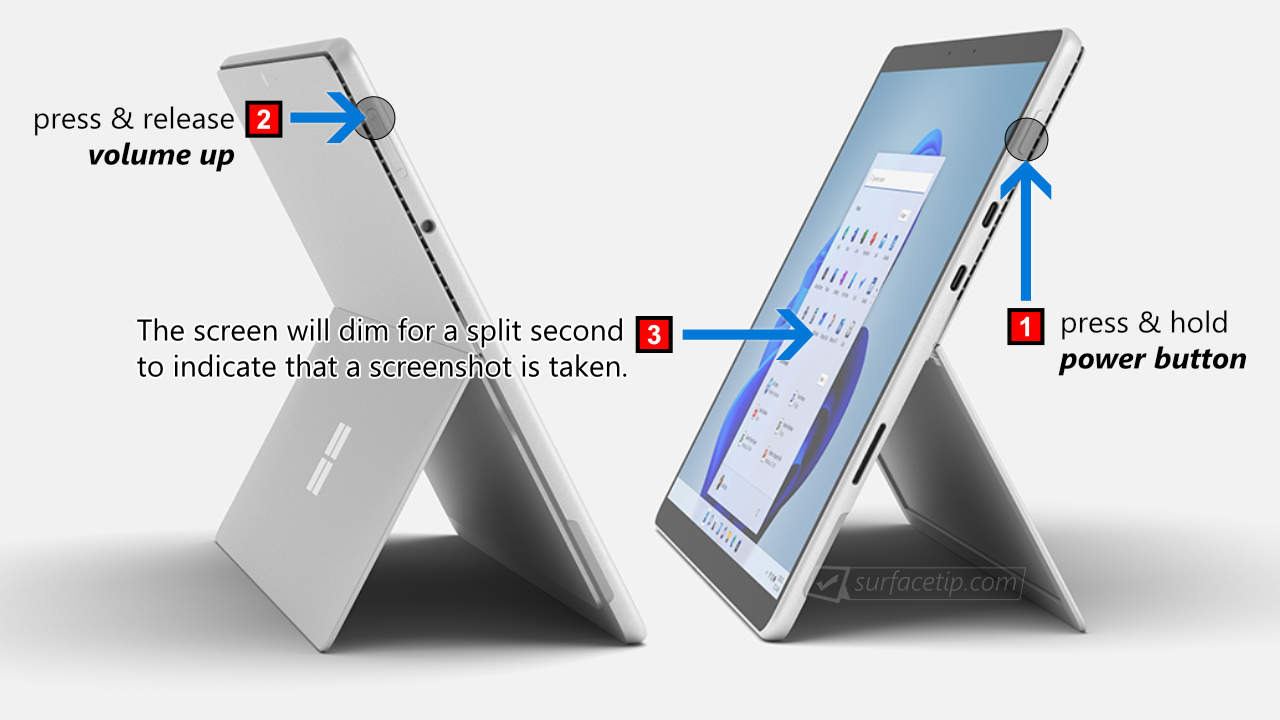
To take screen captures on a Surface Pro 8 or Surface Pro X tablet without a keyboard attached:
- Press and hold the Power button.
- While holding the Power button, press and release the Volume Up button on the side of the device.
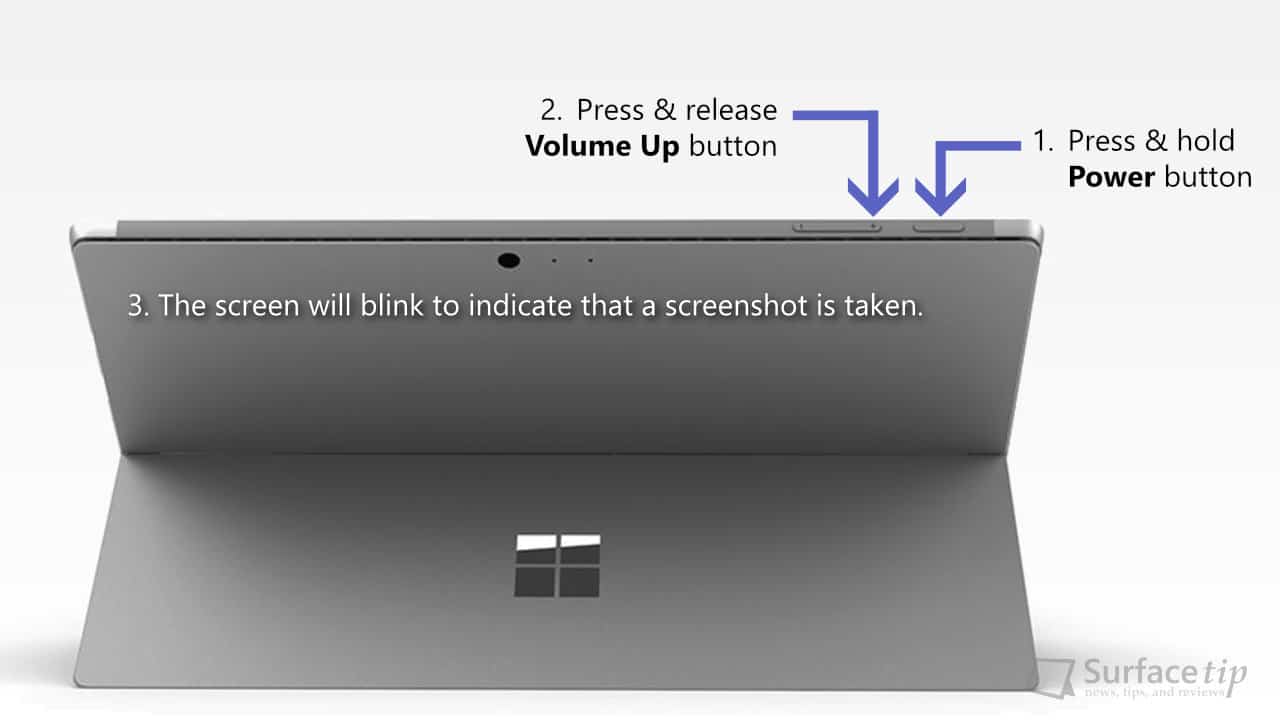
To take a screenshot on a Surface Pro 4, Surface Pro 5, Surface Pro 6, or Surface Pro 7/7+ tablet without a keyboard attached:
- Press and hold the Power button.
- While holding the Power button, press and release the Volume Up button on the side of the device.

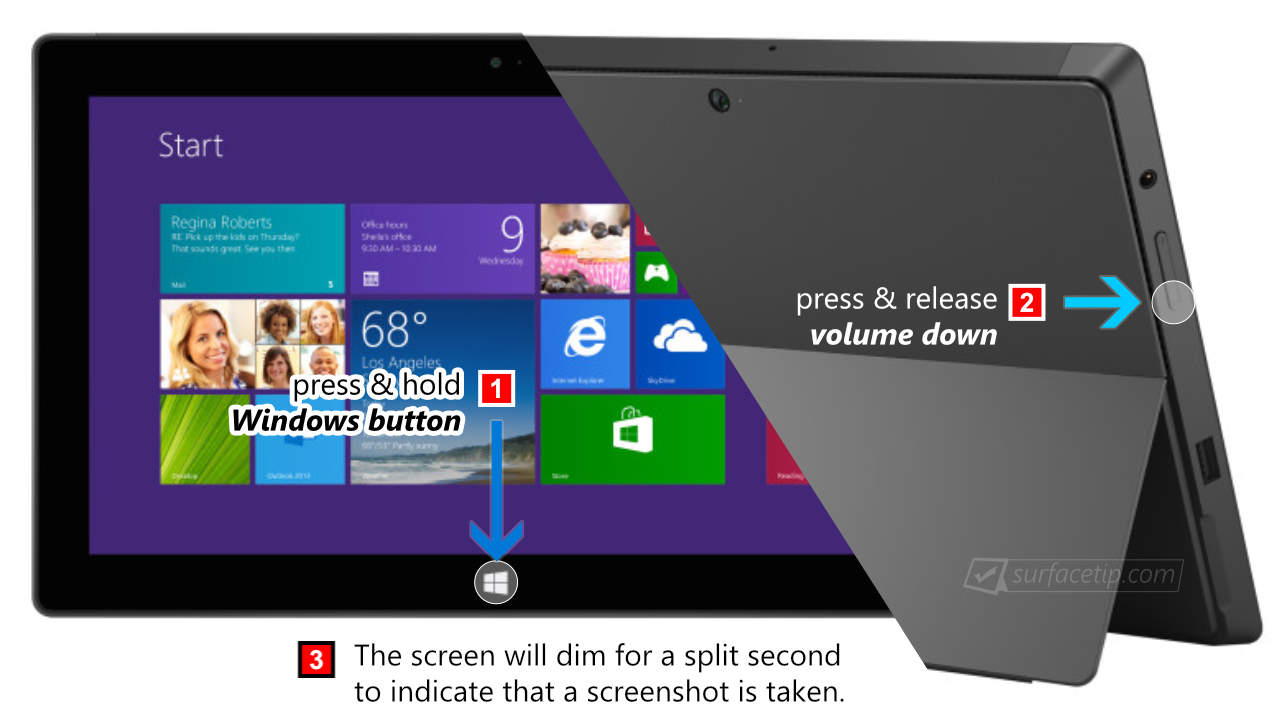
To take a screenshot on a Surface Pro 3 tablet without a keyboard attached:
- Press and hold the Windows capacitive button.
- While holding the Windows button, press and release the Volume Down button on the side of the device.
To take a screenshot on an original Surface Pro and Surface Pro 2 tablet without a keyboard attached:
- Press and hold the Windows capacitive button.
- While holding the Windows button, press and release the Volume Down button on the side of the device.
The screen will dim for a split second to let you know that a full-screen screenshot has been captured.

2. Using Surface Type Cover
If you have a Surface Type Cover attached, you can follow the traditional ways to take screenshots by using the dedicated PrtScn (Print Screen key) on the keyboard. To do so.
Option 1: Capturing all screens and storing them in the Windows Clipboard.
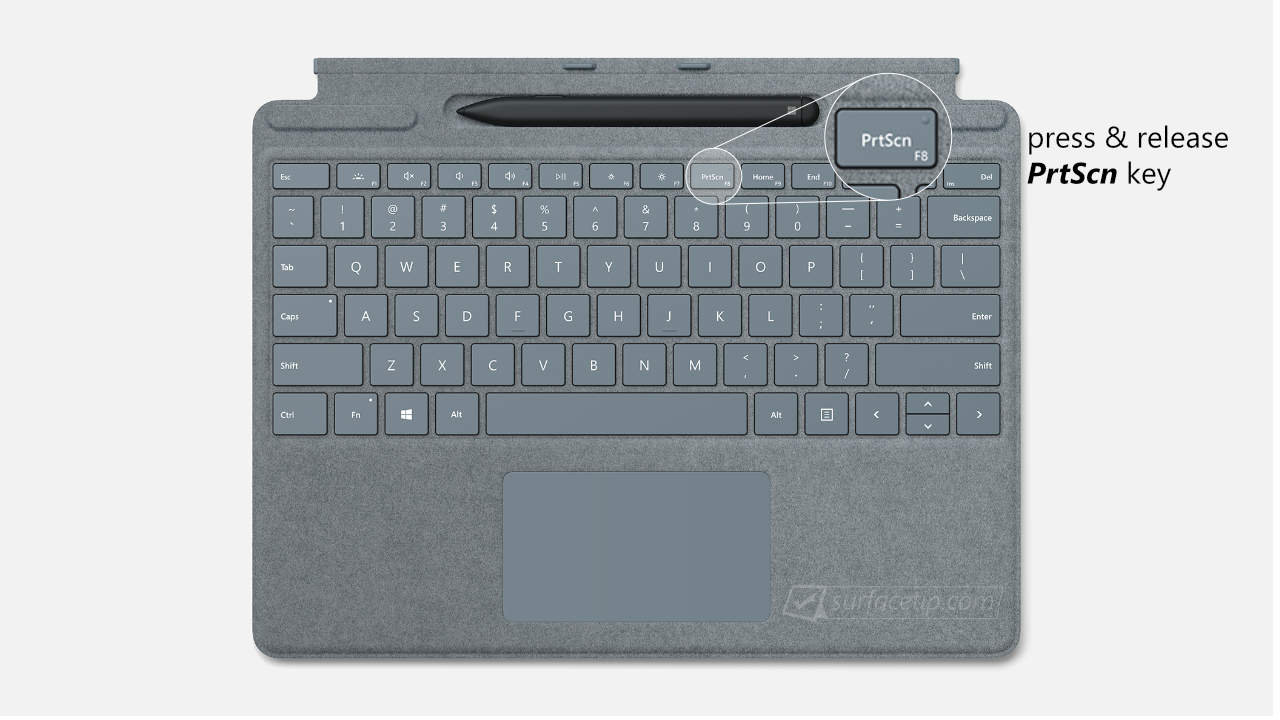
To take a full screenshot on a Surface Pro 8 or Surface Pro X with a Type Cover:
- Press the PrtScn key to take a screenshot.
- Paste to your preferred programs like Paint or Word.
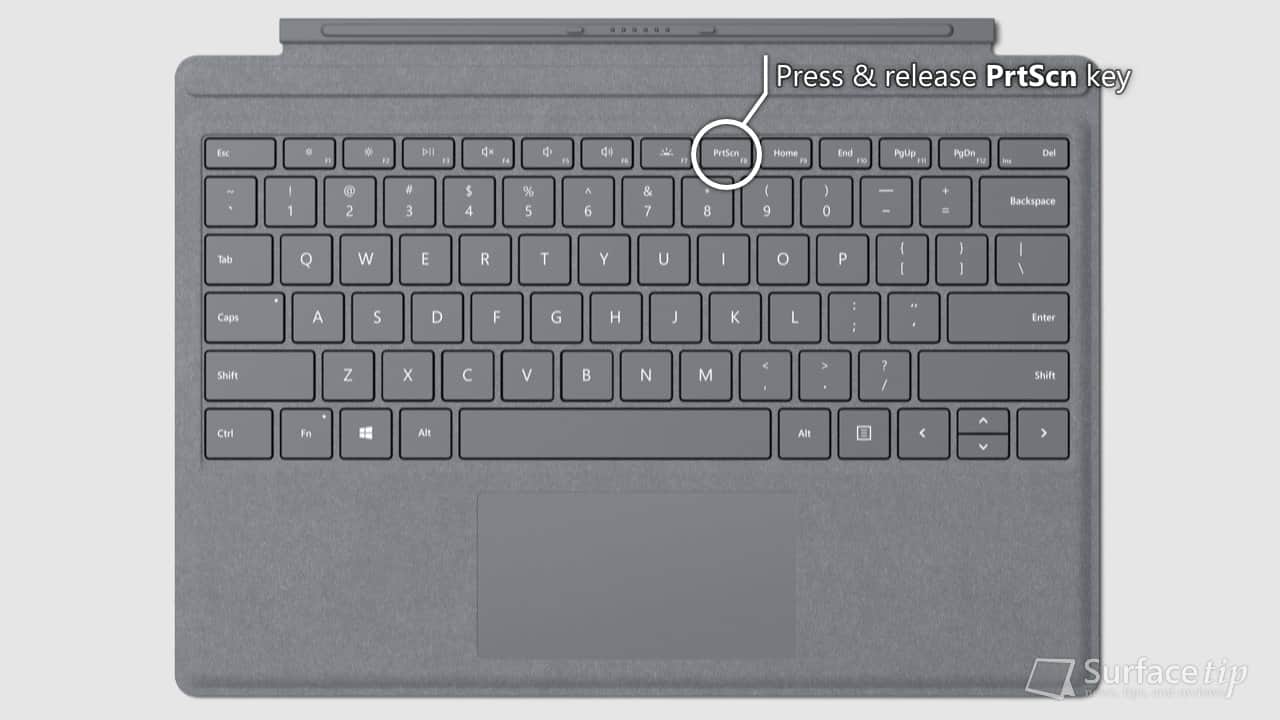
To take a full-screen capture on a Surface Pro 4, Surface Pro 5, Surface Pro 6, Surface Pro 7, or Surface Pro 7 Plus with a Type Cover:
- Press the PrtScn key to take a screenshot.
- Paste to your preferred programs like Paint or Word.
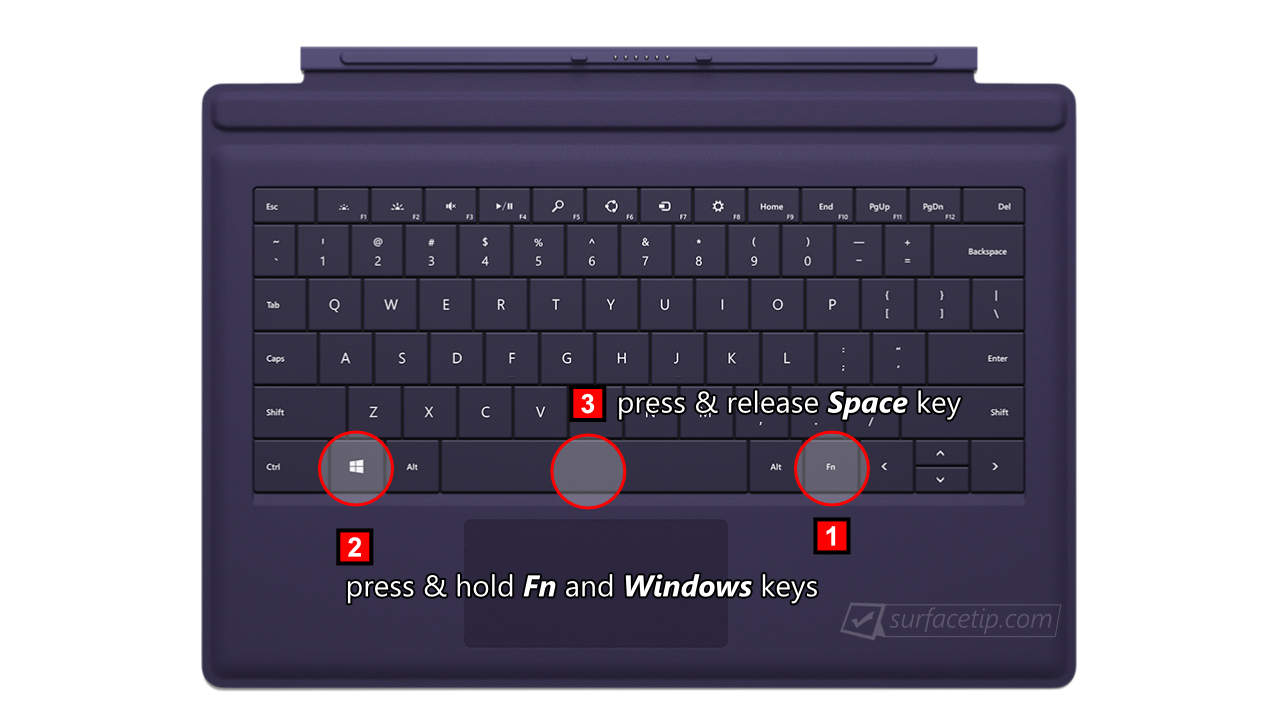
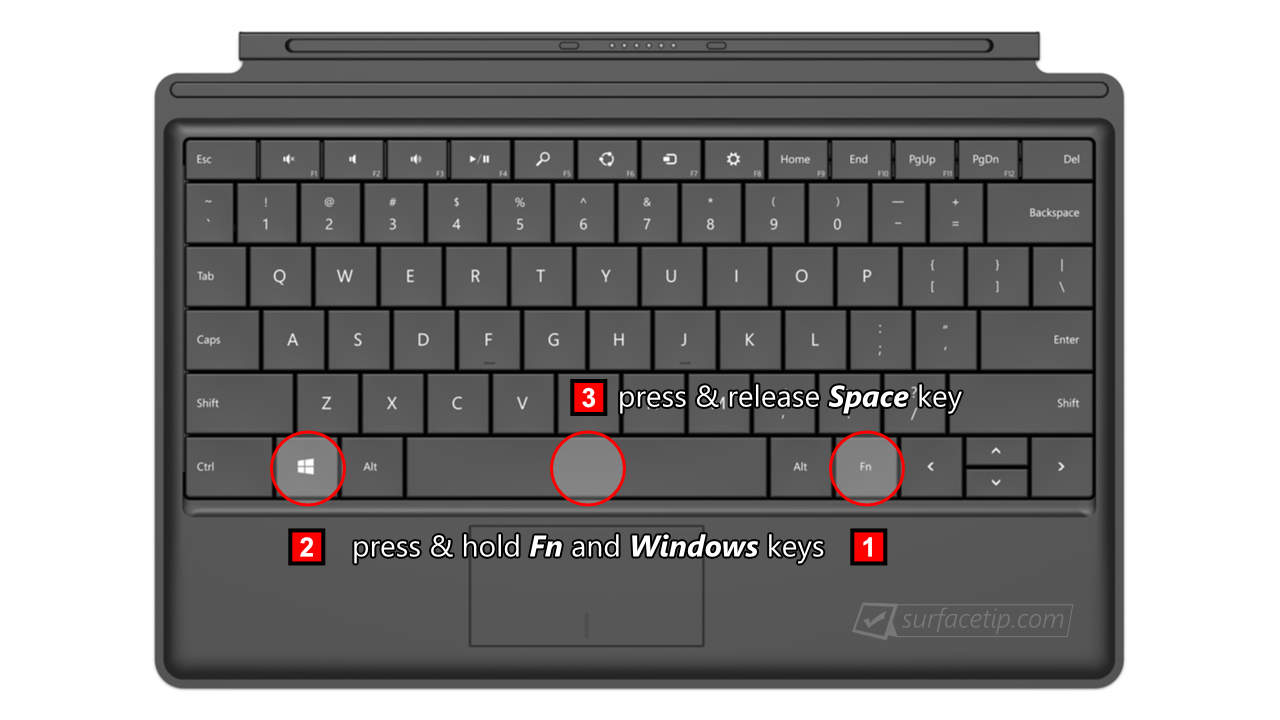
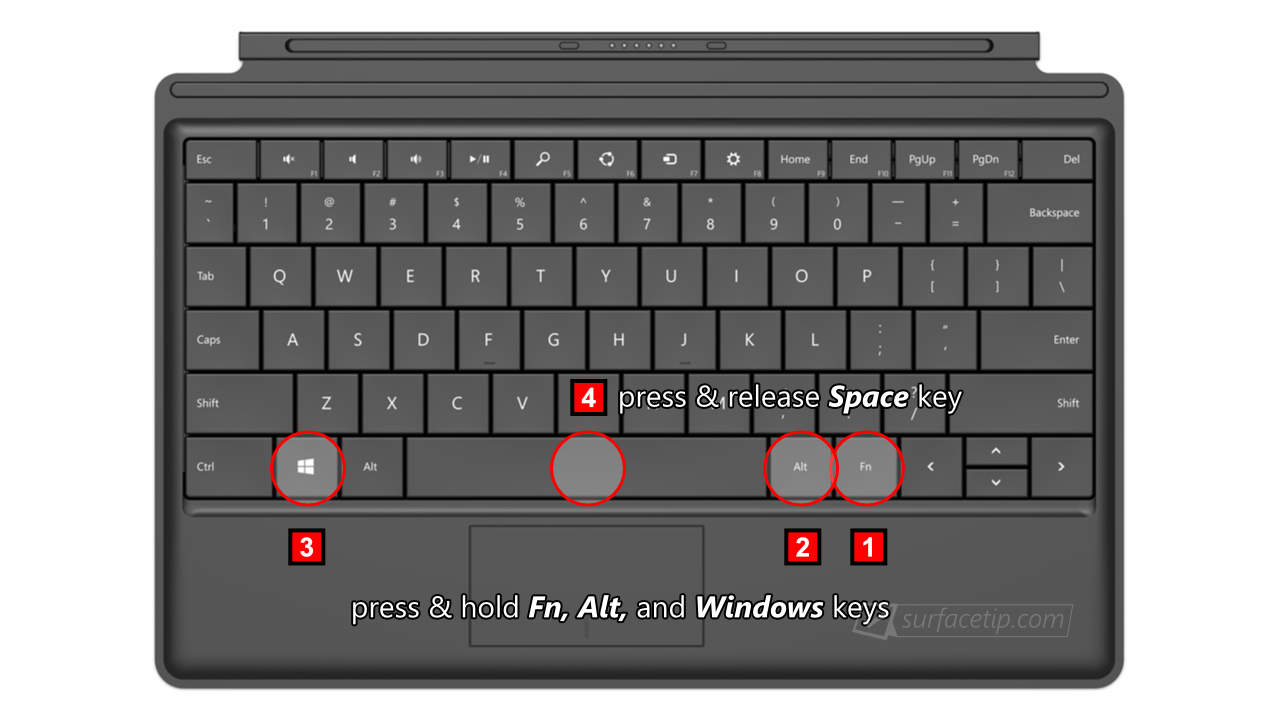
To take a full screenshot on a Surface Pro 3 with a Type Cover:
- Press the Fn key + Windows logo key + Space key to take a screenshot.
- Paste to your preferred programs like Paint or Word.
To take a full screenshot on a Surface Pro 1 and Surface Pro 2 with a Touch or Type Cover:
- Press the Fn + Windows + Space key to take a screenshot.
- Paste to your preferred programs like Paint or Word.
Option 2: Capturing the active window and storing it in the Windows Clipboard.
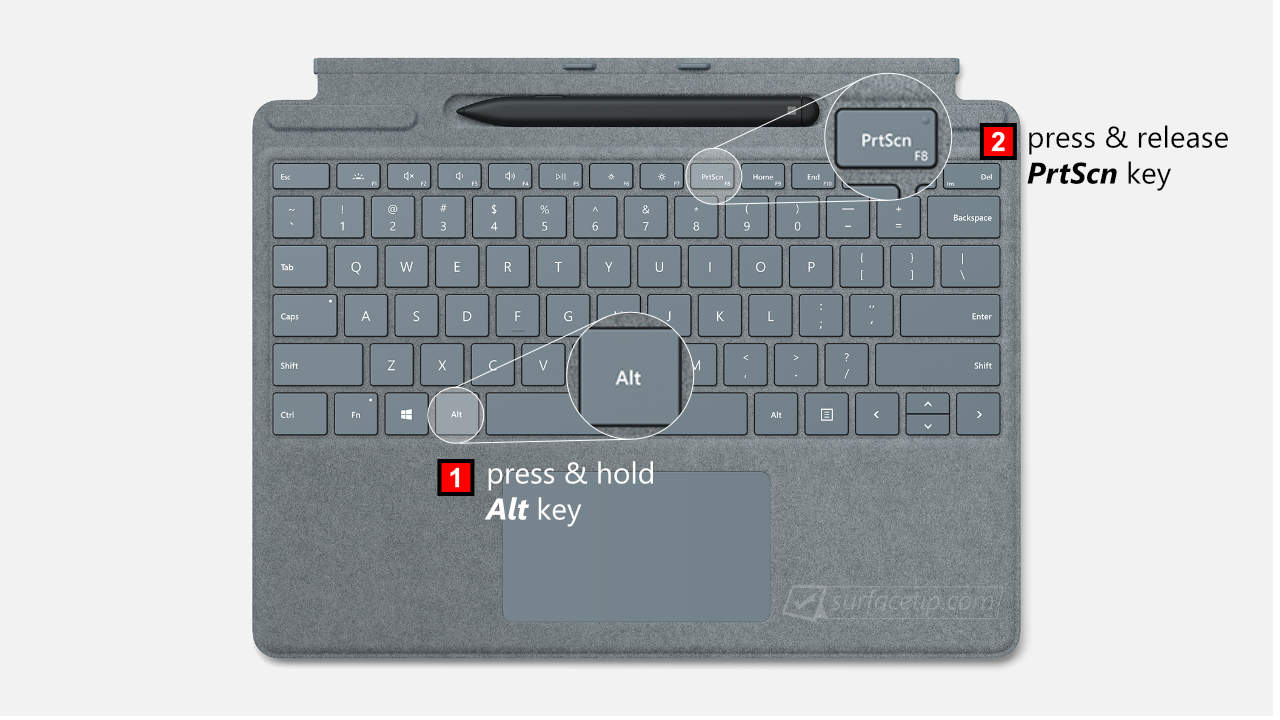
To take an active window screenshot on a Surface Pro 8 or Surface Pro X with Type Cover:
- Press the Alt + PrtScn key to screen capture the active window.
- Paste to your preferred programs like Paint or Word.
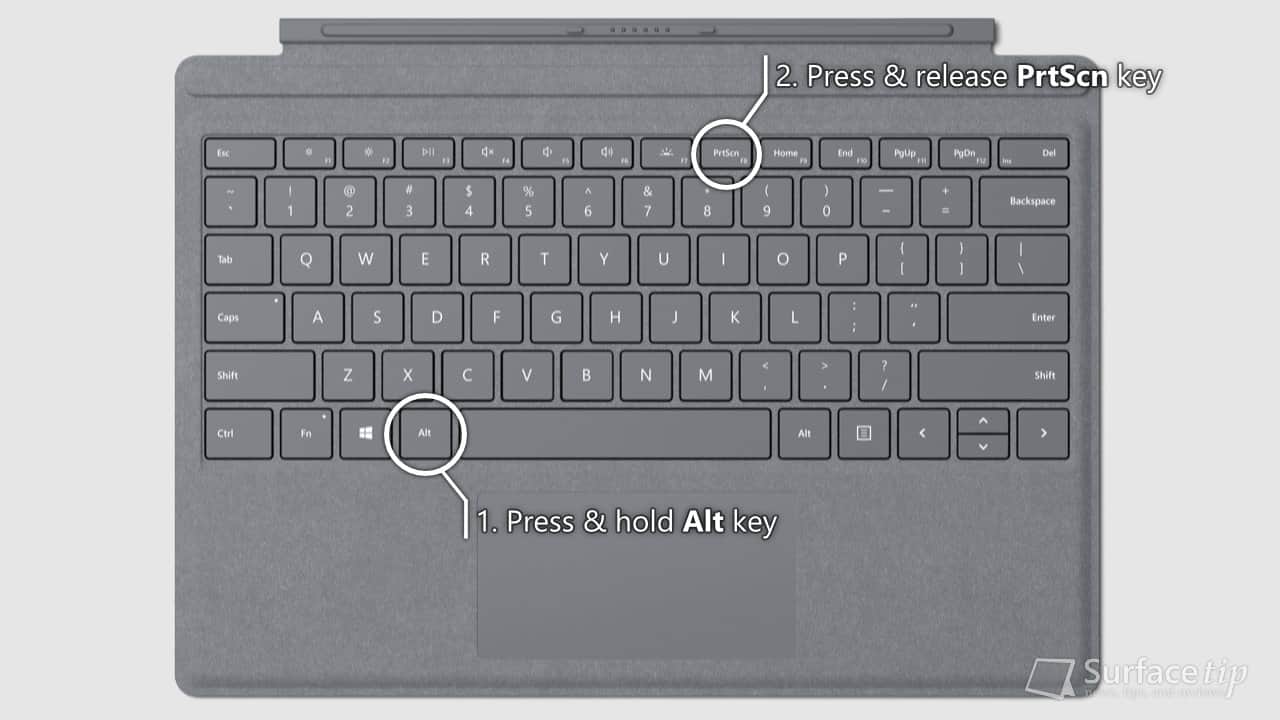
To take an active window screenshot on a Surface Pro 4, Surface Pro 5, Surface Pro 6, Surface Pro 7, or Surface Pro 7 Plus with a Type Cover:
- Press the Alt + PrtScn key to capture the active window.
- Paste to your preferred programs like Paint or Word.
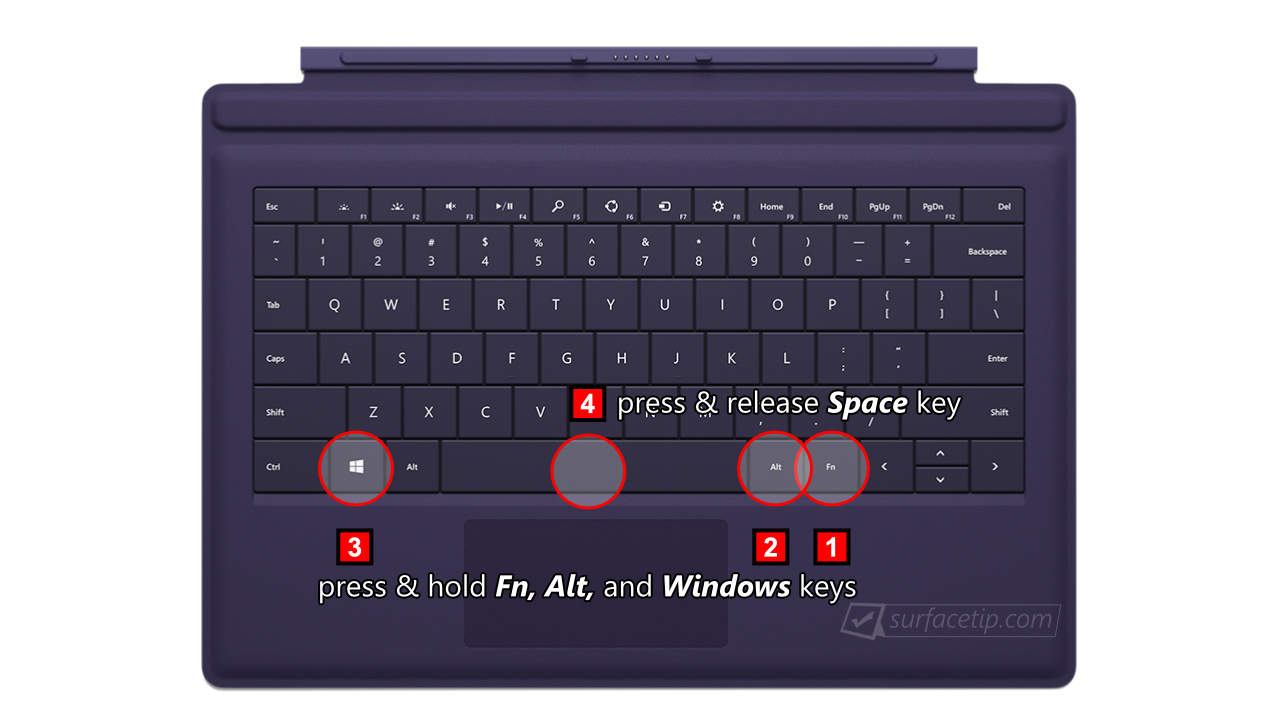
To take an active window screenshot on a Surface Pro 3 with a Type Cover:
- Press the Fn + Alt + Windows + Space key to capture a screenshot of the active window.
- Paste to your preferred programs like Paint or Word.
To take an active window screenshot on Surface Pro 1 and Surface Pro 2 with a Touch or Type Cover:
- Press the Fn + Alt + Windows + Space key to capture an active window screenshot.
- Paste to your preferred programs like Paint or Word.
3. Using Surface Pen
Surface Pen functionalities are getting better functions in Windows 10. Windows 10 anniversary update introduced a new feature called Screen Sketch. This function will capture the device screen and pop up a set of tools for drawing, cropping, and others.
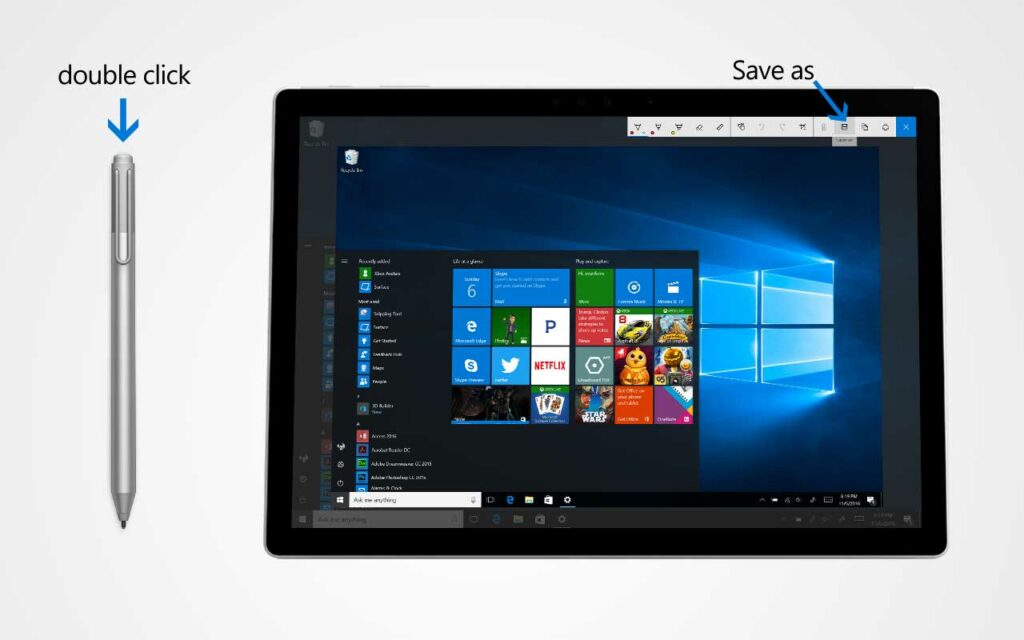
You can take a screenshot by using the Surface Pen with this function. To activate the screen sketch function
- Double-click the eraser button on the top of your Surface Pen.
- Now, you can edit, crop, and save the screenshot by clicking the “Save as” button on the top right of the screen.
4. Using Windows snipping tool
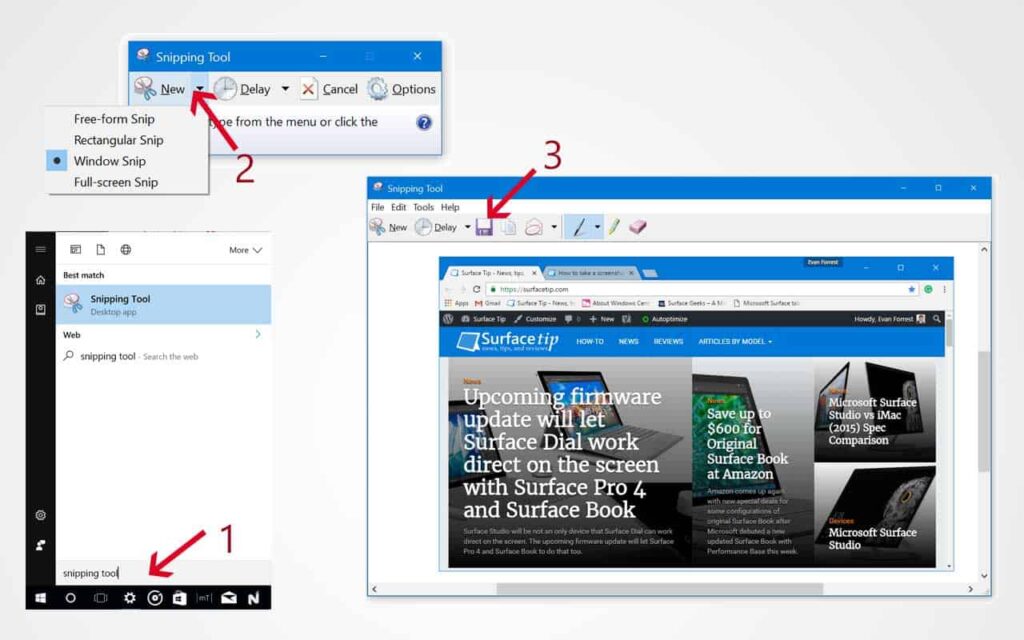
In Windows, a built-in screenshot program called the Snipping tool has more controls and functionalities than the above methods. To open this tool:
- Open the Start menu, Cortana, or Search box, and type Snipping Tool. You can also open this tool by opening the Start menu and locating the Snipping Tool app.
- You can also open this tool by opening the Start menu and locating the Snipping Tool under the Windows Accessories folder.
When you launch the tool, you can take a screenshot in 4 ways:
- Full-screen snip – to capture an entire desktop.
- Window snip – to capture a specific program window.
- Rectangular snip – to capture an area of any rectangle size.
- Free-form snip – to capture any form you draw manually.
After you select an area you want to take a screenshot of, it will display in a new window. You can draw or highlight the screenshot before saving it. This tool also allows you to save as a JPEG, PNG, GIF, or HTML file.
5. Using the Windows snip & sketch tool
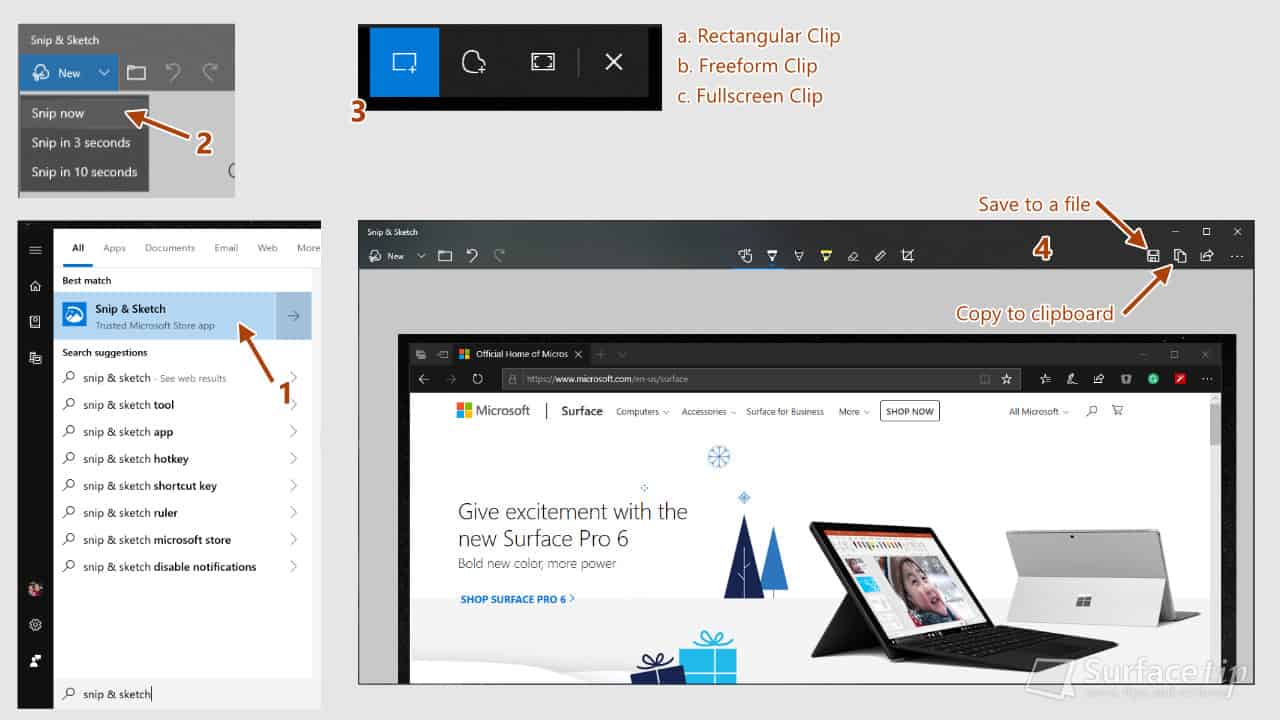
In recent Windows 10 Updates, Microsoft has introduced a new modern tool called Snip & Sketch that allows you to quickly annotate screenshots, photos, and other images with your pen, touch, or mouse and save, paste, or share with other apps. To take a screenshot with this tool:
- Open the Start menu, Cortana, or Search box, and type Snip & Sketch. You can also open this tool by opening the Start menu and locating the Snip & Sketch app.
- When the tool launches, click New and click Snip Now.
- Choose a capture mode from the top of your screen with three options: rectangular snip, free-form snip, and full-screen snip.
- Select an area you want to capture.
- The captured image will appear in a new Snip & Sketch window. At this point, you can annotate, draw, or highlight whatever you want on the screenshot.
- Click the Save icon to save the screenshot to a file. Or click the Copy icon to copy the screenshot to the Windows clipboard so you can paste it elsewhere.
6. Using Windows keyboard shortcuts
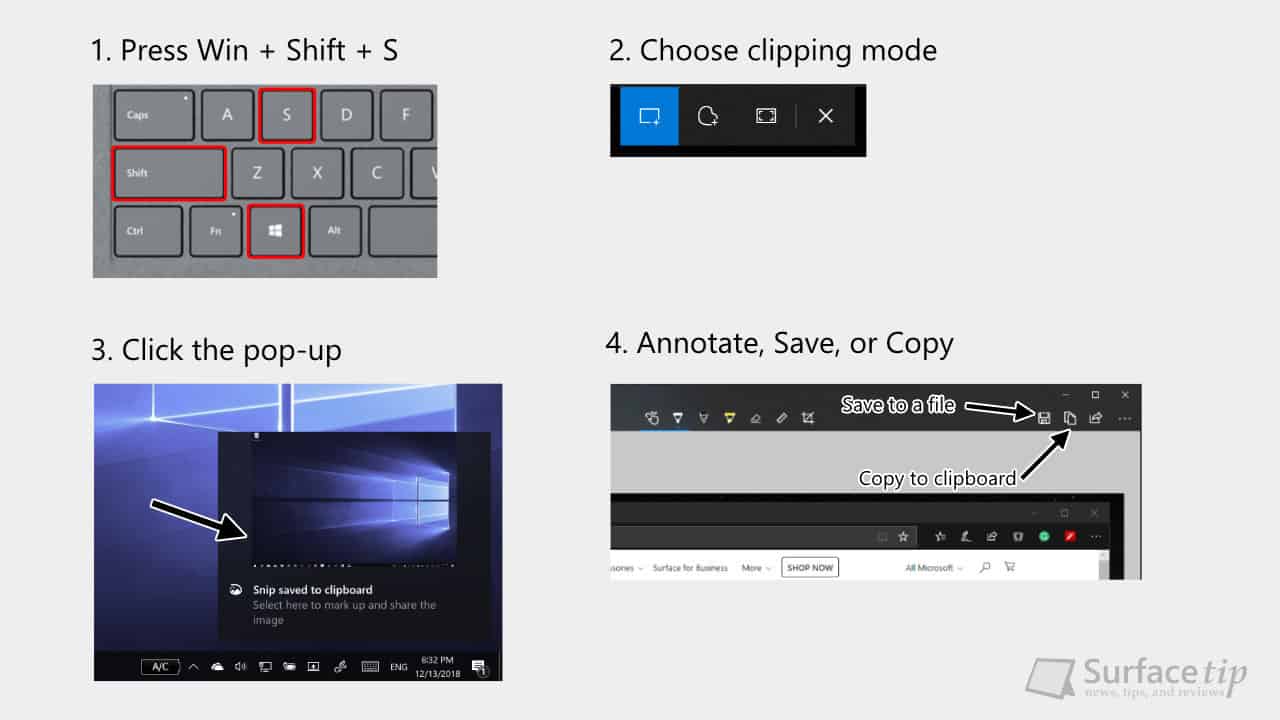
On Windows PC, there is a quick way to activate the Snip & Sketch tool using Windows 10 shortcut keys. To do that:
- Press and hold the Windows key & Shift key, and press and release the S key.
- It will launch the Snip & Sketch tool with the screen clipping mode, so you can select and capture any area you want immediately.
- Now, you can annotate, draw, or highlight the screenshot within the tool.
- Click the Save icon to save the screenshot to a file. Or click the Copy icon to copy the screenshot to the Windows clipboard so you can paste it elsewhere.
FAQs
Check the following frequently asked questions that might answer questions you have.
I can’t take a screenshot with a Surface Pen. What do you think I should do?
Here are the common issues that can prevent your Surface Pen from taking a screenshot on your Surface Pro. That includes:
You didn’t pair the Surface Pen to your Surface Pro – To fully utilize the full functionalities of a Surface Pen, especially the tail eraser, you will need to pair the pen to your Surface. For detailed instructions, you can check our article about how to pair or connect a Surface Pen.
Bluetooth is off – Bluetooth is the wireless signal that Surface Pen and Surface Pro use to communicate and perform activation tasks for the tail eraser button and exchange information. To fix this issue, check if your Surface Pro has Bluetooth turned on.
Surface Pen has a low battery – When the single AAAA battery inside the pen gets low, it will occasionally cause the Surface Pen to lose its functionalities. Check your Surface Pen battery status and replace it if it is too low.
Where do I find my Screenshots on my computer?
The default captures folder for all screenshots on Windows 8, Windows 10, and Windows 11 is in the following locations:
- Pictures library > Screenshots folder
- Local folder: OS drive > Users > USER_NAME > Pictures > Screenshots
- OneDrive folder: OS drive > Users > USER_NAME > OneDrive > Pictures > Screenshots
What are the top third-party software for screen capturing?
Those are the six quick and easy ways to capture a screenshot on your Surface Pro. What is your favorite one? Or do you have any other ways? Please share with us in the comment section below.
COMMENTS
Let us know what you think!
We appreciate hearing your thoughts, questions, and ideas about “The 6 easy ways to take a screenshot on Surface Pro”.
Super helpful! I’ve been using the old method of pasting the screenshot on Paint. Thank you for sharing!
what a pain – it used to be so easy
I dont have a prt scn button on my typecover….how odd.
Surface RT/2/3 and Surface Pro 1-3 keyboard doesn’t have a dedicated Prt Scn key. Alternatively, you can use the “Fn + Windows + Space” shortcut keys to capture the entire screen or the “Fn + Alt + Windows + Space” to capture the active window.
I don’t have printscreen button nor does windows key shift S work. Help?
You might have an older Surface device. The Surface Pro 3 and prior model’s keyboard don’t have the dedicated “Prt Scn” key. Alternatively, you can use the “Fn + Windows + Space” shortcut keys to capture the entire screen or the “Fn + Alt + Windows + Space” to capture the active window.
Holding power and volume up seems easy enough!
This program is so easy to use. Much easier then holding down to random buttons on the side. And I can choose what I was to snip. Awesome!!
I agree with deest. WHAT A PAIN – IT USED TO BE SO EASY and SIMPLE. New is not always better.
I used Solution #1, and it worked perfectly! Thank you!
What happened, yeah ! why it doesn’t work anymore?
I have a surface Pro with Windows 11 and a light pen, I cannot get it to take a screenshot in tablet mode . Holding down power button on Right side and clicking volume up on the left is mot working. Nor is double clicking the pen and trying to use the snipping tool . could someone please help!
Did you pair the light Surface Pen with your Surface Pro? Those functions required a Bluetooth connection between them. Here is how to pair a Surface Pen with your Surface.
PS By Surface Pro I mean a surface Pro 8
after the screen shot, when needed to share directly from the snip the only choice is mail. where can we get like WhatsApp, telegram Facebook and the like?
I think those apps didn’t implement the Windows sharing feature. To share your recent screenshot right after you took it, you simply use the keyboard shortcut Ctrl + V to paste it into the chat box in those programs or websites.
Do you have a solution for a surface without a keyboard? I tried the pen method and nothing happened. Nor did the volume and power button. And for the others, I don’t have my keyboard with me right now. Any solutions?
Thank you so much admin for the great post
Great roundup! Appreciate the step by step and the detailed screenshots. Easy to understand your instructions. I tried 2 methods and both worked for my Surface Pro 3. This was a very helpful post. Thank you very much, Evan.