
Surface Pro uses an in-house UEFI firmware developed by Microsoft to improve device protection, security, and its exclusive features support hardware functionality. It will show you a message or an icon on the screen when it finds something wrong during the booting process. So you will know what is wrong and what you should do to fix the issue. That includes when your Surface Pro is overheating or has a low battery.
However, there are so many other causes that can also prevent your Surface tablet from turning on. And some won’t show any messages or any signs on the screen. In this troubleshooting guide, we walk you through all possible issues and how to fix them with a step-by-step guide.
Table of Contents
Why is my Surface Pro not turning on?
To help you identify the issue that blocks your Microsoft Surface from turning on, here are the common causes, starting with the most common and easy to fix.
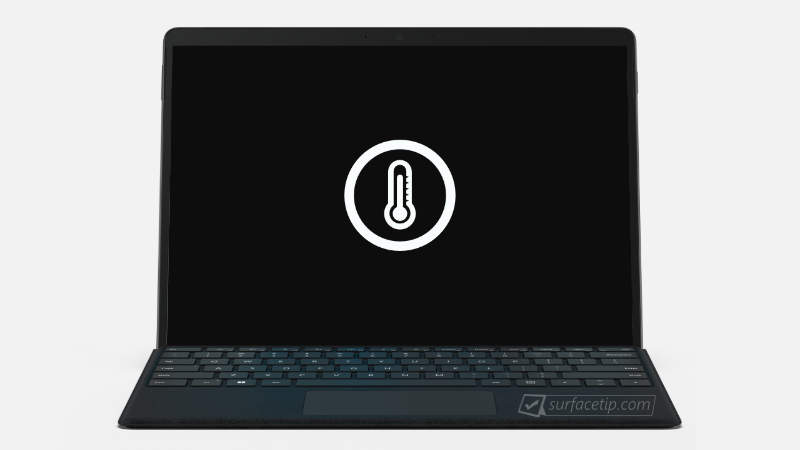
- Overheating – Your device can be overheating after playing games or excessive use in a hot environment or under direct sunlight. When the temperature peaks, your Surface Pro will shut down and temporarily refuse to turn on until the device temperature returns to optimal. In this situation, you see a thermometer icon when you try to turn it on.

The Surface Pro is overheating and not turning on temporarily.
- The battery is too low – It happens when you leave your tablet for an extended period. Or there is a battery draining issue on your Surface Pro. Unlike traditional laptops, the Surface has its new modern standby feature to keep your tablet life updated even if it’s in sleep mode. When in normal condition, it barely drains the battery. However, some traditional software processes may prevent your tablet from going to standby mode. In this situation, you see a low battery icon when you try to turn it on.
Surface Pro has a low battery, and recharge is required.
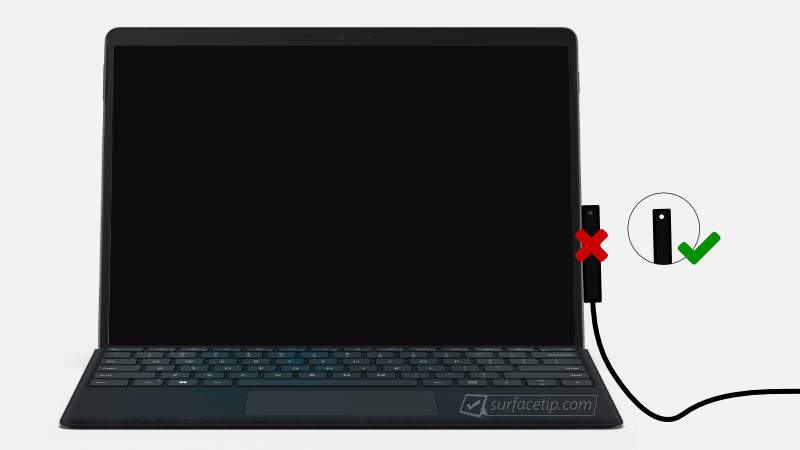
NoteIf the battery is empty, you can expect nothing to appear on the screen when you try to turn it on. - Surface charging issue – If you’ve tried to charge your Surface and it still does not turn on, it could be an issue with the charger and cable. The original Surface power supply has an LED on the connector at the end of the cable. The LED will light up when it’s charging. A flashing or no light at all means it’s not charging.
Surface Pro won’t charge.
- Faulty-connected accessories – There is a possibility that some faulty accessories can prevent your Surface PC from turning on. Your tab might detect a shorted circuit inside those accessories and refuse to turn on. Another possibility is a connected USB drive or SD card containing bootable files that your Surface Pro might attempt to boot.
Surface Pro is stuck on Microsoft or Surface Logo.
- Stuck in standby or sleep mode – Some un-optimized background processes might prevent your Surface Pro from waking up when you press the power button or keyboard.
- Dead battery – It tends to happen if you use your Surface Pro over a long period. Your battery might wear and stop charging enough to turn on your device.
- Hardware issue – Most faulty hardware components will likely interrupt the booting process. Among those, the motherboard is the most crucial part of a system. If there is a loose cable, connector, or faulty components on the mainboard, you’ll need an expert or contact Microsoft for repair.

How to fix a Surface Pro that isn’t turned on
Now it’s time to resolve your Surface Pro issue that won’t wake up or turn on. When you press the power button and see nothing appear on your Surface Pro screen, one of the following solutions will help your Surface Pro to turn on again.
Recharge your Surface Pro
One of the most common reasons your Surface Pro can’t turn on is the battery running out of juice. To protect your Surface battery from wear or death, Microsoft has designed multi-level protection features from Windows to the device’s firmware to prevent your Surface Pro from turning on.
To solve this issue, recharge your Surface Pro using the original charger with your Surface or any compatible power adapters. To do so:
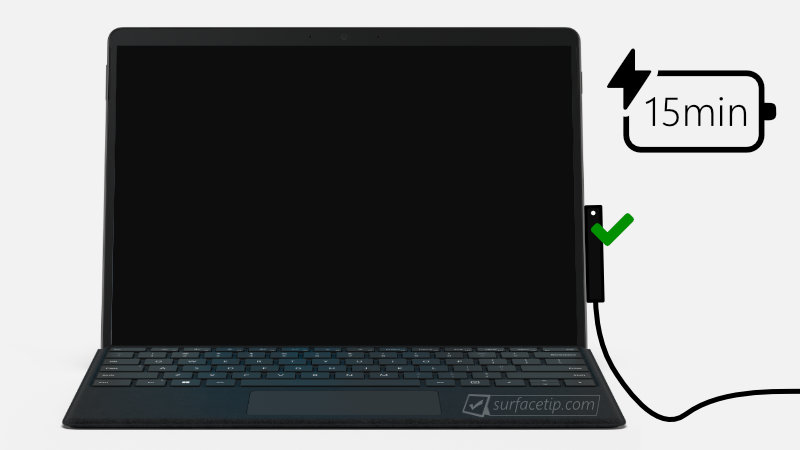
- Plug your Surface charger into an outlet.
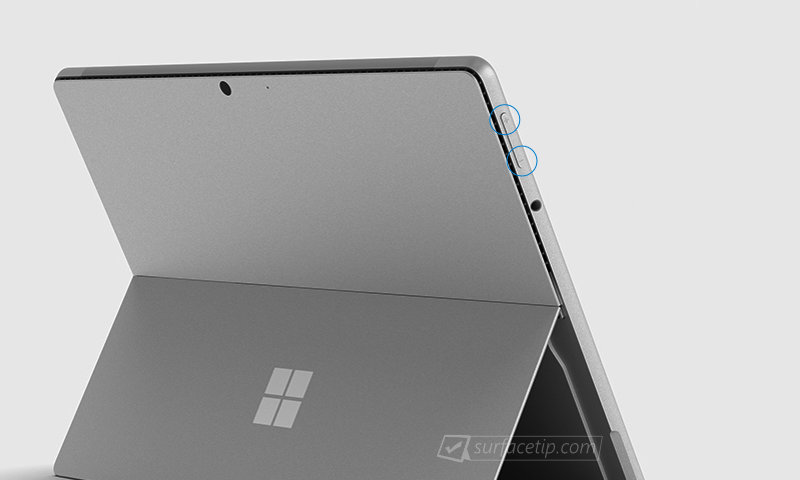
- Plug the Surface charging cable into your Surface Pro charging (Surface Connect) port. The port is on the right side of the tablet.
- Leave it on charge for 5 to 15 minutes, depending on how powerful the charger is. Try to turn it on again by pressing the power button.
If your Surface Pro fails to turn on, leave it on charge for an hour and try again. If it fails again, follow the next step to check the Surface power supply and cable.
Check the charger
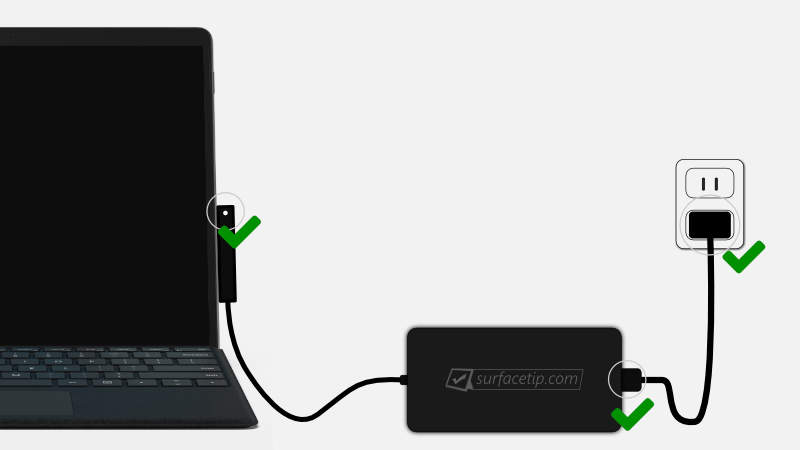
If your Surface Pro doesn’t turn on after you try plugging in the charger in the previous solution, it could be an issue with your Surface charger adapter, connector, or cable.
To verify that, you can check the LED light on the end of the connector. When you plug in an original charging cable, the LED will let you know if your Surface Pro is properly charging. Otherwise, check the following solutions.
Verifying Surface Pro Charging
- Solution 1 – Reverse the charging connector: The Surface charging connector is magnetic and reversible. If there are some loose or don’t firmly connect on one side, you can try to turn it upside down and connect it again. Check the LED to see if it lights up or not.
- Solution 2 – Check your power cord: Verify that the Surface charger power cord is connected firmly to the power socket. The power outlet is connected to a power source and turned on.
- Solution 3 – Check your Surface charger: The charger has a detachable AC plug. Make sure the connector is firmly attached.
- Solution 4 – Clean your Surface charging connector: Unplug your charger from the outlet and your Surface. Use a dry tissue to rub around the connector pins. Make sure there is no rust or dirt.
- Solution 5 – Try another charger: The original Surface charger is cross-compatible among all Surface devices except the original Surface RT/2 and Surface Pro/Pro 2. If you have a charger from Surface Go, Book, or Laptop with the same connector, it will be 100% compatible with your Surface Pro.

Remove accessories
To make sure none of the connected accessories interrupt the booting process, try to remove each accessory one by one and turn it on:
- Remove all storage devices, including USB drives and SD cards (located under the kickstand).
- If you use Surface Dock, disconnect it from your Surface Pro and charge with a charger instead.
- Remove the Surface Type Cover.
- Disconnect peripherals from all ports, including the charger.
If your Surface Pro turns on successfully, the last accessory you remove may be the problem.
Waking up with hotkeys or buttons
If you have an outdated OS build, drivers, or firmware, you might face issues that Microsoft hasn’t addressed lately. Your Surface Pro can get stuck while it’s in sleep mode. Microsoft recommends waking up your Surface Pro using a keyboard shortcut or pressing the tablet buttons.
- Waking up Surface Pro with a keyboard shortcut. Connect your Surface Pro to a Type Cover, Touch Cover, or an external keyboard, and press the following keys: Win + Ctrl + Shift + B

- Waking up Surface Pro in tablet mode – If you don’t have a Type Cover or a keyboard nearby, quickly press both the Volume-up and Volume-down buttons on the tablet three times.


If it works, don’t forget to update your device to the latest updates available through Windows Updates.
Soft reset or force restart
If your Surface tablet refuses to wake up or turn on after following the steps above, there is a way to force the shutdown of your tablet.
To perform a force shutdown on newer Surface Pro devices, including Surface Pro(5th Gen), Surface Pro 6, Surface Pro 7, Surface Pro 8, and Surface Pro X:
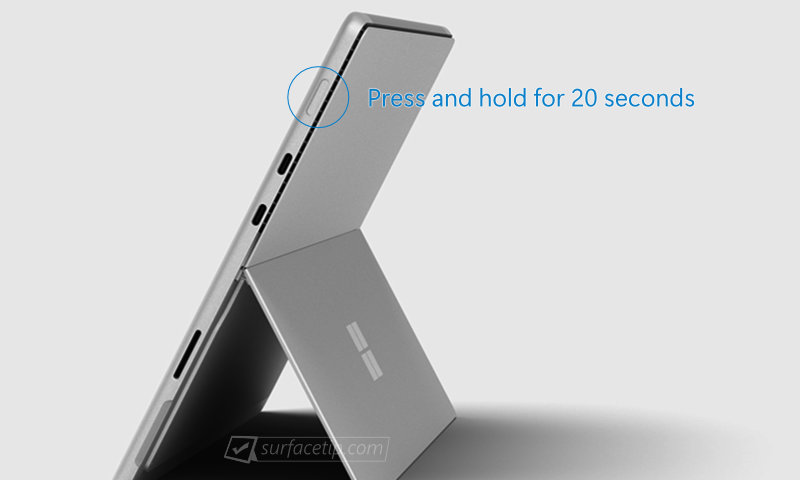
- Press the power button until your Surface Pro shuts down and restarts to the Windows logo. It takes about 20 seconds, then releases the power button.
To perform a force shutdown on older Surface Pro devices, including the original Surface Pro, Surface Pro 2, Surface Pro 3, and Surface Pro 4:
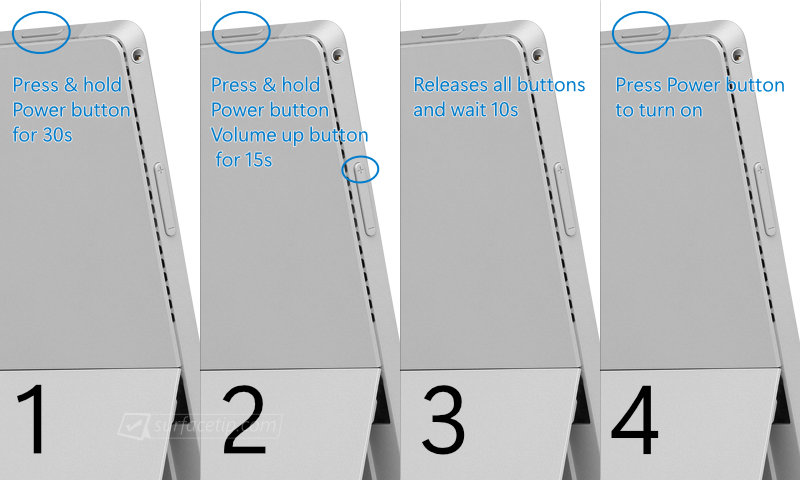
- Press the power button for about 30 seconds, then release it.
- Press and hold the volume-up and power buttons for about 15 seconds until the screen turns off. Then, release the buttons.ImportantYou might see the Surface logo flashing while pressing the buttons. Keep holding for at least 15 seconds.
- Wait ten seconds after releasing the buttons. Now it’s completely turned off.
- Press and release the power button to turn on your Surface Pro.
Contact Microsoft technical support
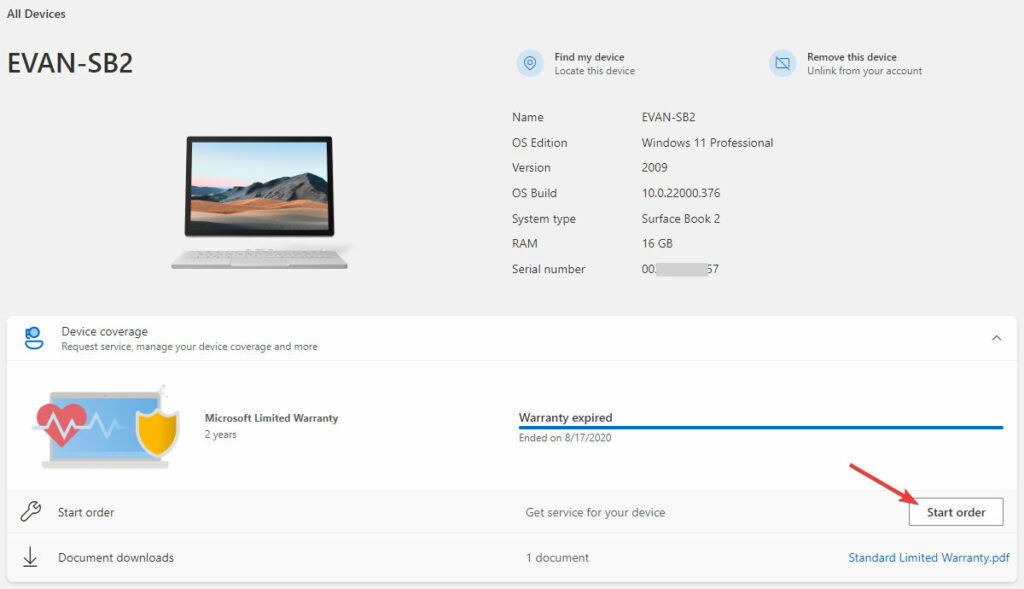
If you’ve tried all the steps above and have had no luck, your Surface Pro might have a dead battery or hardware issue. You should contact the store you purchased the device from or contact your local Microsoft Store for technical support. Alternatively, Microsoft also provides an online device service and repair portal where you can request a repair order for your Surface Pro. To do so:

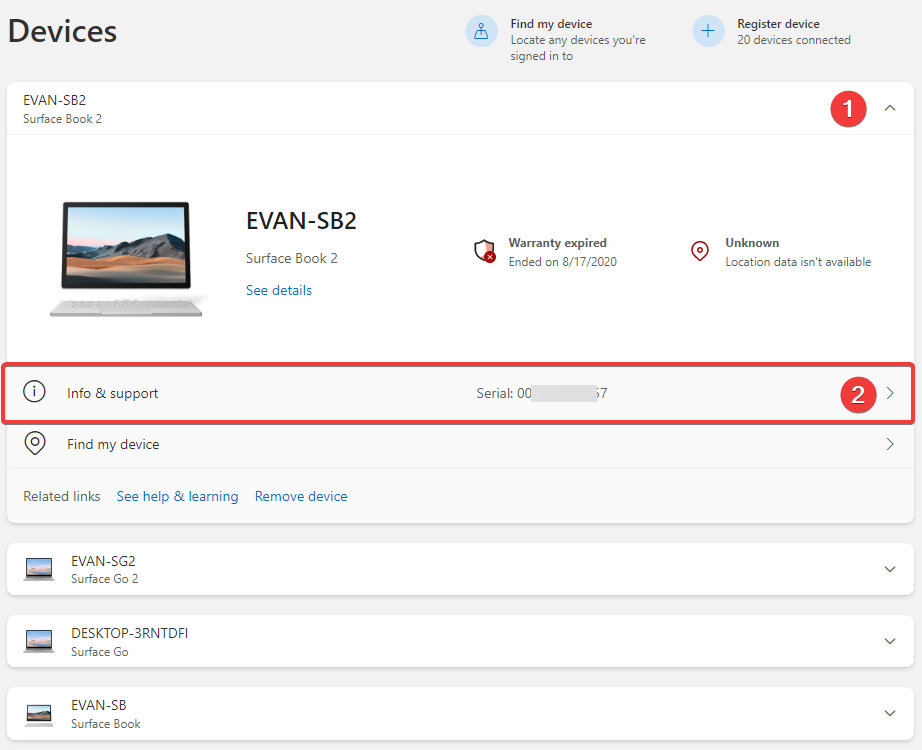
- Go to https://account.microsoft.com/devices
- Sign in with your Microsoft Account.
- Expand a registered Surface model for which you want to make a repair order.
- Select Info and support.

- Select Start order.

- Choose “Device” from the “Category” options.
- Choose “Will not turn on” from the “Issue type” options.
- Describe your issue in the textbox and click Next.

- Follow the instructions to fill out your shipping address and other information.


COMMENTS
Let us know what you think!
We appreciate hearing your thoughts, questions, and ideas about “Surface Pro Won’t Turn On: Fixes and Troubleshooting Guides”.