Microsoft has created a unique UEFI firmware for all its recent Surface devices. This firmware includes security features to safeguard users against pre-boot and boot sequence attacks. One of the essential features of this firmware is Secure Boot, which is precisely engineered to prevent unauthorized operating systems and malicious software applications from booting on your Surface device.
The feature is enabled by default and can be disabled via Surface UEFI. In case it gets disabled, your Surface will notify you by showing up an alert notification right when you turn on your Surface.
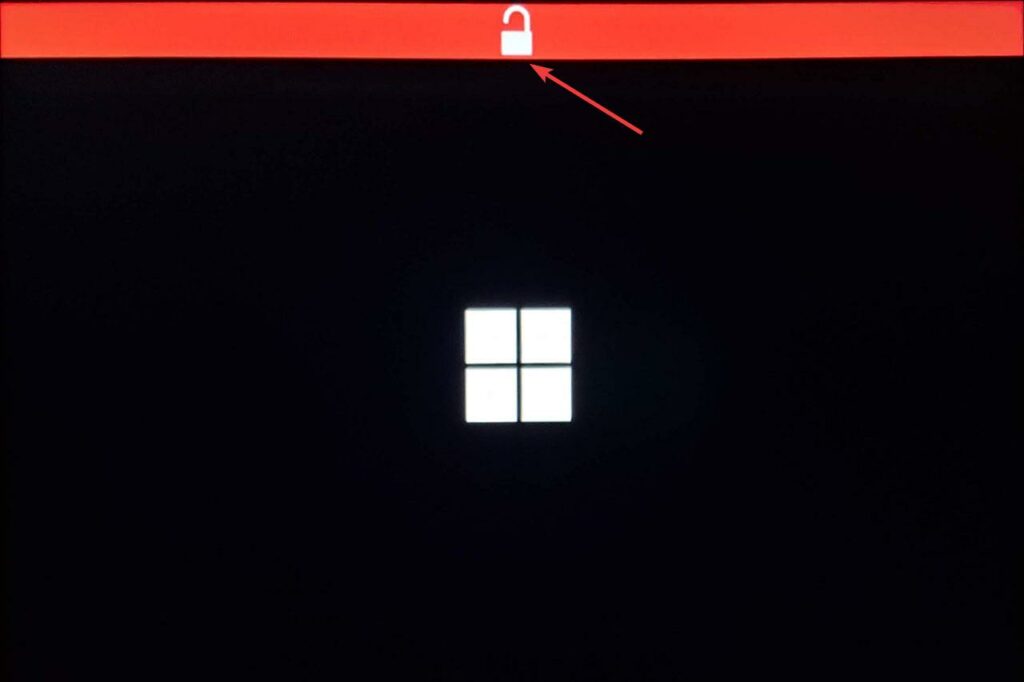
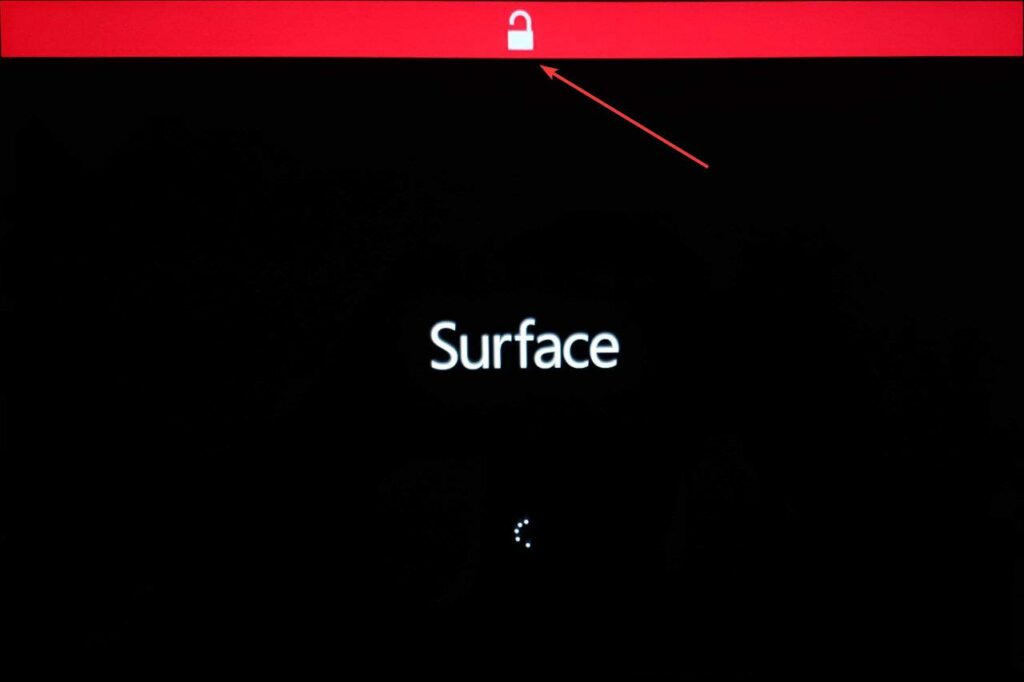
If you see a red stripe and an open padlock on your Surface Boot screen, there is likely something wrong with Surface’s Secure Boot or other security configurations.
Table of Contents
What does Surface Boot with Red Bar Look Like?
Here’s what it looks like on Surface devices released in 2017 and later.
Here’s what it looks like on Surface devices released before 2017.
How to Boot into Surface UEFI Firmware Settings
You can boot your Surface into the UEFI menu by using the following methods:
- Method 1: Hardware Buttons or Keyboard
- Method 2: Windows Recovery Settings
Let’s get into the details of each method.
Method 1: Boot to Surface UEFI via Hardware Buttons or Keyboard
To boot into the Surface UEFI menu on Surface Pro 3, Surface Pro 4, Surface Pro 5, Surface Pro 6, Surface Pro 7, Surface Pro 8, Surface Pro 9, or Surface Pro X, do the following:
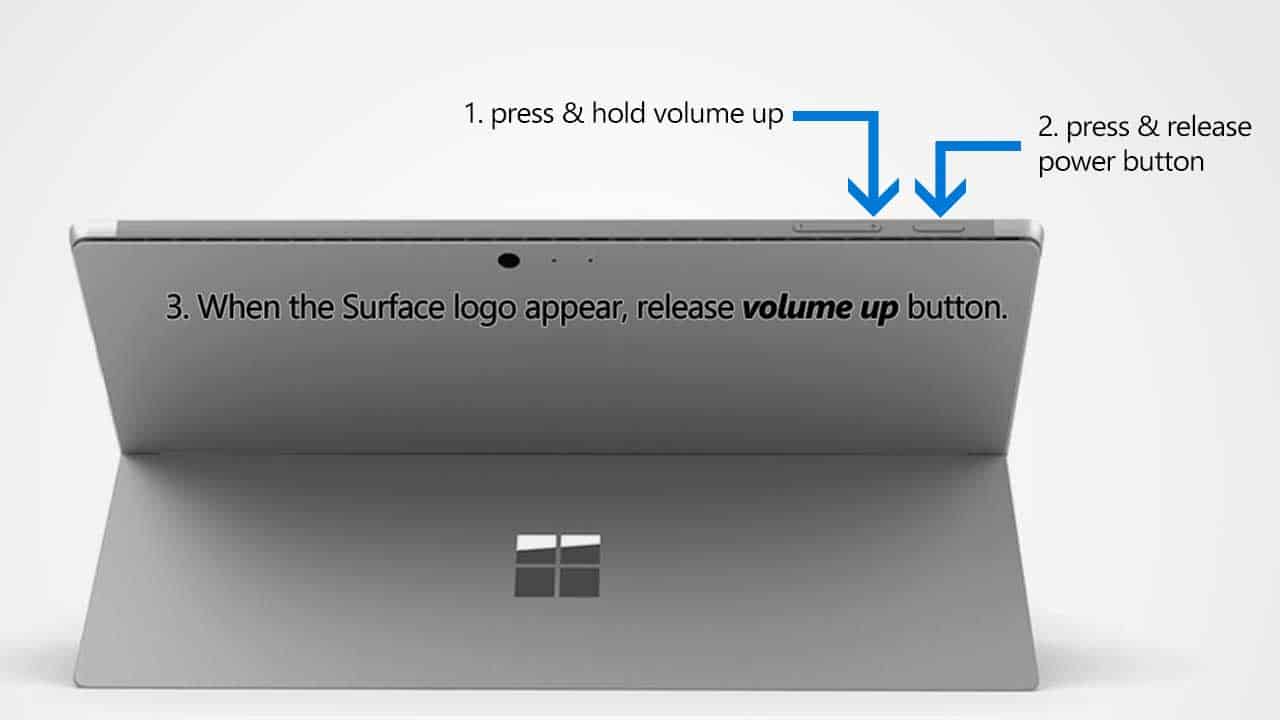
- Shut down your Surface Pro.
- Press and hold the Volume Up button on your Surface, then press and release the Power button.
- When you see the Surface logo screen appear, release the Volume Up button. The Surface UEFI screen will appear in a few seconds.
To boot into the Surface UEFI menu on Surface Laptop (1st Gen), Surface Laptop 2, Surface Laptop 3, Surface Laptop 4, Surface Laptop 5, Surface Laptop Go (1st Gen), Surface Laptop Go 2, Surface Laptop SE, or Surface Laptop Studio, do the following:
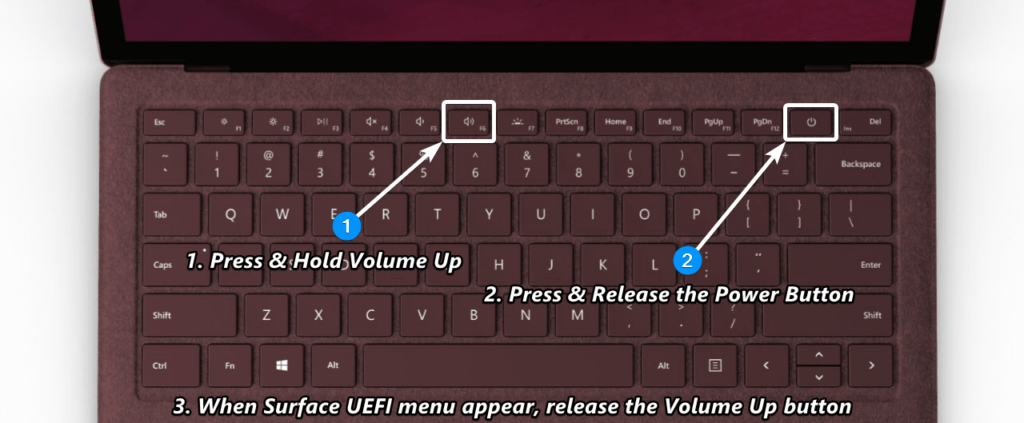
- Shut down your Surface Laptop.
- Press and hold the Volume Up (F6) key on your Surface, then press and release the Power Key next to the Del key.
- When you see the Surface logo appear, release the Volume Up button. The Surface UEFI screen will appear in a few seconds.
To boot into the Surface UEFI menu on Surface Book (1st Gen), Surface Book 2, or Surface Book 3, do the following:
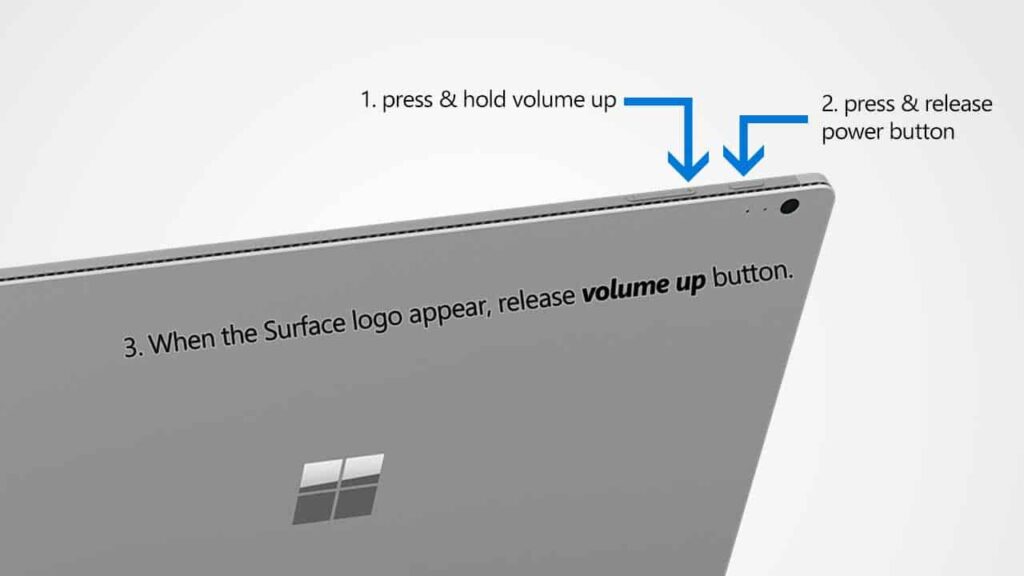
- Shut down your Surface Book.
- Press and hold the Volume Up button on your Surface, then press and release the Power button.
- When you see the Surface logo screen appear, release the Volume Up button. The Surface UEFI screen will appear in a few seconds.
To boot into the Surface UEFI menu on Surface Go (1st Gen), Surface Go 2, or Surface Go 3, do the following:
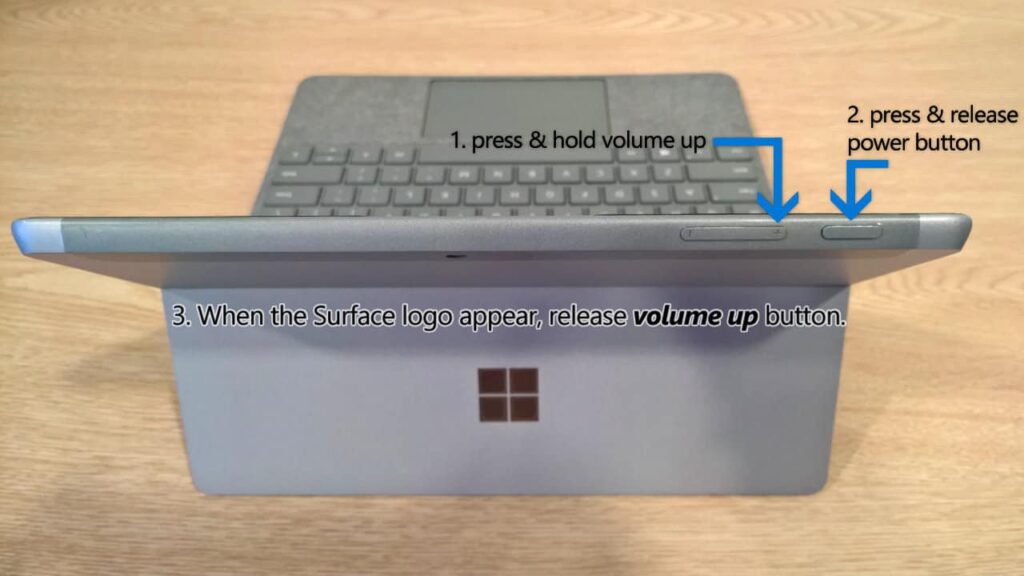
- Shut down your Surface Go.
- Press and hold the Volume Up button on your Surface, then press and release the Power button.
- When you see the Surface logo screen appear, release the Volume Up button. The Surface UEFI screen will appear in a few seconds.
Method 2: Boot to Surface UEFI via Windows Recovery Settings
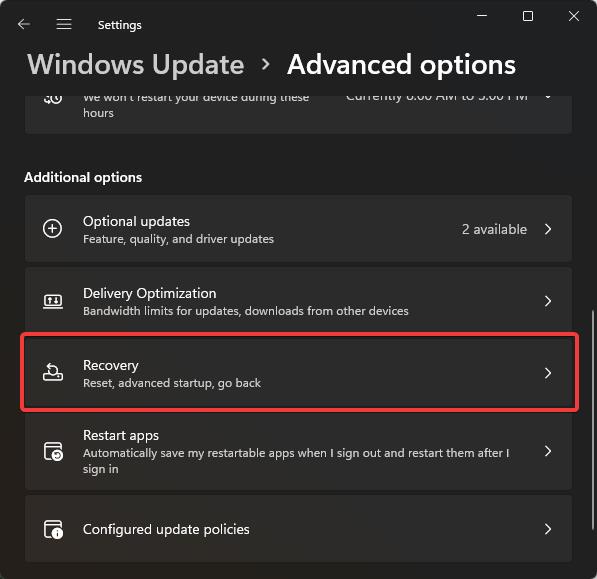
- Open Windows Settings
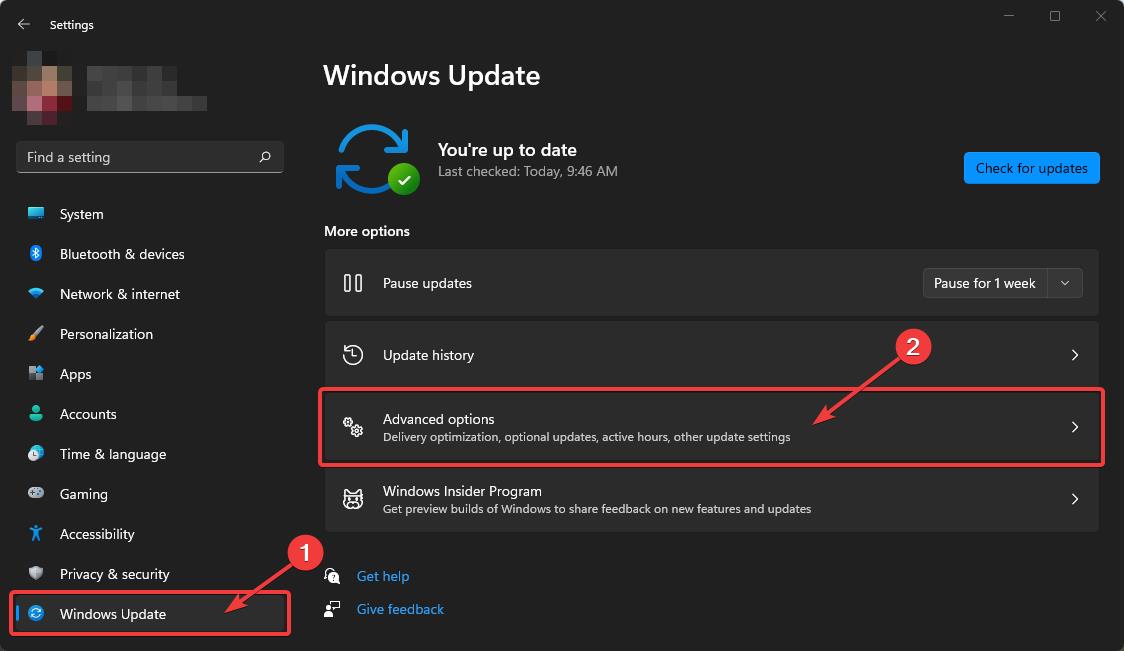
First, you need to access Windows Settings by going to Start and opening the Settings app with the gear icon (or by using Win + I shortcut key). - Go to Windows Updates > Advanced options
On the left pane of the settings, select "Windows Updates". Then select "Advanced options" from the more options section.

- Select the "Recovery" option
Under the "Additional options", select "Recovery".

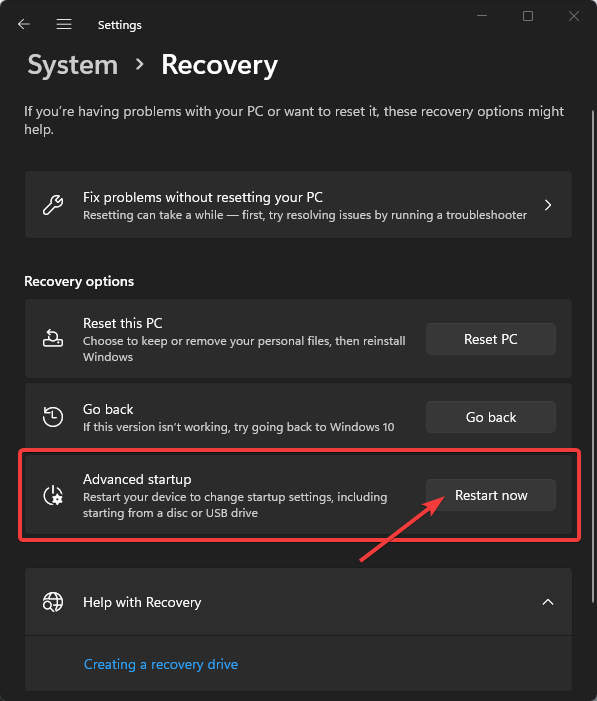
- Restart your Surface Laptop in "Advanced Startup" mode.
Under recovery options, click the "Restart now" button to restart your Surface Laptop in advanced startup mode which will allow you to change startup settings.

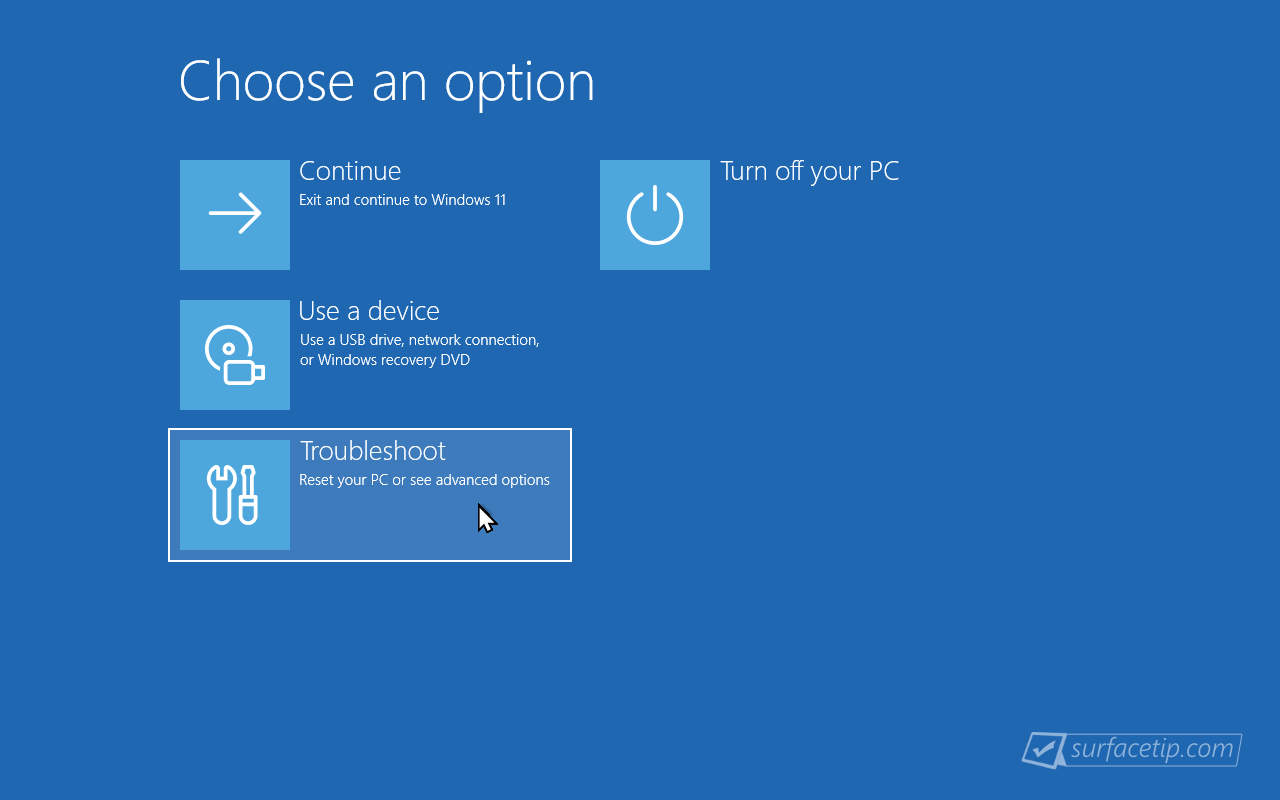
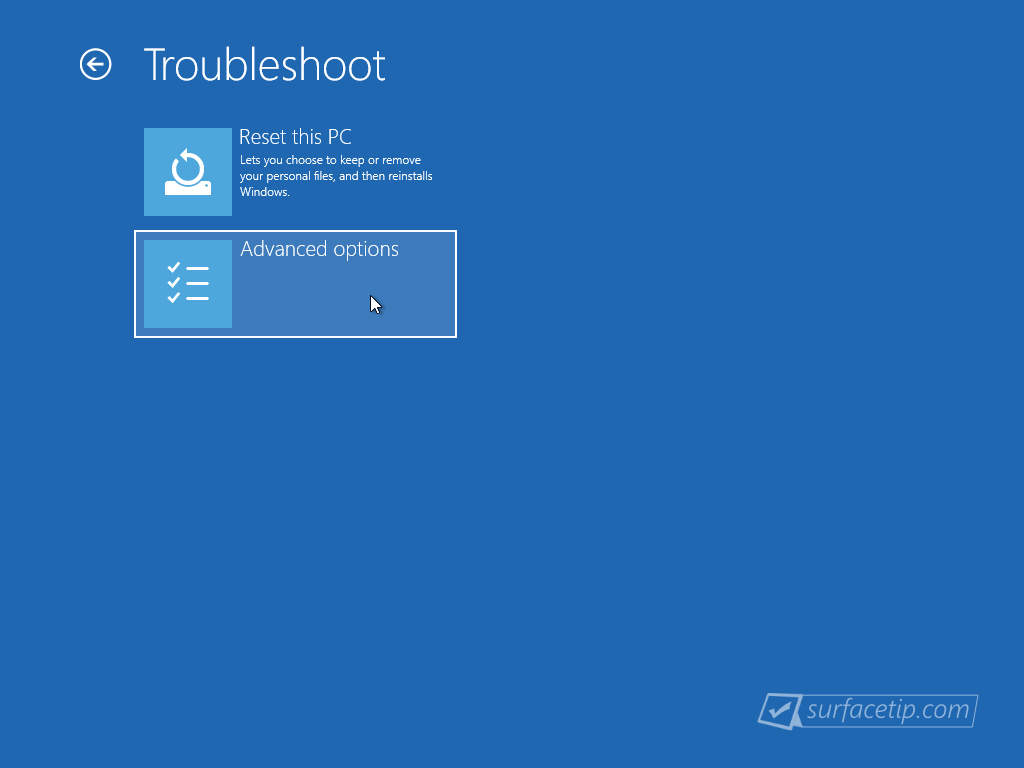
- Select "Troubleshoot"
After your Surface is restarted, you will see a blue screen with the following options. Select "Troubleshoot".

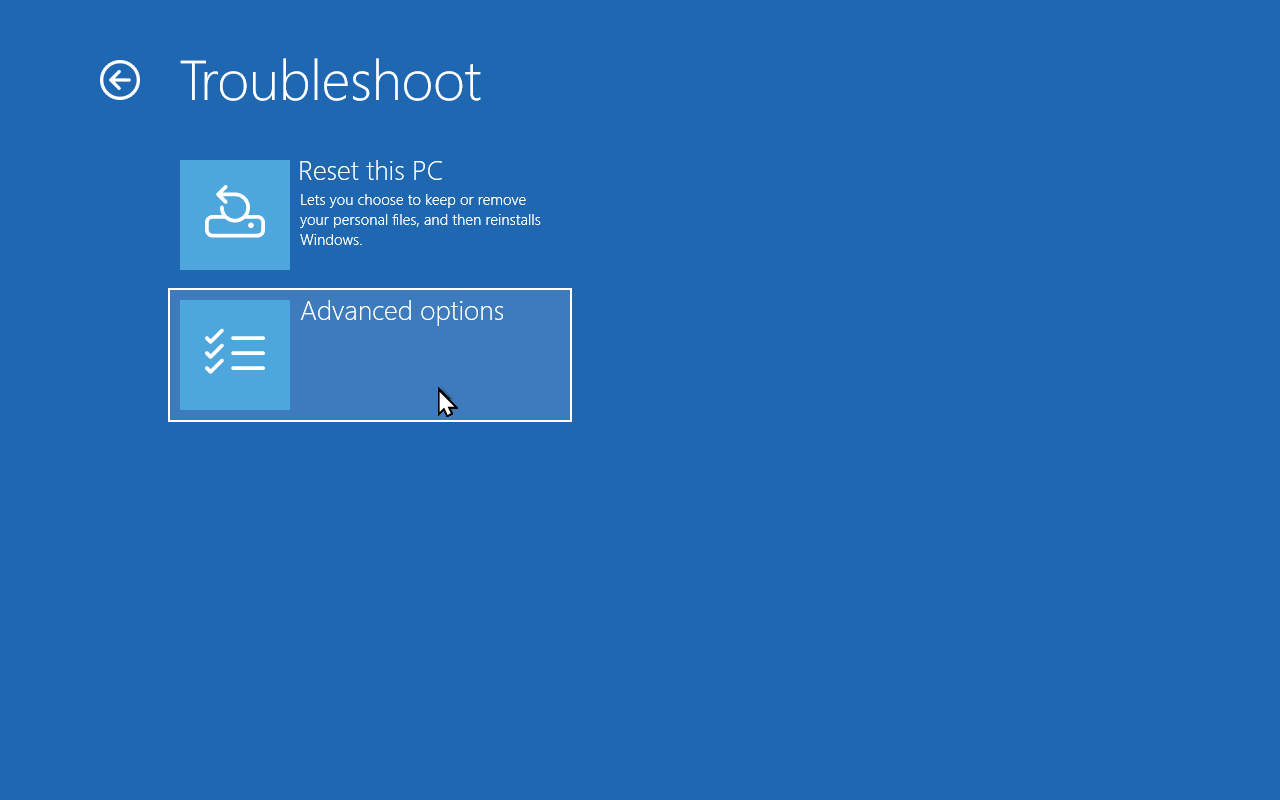
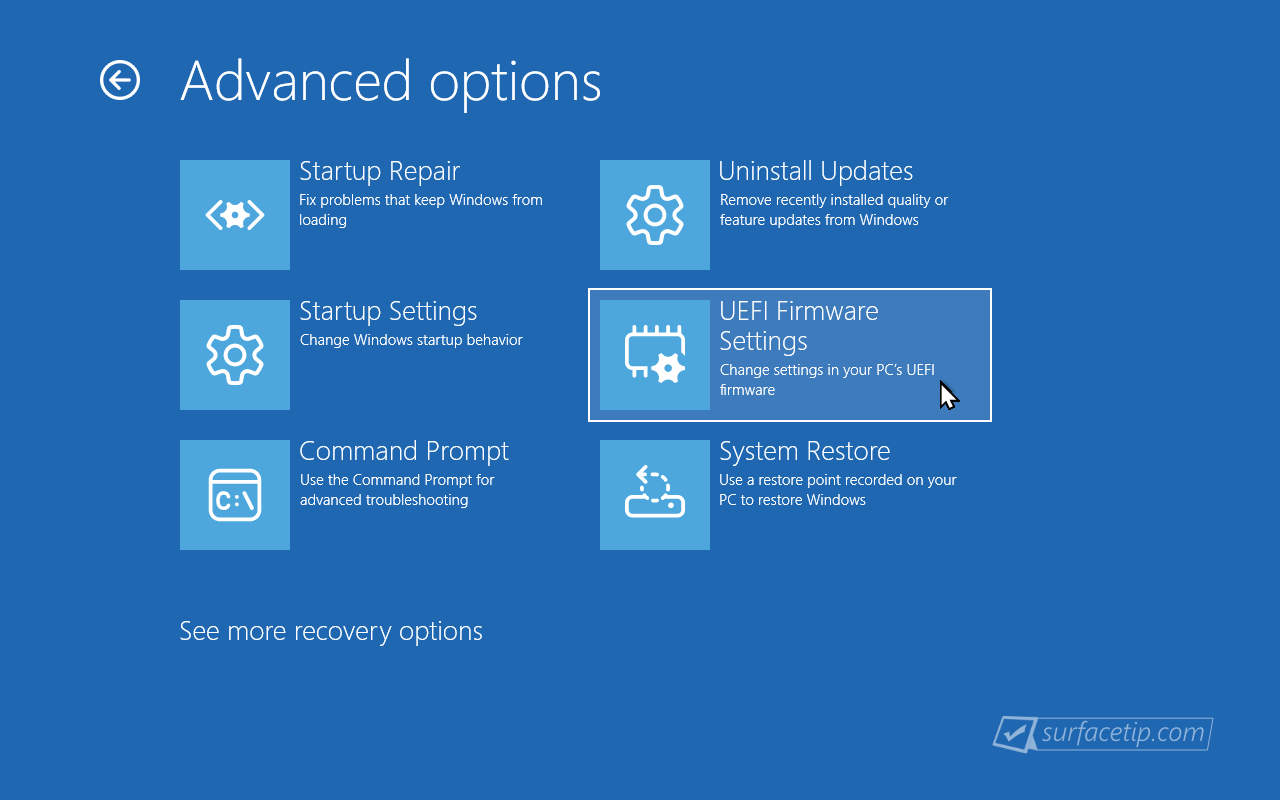
- Select "Advanced options".
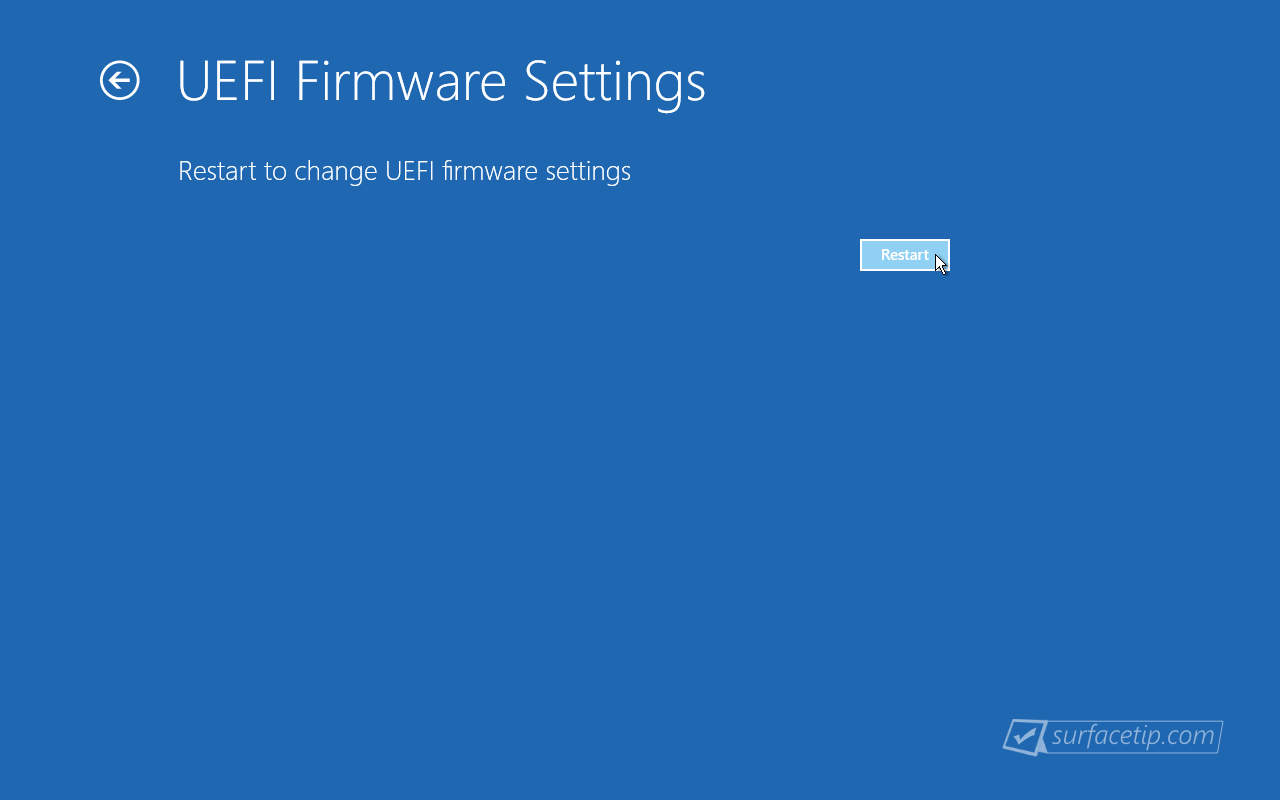
- Select "UEFI Firmware Settings".
- Select "Restart" to restart your Surface directly into the UEFI Firmware Settings.

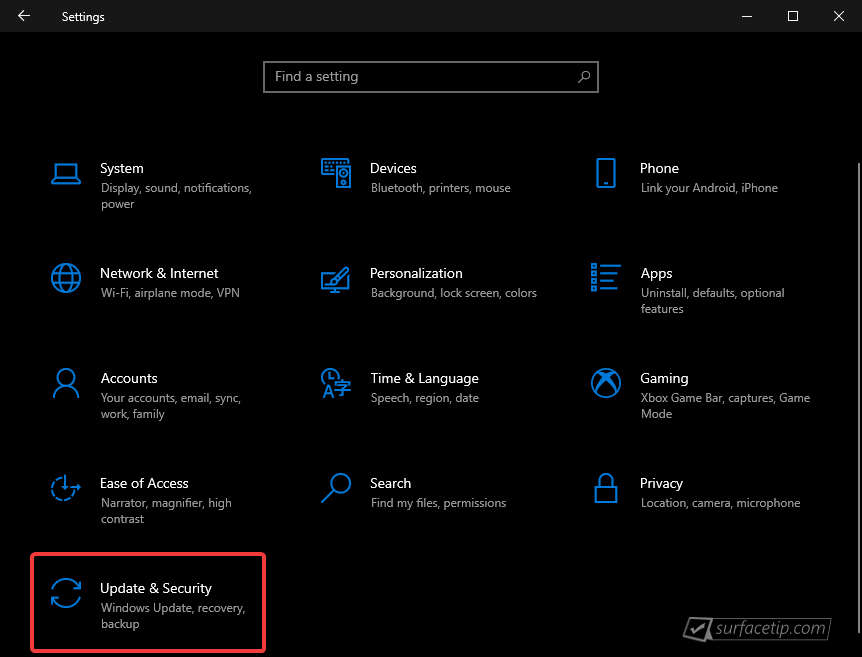
- Open Windows Settings
First, you need to access Windows Settings by going to Start and clicking the Gear icon (or by using Win + I shortcut key). - Go to Update & Security
In Windows Settings, select "Update & Security".

- Go to Recovery
On the left side of the settings, select Recovery.
- Restart your Surface in Advanced Startup
Under the "Advanced startup" section, click Restart now to restart your Surface in an advanced startup mode.
- Select "Troubleshoot"
After your Surface is restarted, you will see a blue screen with the following options. Select "Troubleshooting".
- Select "Advanced options".

- Select "UEFI Firmware Settings".
- Select "Restart" to restart your Surface directly into the UEFI Firmware Settings.


Configuring UEFI Settings to Remove the Red Bar from Surface Boot Screen
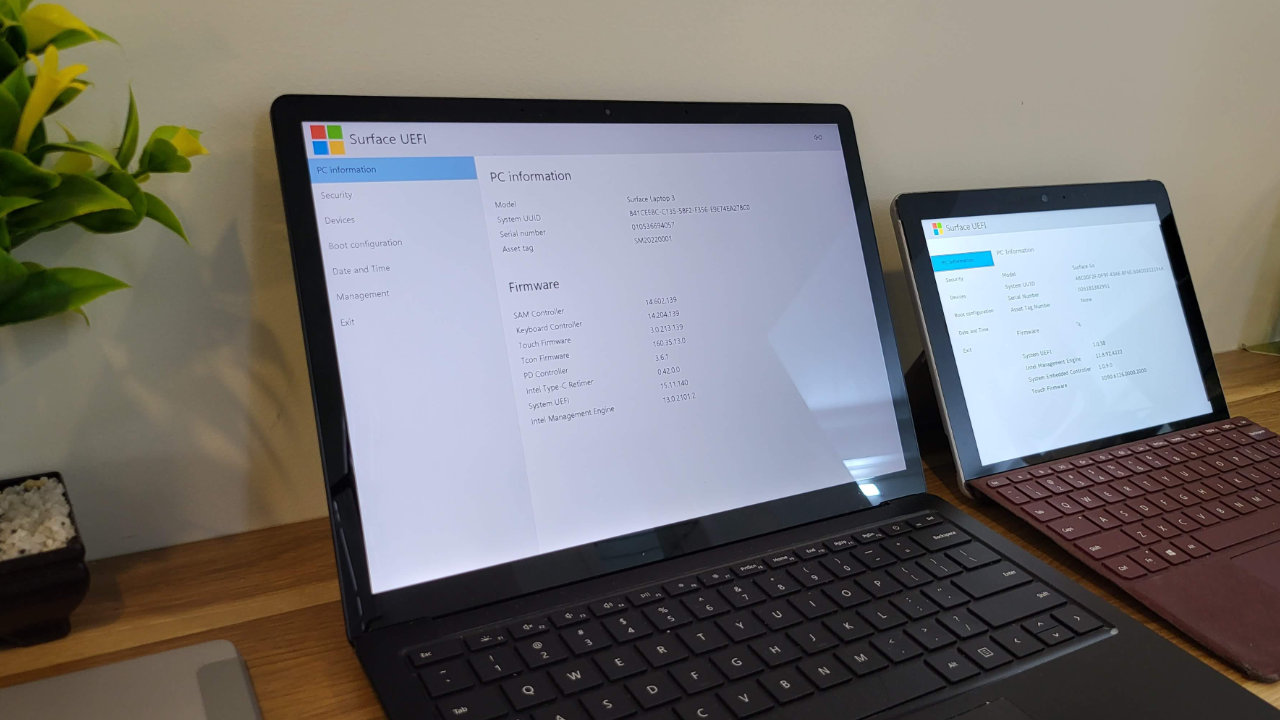
To get a clean look at your Surface devices, go to Surface UEFI and re-enable the Secure Boot security feature.
On Surface Pro 4, Surface Pro (5th Gen), Surface Pro 6, Surface Pro 7, Surface Pro 8, and Surface Pro X:
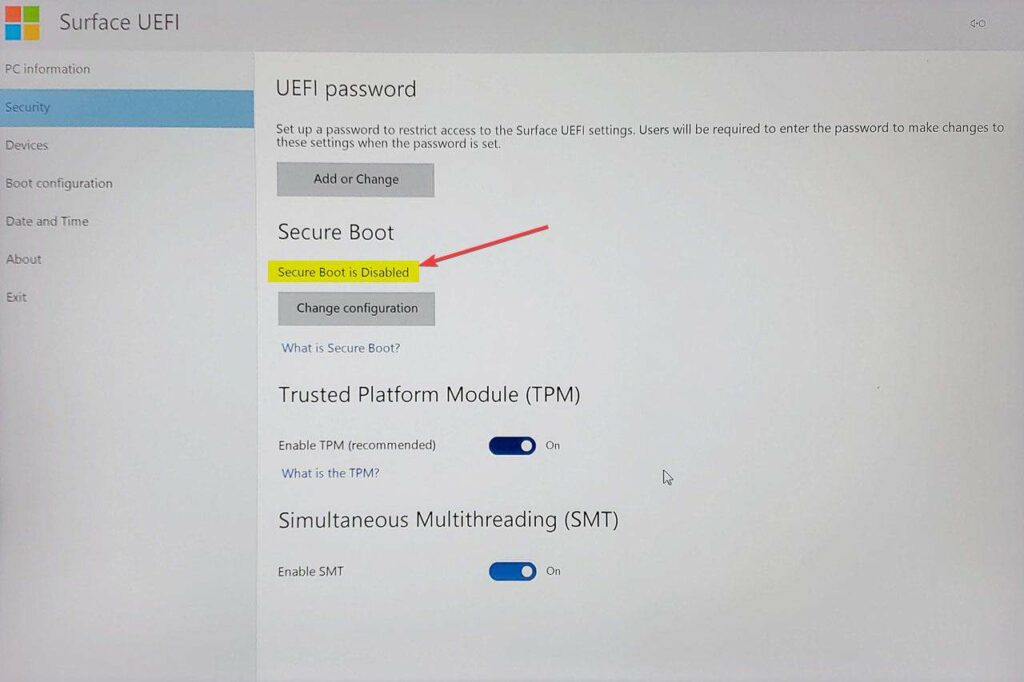
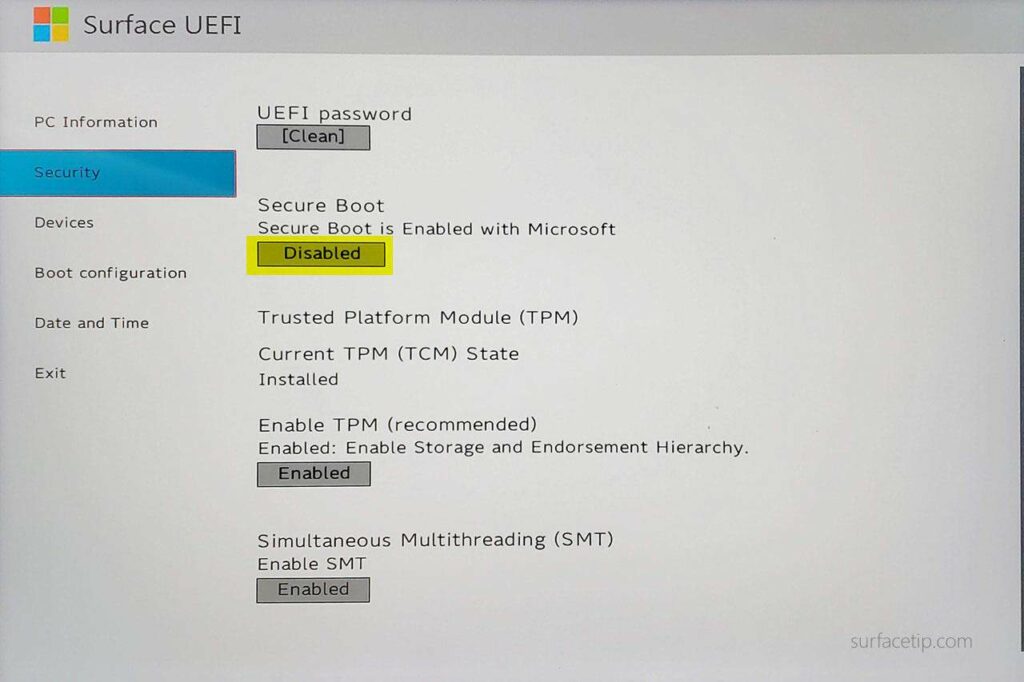
- Go to the Security page, under the Secure Boot section, and click the “Change configuration” button.
You can notice that the current setting for Secure Boot is Disabled.

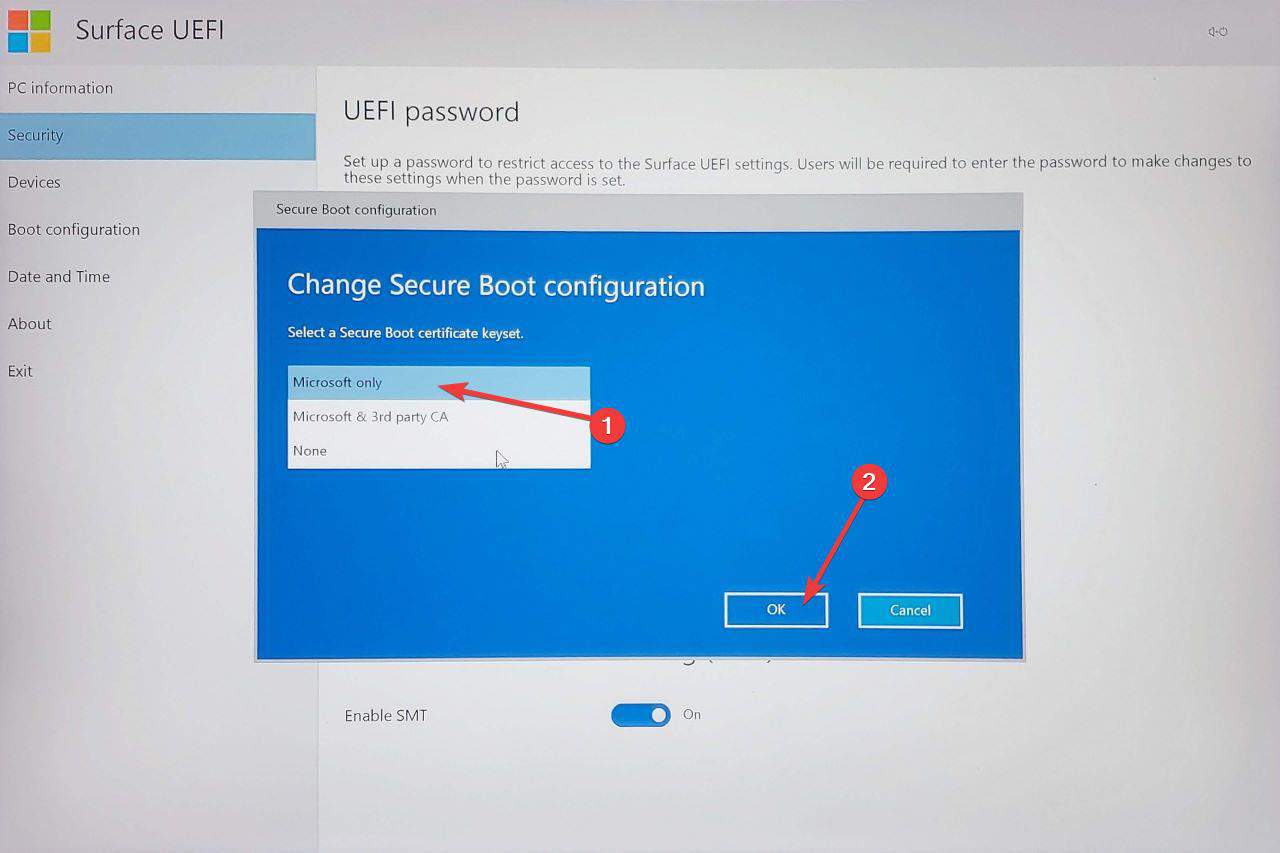
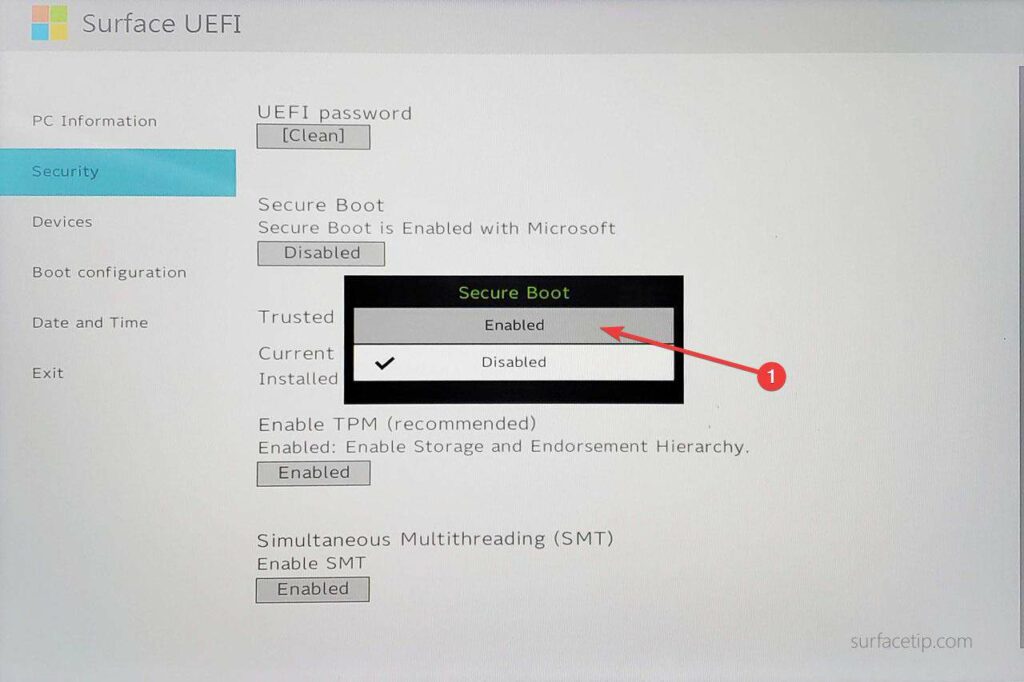
- On the “Change Secure Boot configuration” dialog, change the option to “Microsoft only” and click OK to apply the option.

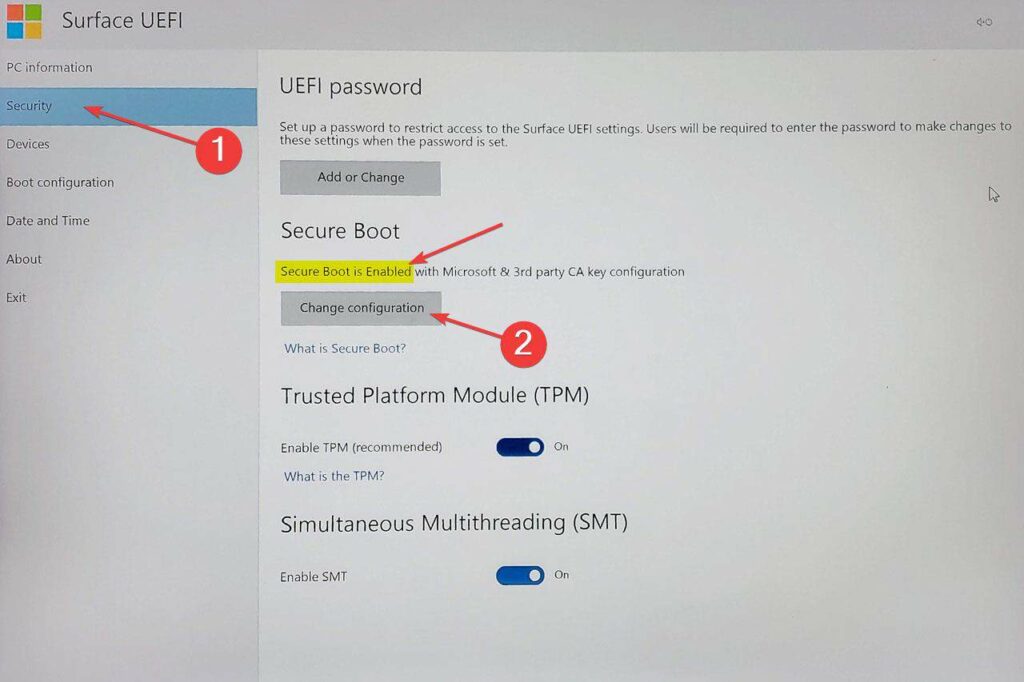
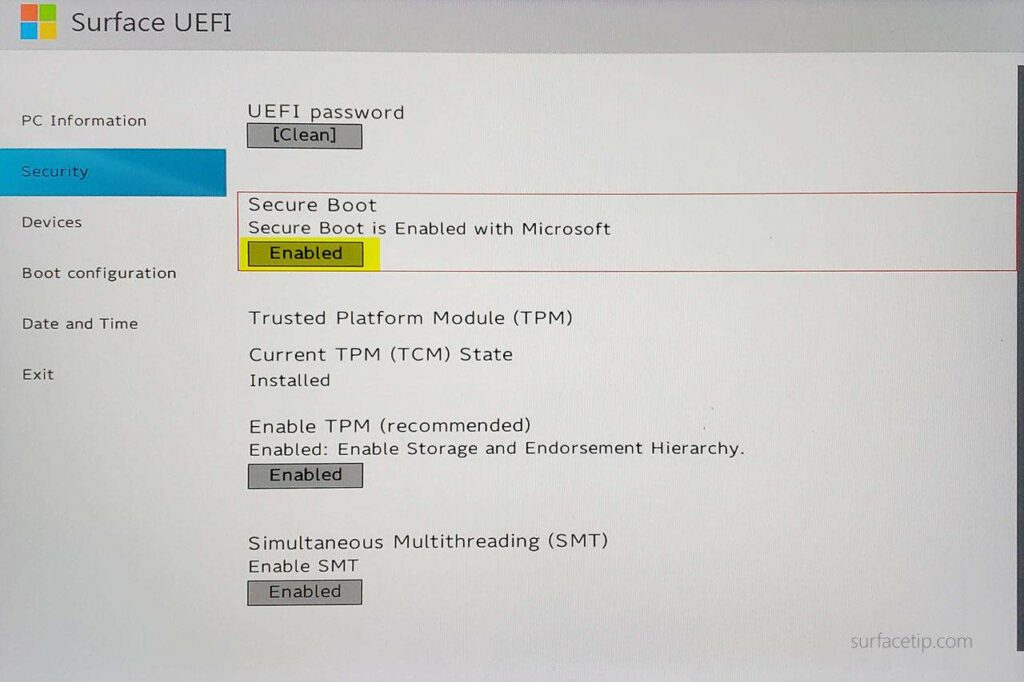
- Now, the current setting of Secure Boot will be changed to Enabled.
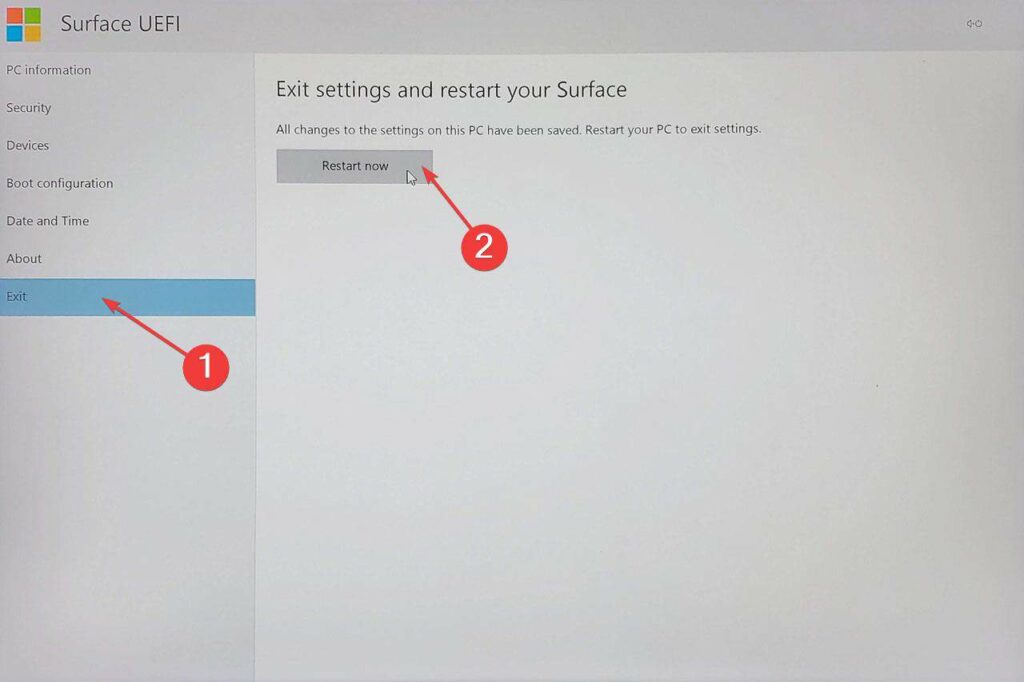
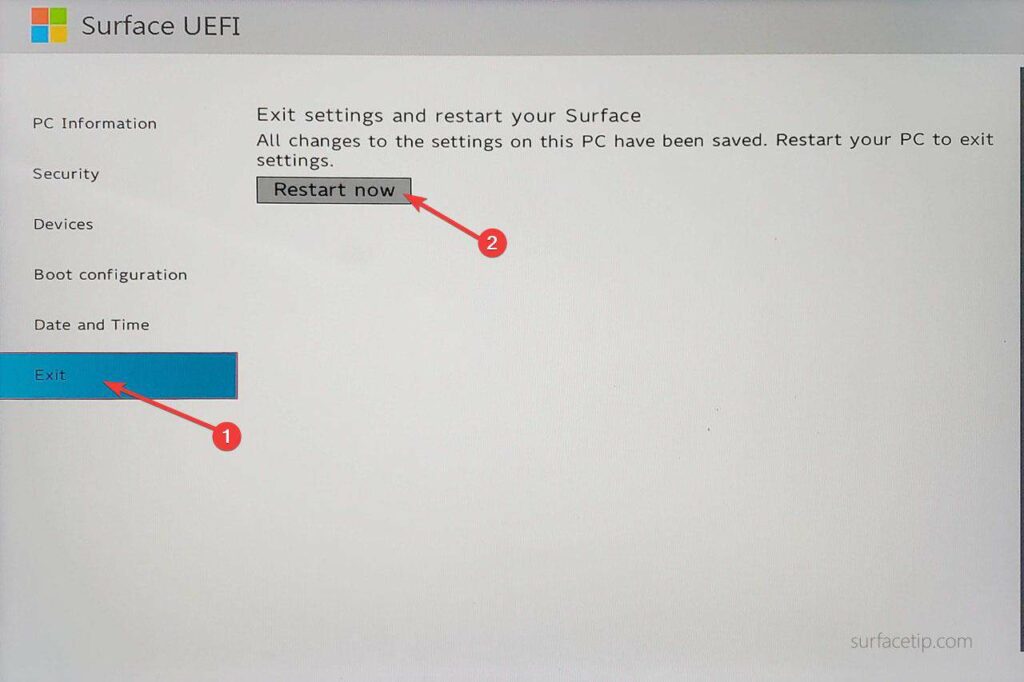
- Go to the Exit page, click the “Restart now” button to save the settings, and restart your Surface.
- After rebooting, the red bar with an unlocked lock icon in the middle of the screen should disappear, which means the Secure Boot is successfully enabled.
On Surface Laptop (1st Gen), Surface Laptop 2, Surface Laptop 3, and Surface Laptop 4:
- Go to the Security page, under the Secure Boot section, and click the “Change configuration” button.
You can notice that the current setting for Secure Boot is Disabled.
- On the “Change Secure Boot configuration” dialog, change the option to “Microsoft only” and click OK to apply the option.
- Now, the current setting of Secure Boot will be changed to Enabled.
- Now go to the Exit page, and click the Restart now button to save the settings and restart your Surface.
- After rebooting, the red bar with an unlocked lock icon in the middle of the screen should disappear, which means the Secure Boot is successfully enabled.
On Surface Book(1st Gen), Surface Book 2, and Surface Book 3:
- Go to the Security page, under the Secure Boot section, and click the Change Configuration button.
You can notice that the current setting for Secure Boot is Disabled.
- On the “Change Secure Boot configuration” dialog, change the option to “Microsoft only” and click OK to apply the option.
- Now, the current setting of Secure Boot will be changed to Enabled.
- Now go to the Exit page, and click the Restart now button to save the settings and restart your Surface.
- After rebooting, the red bar with an unlocked lock icon in the middle of the screen should disappear, which means the Secure Boot is successfully enabled.
On Surface Go, Surface Go 2, and Surface Go 3:
- Go to the Security page, under the Secure Boot section, and click Disabled.
You can notice that the current setting for Secure Boot is Disabled, as displayed in the button label.
- On the Change Secure Boot configuration dialog, change the option to Enabled.
- Now, the current setting of Secure Boot will be changed to Enabled.
- Now go to the Exit page, and click the Restart now button to save the settings and restart your Surface.
- After rebooting, the red bar with an unlocked lock icon in the middle of the screen should disappear, which means the Secure Boot is successfully enabled.
FAQs
To further help, here are some answers to questions you may have about Secure Boot and the red bar on Surface startup:
How do you check if Secure Boot is enabled on Windows 10 and 11?
To check the status of the Secure boot configuration on your Surface or any PCs running Windows 10 and Windows 11, do the following:
- Go to Start > All apps > Windows Security
- On the app sidebar, select the Device Security option.
- You can find the Secure Boot status information here under the Secure Boot section.
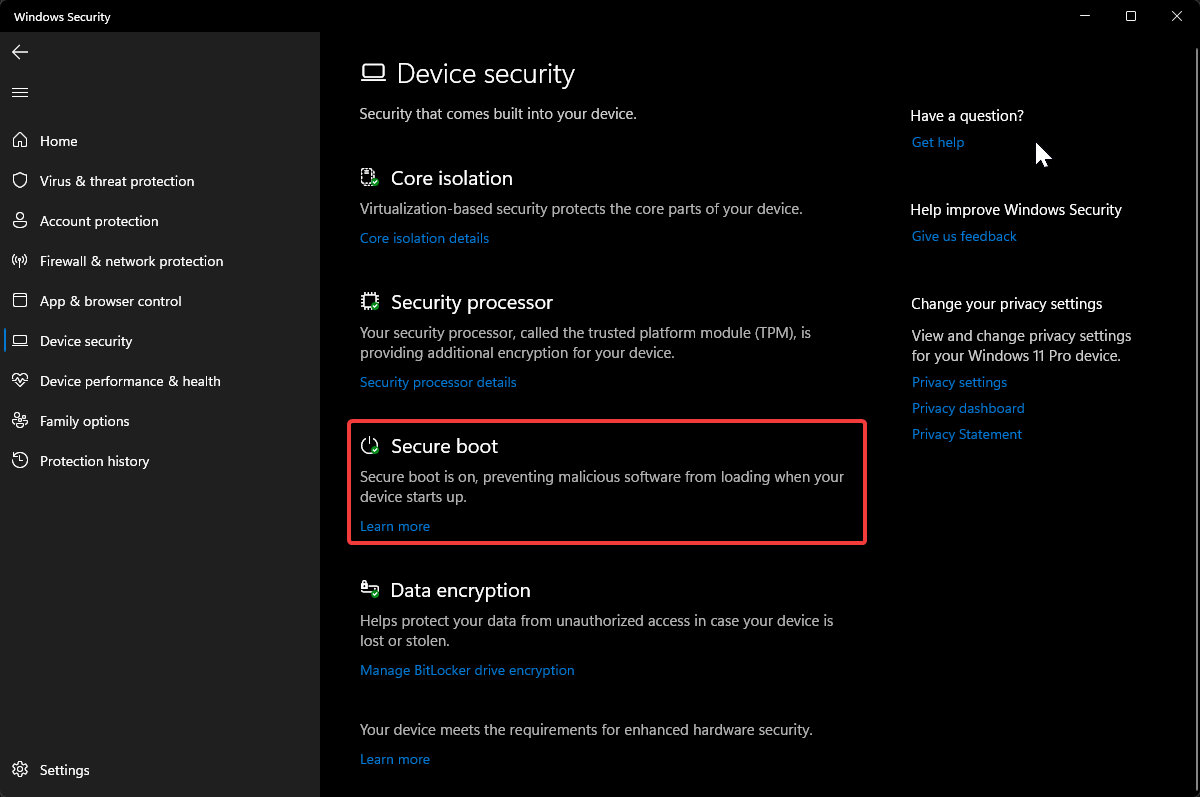
Secure boot is on


COMMENTS
Let us know what you think!
We appreciate hearing your thoughts, questions, and ideas about “How to Get Rid of Red Bar with Unlocked Lock Icon from Surface Boot Screen”.
Did not work for me. Stuck at the Red Bar screen. Can turn off by pressing volume up + power button. Followed the steps to (try to) power on again, the Red Bar comes up again and nothing happens after that even though kept my finger on the volume up button.
Same with my surface. Will not do anything but the red bar unlock icon. Maybe it’s a Microsoft set up to make you have to get another surface. Well if it is, I went for MSI
If you can boot to Windows, you should use Method 2: Boot to Surface UEFI via Windows Recovery Settings. It works for me every time.
Is there any other way to boot into UEFI. Volume + Power button is not working for me. I have tried for about 20 times but stuck at the Red Bar with unlock icon and Surface logo. cant go beyond that.
Tried many combination along with Recovery USB but nothing seems to work
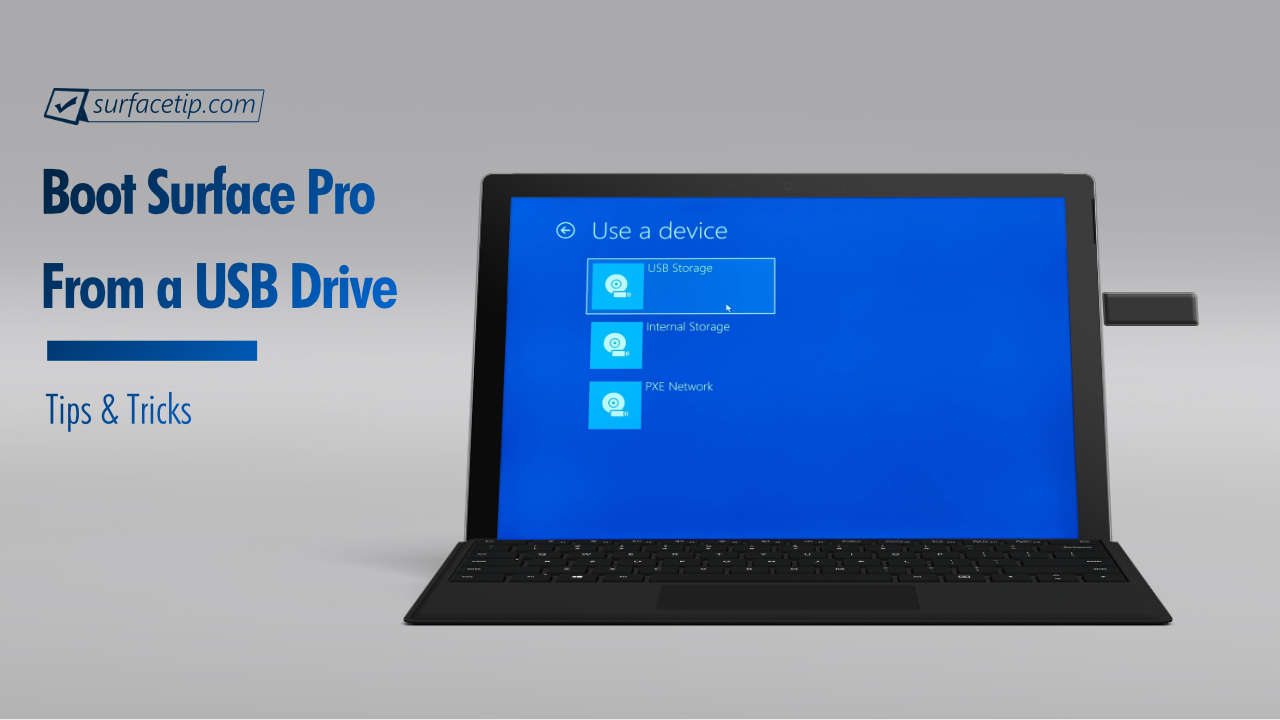
Yes, it sometimes happened to me as well. Boot to UEFI by pressing buttons doesn’t always work. There is another approach, as you mentioned, by using Recovery USB. Here are some resources that you may want to review to get your Surface boot from USB:
– How to create Recovery Drive: https://surfacetip.com/reset-surface-using-usb-recovery-drive/
– How to boot from USB: https://surfacetip.com/surface-pro-boot-from-usb/
No good same as the above – nothing
Did you ever fix the problem?
i’ve done all the step that you mention. nothing happen. keeps on returning back to red bar and unlocked ikcon..
Did you able to boot your Surface into Surface UEFI and change the Secure Boot configuration to “Secure Boot is Enabled”? Check the FAQs section of the article I’ve just added to help you check the Secure boot status on your Surface.
Hi, did you ever get this resolved? I am having the identical issue with myu Surface Pro 4. Red bar and unlock icon.
I have tried the volume+ and power button numerous time – with no luck
Nothing works,it dose not go to boot mode at all
Will cahnging the SsD will work?
My surface is always shows up UEFI display whenever I start it. Tried restarting it but getting same screen and now i want to install a fresh windos OS in it
Could you please help this is also not going in recovery mode
So now one year later i am here cant get beyond the black screen with the Red bar and the surface logo.
Everything i tried failed.
What can i do now ?
I’m in the same situation with one of our Surface Pro 4s. I did the red bar a couple of months ago, but it would still boot into recovery with the Power+Up Volume combo. Now it won’t do anything but sit on that screen. I suspect, unfortunately, that it’s just dead. SSD failure, or the BIOS ROM, or something else isn’t working anymore. It’s a glued together single board design, so a repair, if even possible (if MS is like Apple you can’t just swap on-board components for new ones), is beyond my skills and tools.