Microsoft Surface is designed to be a powerful machine with a compact design. The keyboard layout on the surface has been redesigned to reflect Windows functions and multimedia. You will never find the “print screen” key for older Surface Type Covers.
You might get stuck when switching from a desktop or laptop. However, Microsoft Surface with Windows 10 has many alternative methods to do more than a screenshot. Read on to find out the best method for you.
Table of contents
Method 1: Take a screenshot by using Surface hardware buttons
On most 2-in-1 devices like Microsoft Surface, you can take a screenshot by using hardware buttons. This method is helpful in tablet mode without connecting to the type cover.
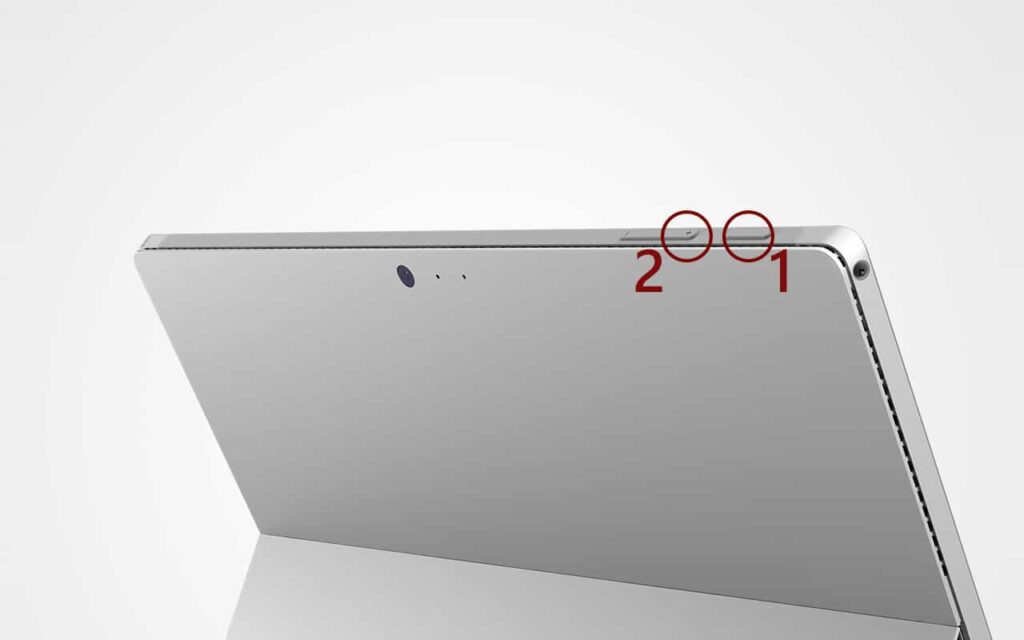
Surface RT/2, Surface Pro/2, Surface 3, and Pro 3: to take a screenshot:
- Press and hold the Windows logo button on the front of the device.
- While you hold down the Windows logo button, push the volume-down button on the side of the device.
The screen will dim and return to bright again to let you know a screenshot has been recorded.
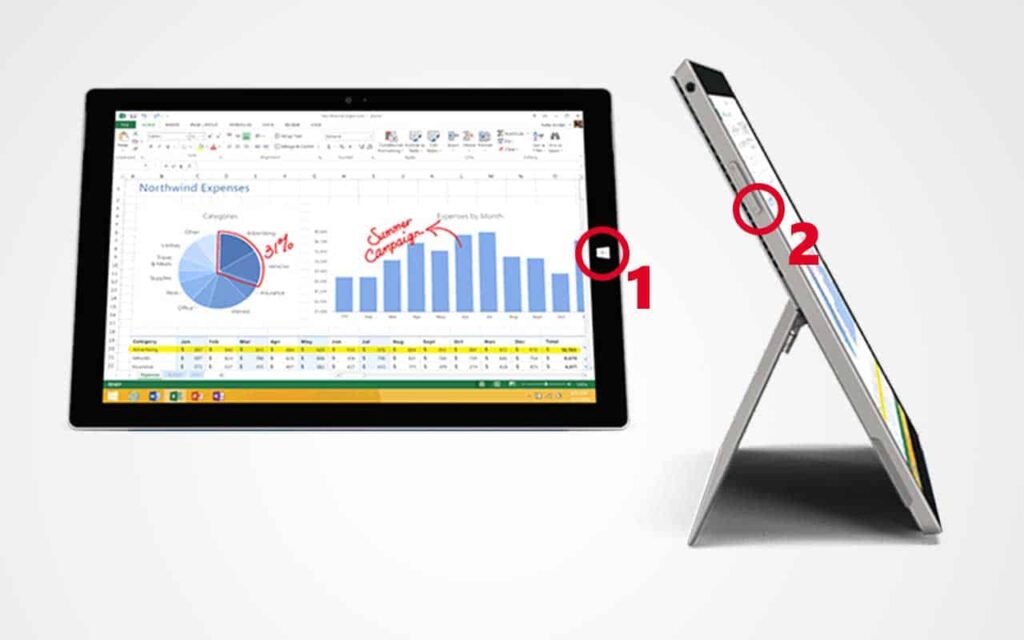
Surface Pro 4 and Surface Book: there is no Windows logo button on these devices, so there is a slight action change here.
- Press and hold the power button.
- While you hold down the power button, press the volume up button on the side of the device.
The screen will dim and return to bright again to let you know a screenshot has been recorded.

Method 2: Take a screenshot with the Surface Type Cover
For Surface Pro 4/(2017) Type Cover, Surface Book/2 and Surface Laptop Keyboard
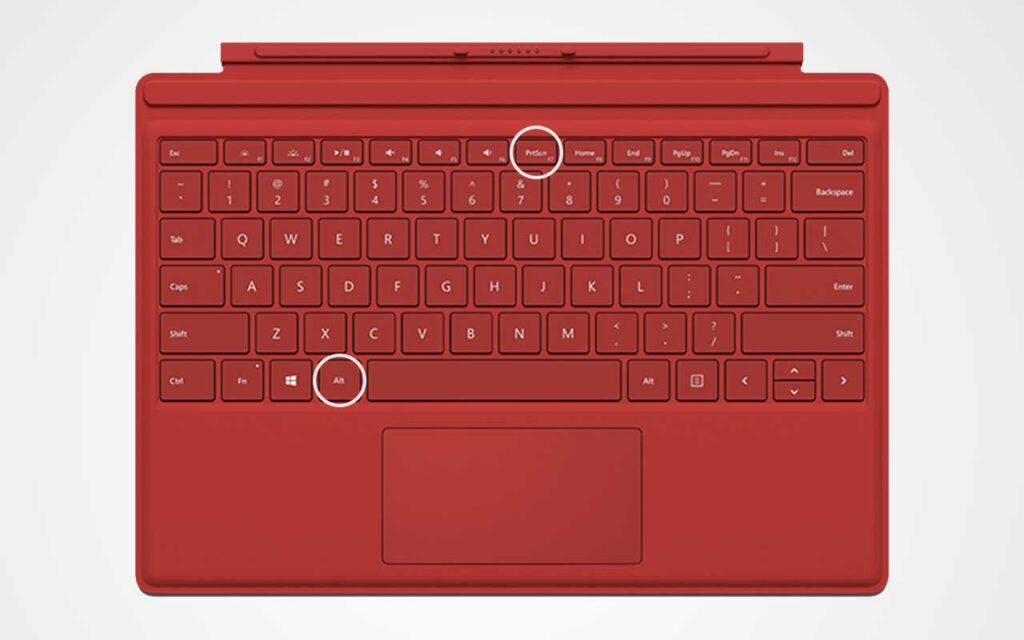
From Surface Pro 4 and Surface Book, Microsoft has decided to include a dedicated PrtSn (Print Screen) key on the keyboard. Like the general keyboard, you have two options to take a screenshot.
Option 1: Capturing all screens and storing them in the Windows Clipboard.
- Press the PrtSn key to take a screenshot.
- Paste to your preferred programs like Paint or Word.
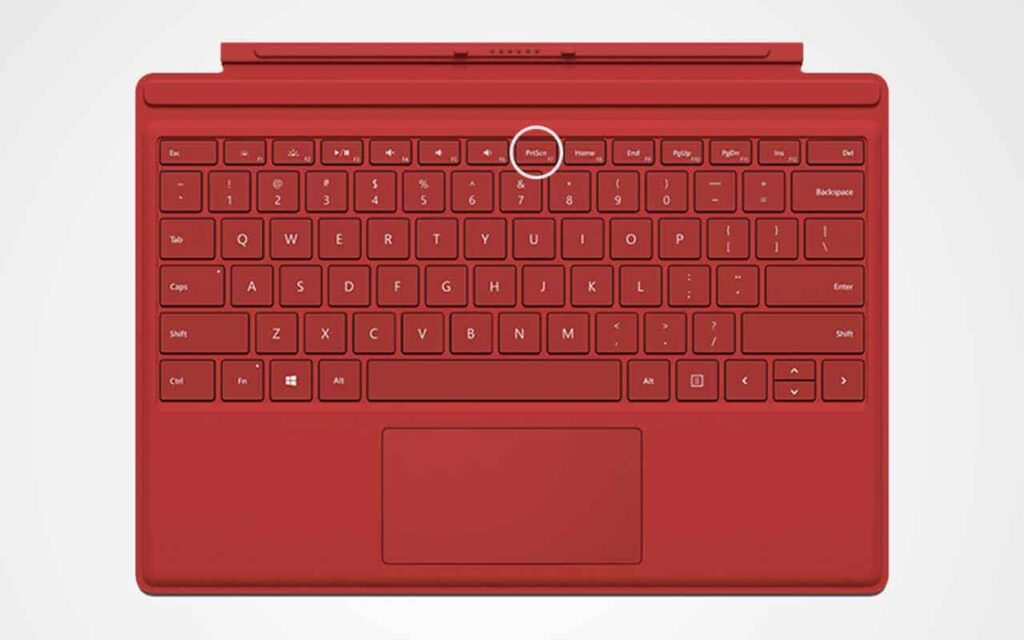
Option 2: Capturing the active window and store it in the Windows Clipboard.
- Press the Alt + PrtSn key to screenshot the active window.
- Paste to your preferred programs like Paint or Word.
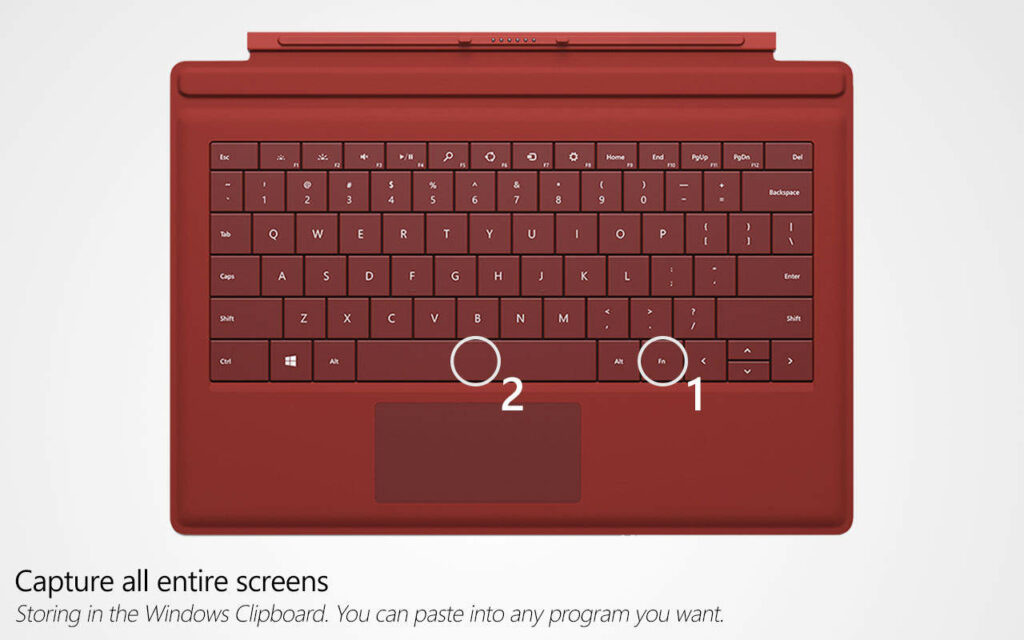
For Surface RT/2, Surface Pro/2/3, Surface 3, or newer Type Cover
On older Surface Type Covers, there is no dedicated print screen key. However, you can take screenshots using particular key combinations.
Option 1: Capturing all entire screens and saving to a PNG file.
- Press and hold down the Fn and Windows keys, then press the Space key (Fn + Win + Space).

The screen will dim and go back to bright as in method 1. The screenshots you took with this method are saved in the Screenshots folder under the Pictures library.
Option 2: Capturing all entire screens and store in the Windows Clipboard.
- Press and hold down the Fn key, then press the Space key (Fn + Space).
- Then, paste it into your preferred programs like Paint or Word.
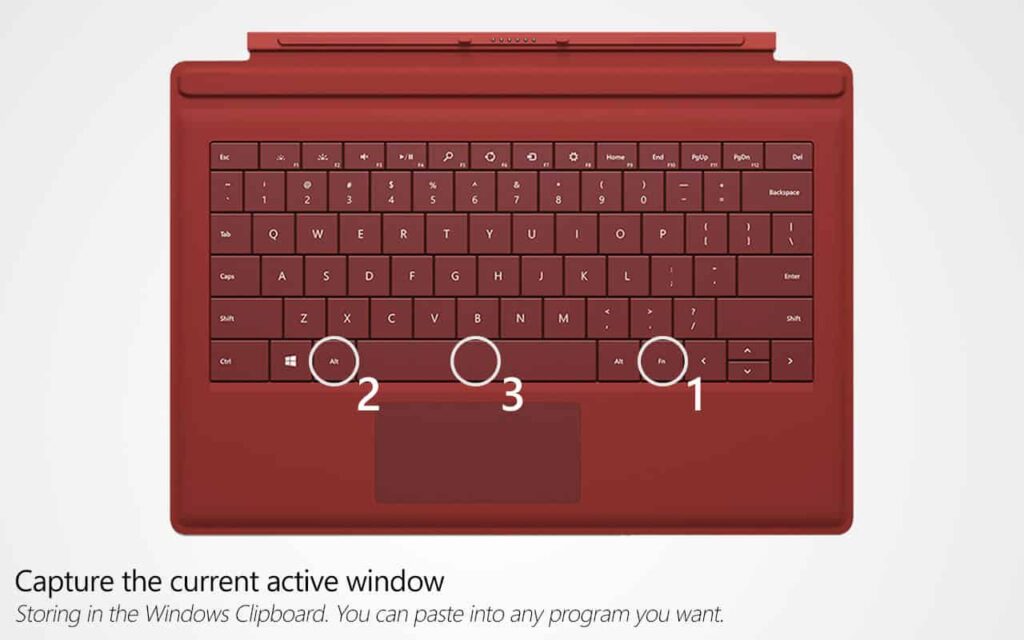
Option 3: Capturing the active window and store it in the Windows Clipboard.
- Press and hold down the Fn and Alt keys, then press the Space key (Fn + Alt + Space).
- Then, paste it into your preferred programs like Paint or Word.
Method 3: Take a screenshot with a Surface Pen
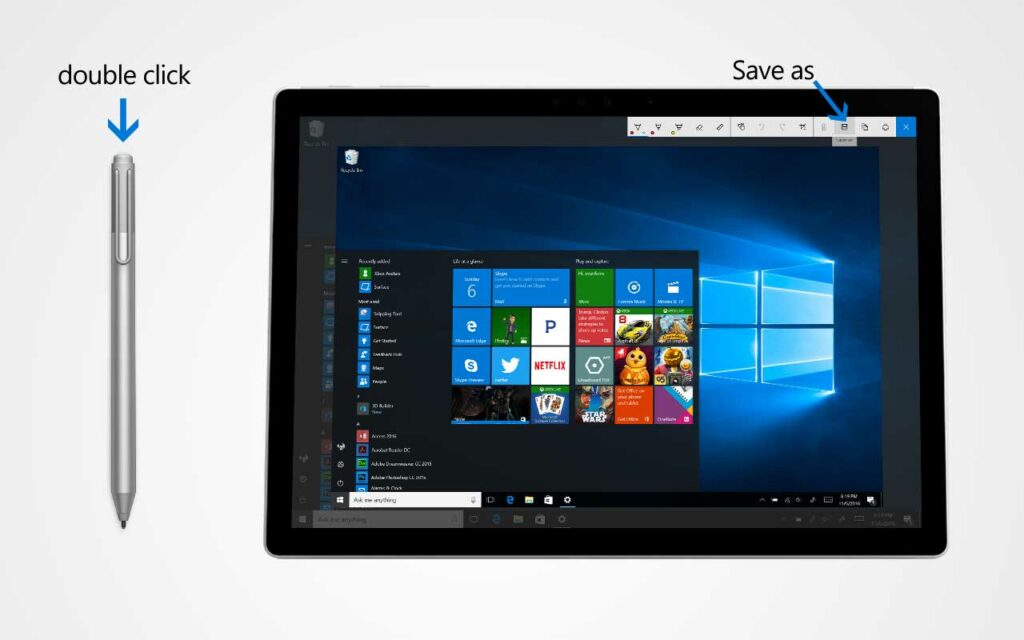
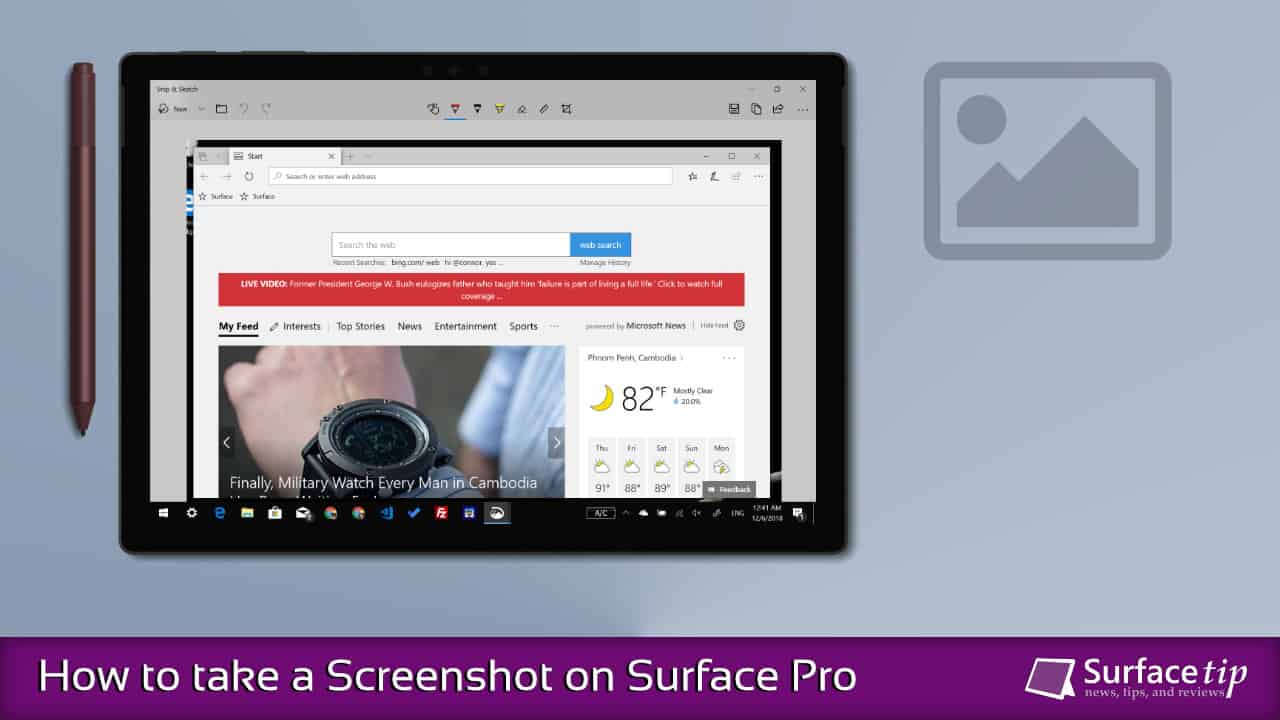
Surface Pen has been developed and getting much better functions in Windows 10. The Windows 10 anniversary update has a new feature called Screen Sketch. This function will capture the device’s screen and pop up with tools for drawing, cropping, and others.
You can take a screenshot by using the Surface Pen with this function. To activate the screen sketch function, double-click the eraser button on the top of your Surface Pen. Now, you can edit, crop, and save the screenshot by clicking the “Save as” button on the top right of the screen.
Method 4: Take a screenshot with the Windows Snipping Tool
In Windows, a built-in screenshot program called the Snipping tool has more controls and functionalities than the above methods. To open this tool:
- Open the Start menu and type “Snipping Tool” directly into the Cortana textbox.
- You can also open this tool by opening the Start menu and locating the Snipping Tool under the Windows Accessories folder.
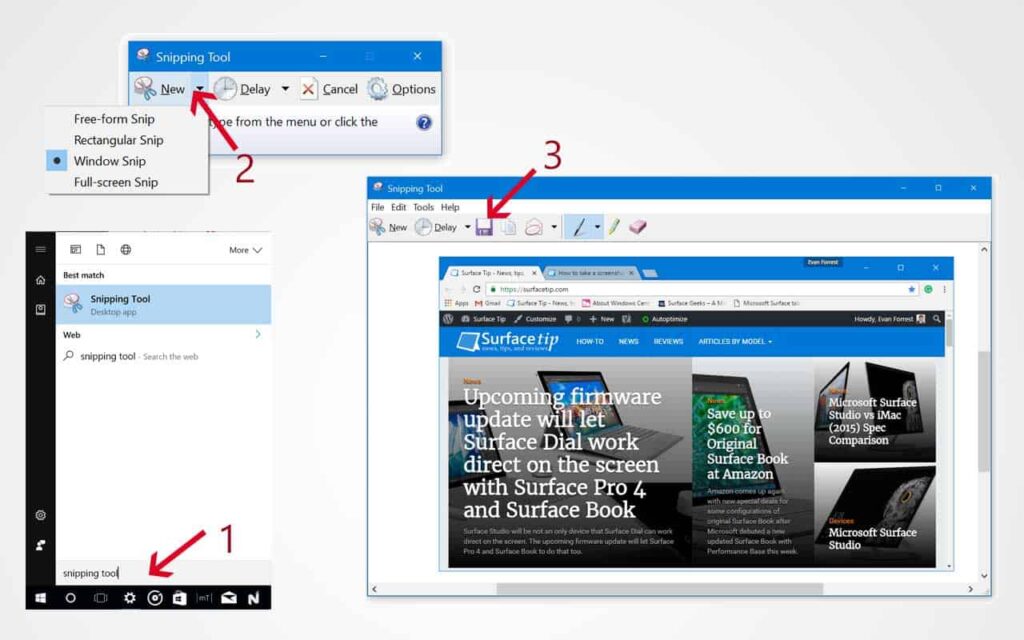
When you launch the tool, you can take a screenshot in 4 ways: Full desktop, specific program windows, any size of rectangle shape, and any form you draw manually.
After you select an area you want to take a screenshot, it will display in a new window. You can draw or highlight the screenshots before saving them. This tool allows you to save the screenshot as a JPEG, PNG, GIF, or HTML file.
Those are the four ways you can screenshot your surface computer. What is your favorite choice? Or do you have any other ways? Please share with us in the comment section below.
COMMENTS
Let us know what you think!
We appreciate hearing your thoughts, questions, and ideas about “How to take a screenshot on Microsoft Surface”.
The hardware screenshot on Surface Pro 4 is hold POWER and VOLUME UP. NOT volume down.
Really appreciate your correction. Thank!
OMG thank you so much I’ve been trying to figure it out for like 10 minutes
Thank you for your practical comment. Really Helpful.
I have a first generation Surface Pro. I tried a few of these methods to no avail. Suggestions?
Here is a quick summary to take a screenshot on original Surface Pro: